Table of Contents
Advertisement
Quick Links
Saxon - Workstation
SWT1820-B1 & SWT1820-B2
8
9
2
ASSEMBLY
10
7
INSTRUCTIONS
3
Saxon
8
Workstation - Low Toolbar
4
1
9
2
3
9
10
3
11
8
4
9
2
5
Pack 1:
1x Top Pack
10
3
Pack 2:
1x Rail Pack
(1800w)
7
4
Pack 3:
1x Rail Pack
(1200w)
10
11
4
Pack 4:
12
9
1x Leg Pack
5
Pack 5:
1x Fitting Kit
10
6
3
Pack 6:
1x Tool Rail
11
7
4
Pack 7:
2x Supports
8
5
Pack 8:
1x Power Module
1
15-12-2021
11
12
5
10
6
11
4
12
8
5
9
6
2
1
1
Advertisement
Table of Contents

Summary of Contents for dams Saxon SWT1820-B1
- Page 1 15-12-2021 Saxon - Workstation SWT1820-B1 & SWT1820-B2 ASSEMBLY Pack 4: 1x Leg Pack INSTRUCTIONS Pack 5: Saxon 1x Fitting Kit Workstation - Low Toolbar Pack 1: Pack 6: 1x Top Pack 1x Tool Rail Pack 2: Pack 7: 1x Rail Pack 2x Supports (1800w) Pack 3:...
- Page 2 **mm **mm 1,2,3...
- Page 3 Please check that you have all the panels PACK 2: Pack 1: 1x Top Pack 1 x Leg Pack 1800 x 1000mm = 350 x 415mm = OT-BLD SWT18-12-FR21 700 x 700mm = OT-ELD PACK 3: Pack 4: 1 x Rail Pack 1x Leg Pack 1800mm = RP18 1200mm = RP12...
- Page 4 Please check that you have all the panels PACK 7: PACK 8: 2 x Supports 1 x Power Module 200mm high = SWT-DTA2 350 x 415mm = 800mm high = SWT-DTA8 ENDD1-k Please check that you have all the fittings FITTINGS SUPPLIED Leg Fixing Bracket Leg Fixing Plate...
- Page 5 SAXON WORKSTATION ASSEMBLY Step 1 Unpack your new Saxon Workstation and please recycle all packaging. Step 2 Align the fixing holes in the rails to the holes in the underside of the top panel. Loosely screw in the M6 connector bolts as shown and turning clockwise.
- Page 6 Step 4 Locate all 4x legs with the M6 socket head bolts and the fixing plate as shown and tighten clockwise. Step 5 Screw in the M8 adjustable foot into the leg frames as shown and turn clockwise to tighten. Step 6 Carefully turn over the Workstation.
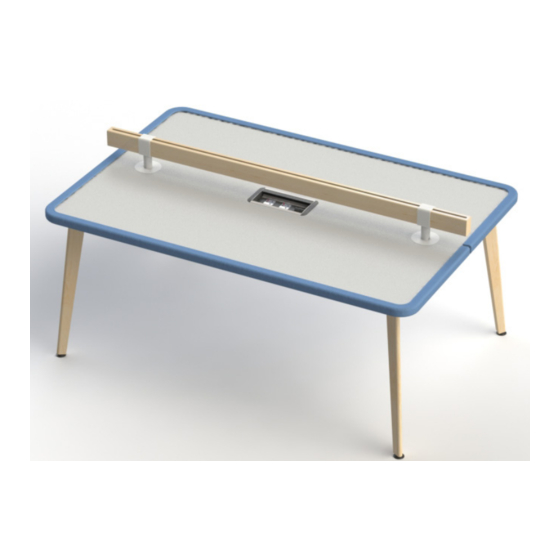
- Page 7 Step 7 Locate the power module as shown and clip in place. Step 8 Locate the supports as shown, and attach using M8 hex bolts to secure the brackets to the underside. Step 8 Slide the toolbar and fix in place using the M6 grub screws pre- fitted to the supports.
Need help?
Do you have a question about the Saxon SWT1820-B1 and is the answer not in the manual?
Questions and answers