Table of Contents
Advertisement
Quick Links
Operating Instructions FOR C100 USERS
OPERATION
OPERATION
1) Remove the garden tiller
1) Remove the garden tiller
1) Wear
from its trailer/carrier. Use caution.
either
safety
from its trailer/carrier. Use caution.
caution.
glasses or helmet & visor
2) Familiarize yourself with the machine and its
2) Familiarize yourself with the machine and its
combination, loose fitting
controls.
e machine and its
gloves, & hearing protection.
controls.
3) Ensure the safety clutch control lever is in the
2) Familiarize yourself with the woodchipper and its
3) Ensure the safety clutch control lever is in the
controls.
disengaged position. The safety clutch
disengaged position. The safety clutch
ntrol lever is in the
control lever is located on the left handle bar.
3) No foreign objects such as stones, steel, cans,
Open fuel shut-off valve. Move choke
control lever is located on the left handle bar.
The disengaged position of the lever is down.
glass, sweepings, wire, rope or nails should be fed
he safety clutch
control to CHOKE or START position.
The disengaged position of the lever is down.
into the chipper chute, as damage will occur.
he left handle bar.
4) Remove the shaft locking pin located behind
Note: Choke must fully close. Move throttle
4) Remove the shaft locking pin located behind
4)
Open fuel shut-off valve, if engine is
controlto RUN or FAST position. If engine is
the wheel axle. Store pin in hole provided on
the wheel axle. Store pin in hole provided on
the lever is down.
equipped. Move choke control to CHOKE
equipped with rocker style stop switch, push
left hand side of handle bar.
left hand side of handle bar.
or START position.
RUN or I (I = Ignition) before starting. Rewind
pin located behind
5) The wheel axle will now pivot. Lift up on the
Starter: Grasp rope
5) The wheel axle will now pivot. Lift up on the
Note: choke must fully
handle to allow wheel axle to pivot. For
handle and pull slowly
n hole provided on
handle to allow wheel axle to pivot. For
close. Move throttle
until resistance is felt
Transport, keep the wheel axle forward. When
control to RUN or FAST
transport, keep the wheel axle forward. When
.
to prevent kickback.
cultivating, keep the wheel axle rearward for
position. If engine is
cultivating, keep the wheel axle rearward for
Then pull cord rapidly
equipped with rocker
added stability and control.
added stability and control.
vot. Lift up on the
to overcome compression, and start engine.
style stop switch, push RUN,
DO NOT transport the tiller with the wheel
DO NOT transport the tiller with the wheel
Repeat if necessary with choke off and throttle
or I (I=Ignition) before starting.
xle to pivot. For
axle in the rear position.
axle in the rear position.
control at maximum rpm (FAST position). Operate
Manual Rewind Starter: Grasp rope handle
xle forward. When
the engine at maximum rpm (FAST position).
6) Adjust depth shoe (if equipped) by removing
6) Adjust depth shoe (if equipped) by removing
and pull slowly until resistance is felt to prevent
axle rearward for
shaft locking collar and sliding depth shoe to
shaft locking collar and sliding depth shoe to
kickback. Then pull cord rapidly to overcome
desired position. Replace shaft locking collar.
compression and start engine. Repeat if necessary
desired position. Replace shaft locking collar.
with choke off and throttle control in FAST position.
7)
Open fuel shut-off valve. Set choke
er with the wheel
7)
Open fuel shut-off valve. Set choke
Operate engine in FAST position.
control to Choke or Start position.
control to Choke or Start position.
5) After the engine is cranked slowly increase the
Set throttle control to Run or Fast
Set throttle control to Run or Fast
engine RPM to approximately halfway on the
position. Set engine
position. Set engine
pped) by removing
throttle control lever whilst engaging onto the belts.
stop switch to On or
stop switch to On or
Rapid engagement may stall the engine. Release
ding depth shoe to
Run position. Pull
Run position. Pull
handle when fully engaged. Allow engine to reach
haft locking collar.
starter cord rapidly.
maximum operating speed of approximately 3000
starter cord rapidly.
Repeat (if necessary)
RPM and operating temperature.
Repeat (if necessary)
valve. Set choke
with choke off.
with choke off.
6) When feeding branches into woodchipper, make
sure to feed, the large end of the branch first.
Start position.
8) When in position to begin garden tilling,
8) When in position to begin garden tilling,
Place the branches into the material intake hopper
engage the safety clutch control lever. The
to Run or Fast
engage the safety clutch control lever. The
from the operator zone. Branches should not be
tynes will begin rotating. Wheel axle must be in
tynes will begin rotating. Wheel axle must be in
forced into the intake hopper. If branches are
the rear position while tilling. Release the
the rear position while tilling. Release the
extremely long it is recommended that they be cut
safety clutch control lever to stop the tynes
into shorter lengths to achieve best results.
safety clutch control lever to stop the tynes
rotating. Tyne speed is governed by engine
rotating. Tyne speed is governed by engine
Note: Side branches should be pruned off to avoid
throttle setting.
throttle setting.
clogging the intake hopper. Light / Bushy / Spongy
matertial should not be forced into the chipping unit.
WARNING! – KEEP HANDS AND
WARNING! – KEEP HANDS AND
The woodchipper should feed itself.
FEET CLEAR OF TYNES AT ALL
FEET CLEAR OF TYNES AT ALL
If the machine does not self feed, the chipper
TIMES!
TIMES!
knives may be dull or the anvil to blade setting
in garden tilling,
may require adjustment.
control lever. The
eel axle must be in
9) Do not hurry the job. Proceed slowly and allow
9) Do not hurry the job. Proceed slowly and allow
9) Do not hurry the job. Proceed slowly and allow
the machine time to do the job. When ground
the machine time to do the job. When ground
the machine time to do the job. When ground
is extremely hard, reduce engine speed.
is extremely hard, reduce engine speed.
is extremely hard, reduce engine speed.
Discharge Chute
Make sure this is
down and secure
WARNING! – IN CASE OF DIFFICULTY,
during transit
DISENGAGE THE SAFETY CLUTCH
CONTROL LEVER. ALL TILLING ACTION
STOPS. Press the engine "STOP" button
10) Stop Engine: Release the safety clutch control
located on the engine.
10) Stop Engine: Release the safety clutch control
lever. Move throttle to Slow position. Set engine
lever. Move throttle to Slow position. Set engine
stop switch to Stop or Off position. DO NOT move
stop switch to Stop or Off position. DO NOT move
DANGER
10) Stop Engine: Release the safety clutch control
choke control to Choke
choke control to Choke
Discharge Area
lever. Move throttle to Slow position. Set engine
or Start position to stop
or Start position to stop
Stay clear of this
engine. Backfire or
engine. Backfire or
stop switch to Stop or Off position. DO NOT move
area at all times
engine damage may
engine damage may
choke control to Choke
occur.
occur.
7) CAUTION: If the woodchipper discharge clogs with
or Start position to stop
material, stop the engine immediately, disengage
AFTER USE
AFTER USE
engine. Backfire or
the engine engagement handle, clear blockage,
then restart engine.
engine damage may
1)
1)
CAUTION: If the chipping disc jams and the engine
occur.
stalls, disengage the engine engagement handle.
2) Allow machine to cool down.
Make sure all obstructions are clear and the chipper
2) Allow machine to cool down.
disc spins freely. Restart engine.
AFTER USE
3) Wash mud and dirt off of the garden tiller.
3) Wash mud and dirt off of the garden tiller.
8) When unit is in operation, approach chipper from the
Ensure no water enters the carburettor.
Ensure no water enters the carburettor.
operator zone side (See Figure 1.)
1)
Turn fuel shut off valve to the "OFF"
4) Remove any weeds, wire, rope or other
KEEP CLEAR OF DISCHARGE AREA.
4) Remove any weeds, wire, rope or other
position.
material that may have wrapped around the
material that may have wrapped around the
Pay attention to discharge direction.
tynes and rotor assembly.
tynes and rotor assembly.
9) The chipping disc will take several seconds to stop
2) Allow machine to cool down.
5) Return wheel axle to forward position for
5) Return wheel axle to forward position for
after engine has been turned off.
transport. Replace shaft locking collar.
transport. Replace shaft locking collar.
3) Wash mud and dirt off of the garden tiller.
WARNING: Do not go near the chipping disc for any
6) Return depth shoe (if equipped) to full Up
reason during this period.
Ensure no water enters the carburettor.
6) Return depth shoe (if equipped) to full Up
position.
position.
10) Stop Engine: Do not move choke control to CHOKE
4) Remove any weeds, wire, rope or other
position to stop engine. Backfire or engine damage
may occur. Move throttle control to SLOW position,
material that may have wrapped around the
then push rocker switch to O (STOP) or turn key to
tynes and rotor assembly.
OFF, if equipped.
AFTER USE
5) Return wheel axle to forward position for
transport. Replace shaft locking collar.
1)
6) Return depth shoe (if equipped) to full Up
2)
position.
with warm soapy water. Ensure no water enters the
carburettor.
© Copyright 2001, Red Roo Sales & Service Company Pty. Ltd.
© Copyright 2001, Red Roo Sales & Service Company Pty. Ltd.
© Copyright 2017, Red Roo Sales & Service Company Pty. Ltd.
Chipper
Intake Hopper
WARNING! – IN CASE OF DIFFICULTY,
WARNING! – IN CASE OF DIFFICULTY,
Marterial not to
DISENGAGE THE SAFETY CLUTCH
DISENGAGE THE SAFETY CLUTCH
exceed 4"
CONTROL LEVER. ALL TILLING ACTION
or 100mm
CONTROL LEVER. ALL TILLING ACTION
STOPS. Press the engine "STOP" button
STOPS. Press the engine "STOP" button
located on the engine.
located on the engine.
Figure 1.
Operator Zone
Turn fuel shut off valve to the "OFF"
Turn fuel shut off valve to the "OFF"
position.
position.
Turn fuel tap to "OFF" position.
Allow machine to cool down. Clean
1301-0018
1301-0018
SAFETY PRECAUTIONS
SAFETY PRECAUTIONS
SAFETY PRECAUTIONS
AND OPERATING
AND OPERATING
AND OPERATING
INSTRUCTIONS
INSTRUCTIONS
INSTRUCTIONS
GT622
GT622
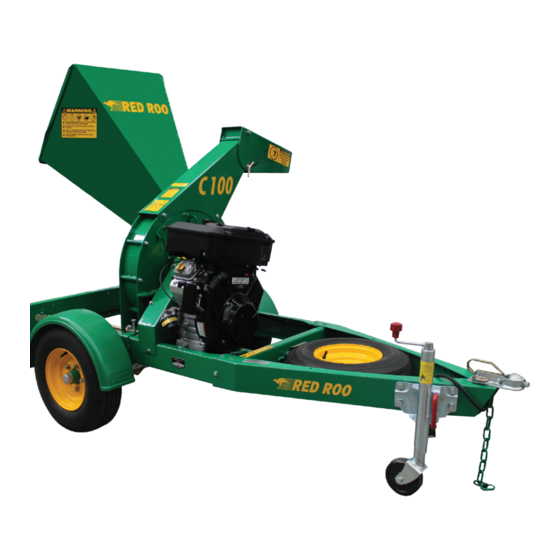
C100
GARDEN
GARDEN
WOODCHIPPER
TILLER
TILLER
GT622
Commercial Environmental Equipment
GARDEN
Commercial Environmental Equipment
Online Demonstration Available at:
www.redroo.com/products/chipper
™
™
™
Advertisement
Table of Contents

Related Manuals for red roo C100

Summary of Contents for red roo C100
- Page 1 Online Demonstration Available at: may require adjustment. © Copyright 2001, Red Roo Sales & Service Company Pty. Ltd. 1301-0018 © Copyright 2001, Red Roo Sales & Service Company Pty. Ltd. 1301-0018 www.redroo.com/products/chipper...
- Page 2 * Use only approved fuel containers and funnels. the hydraulic trencher, take a break. If you have any © Copyright 2017, Red Roo Sales & Service Company Pty. Ltd. Identify and mark the location of sprinkler heads, the area thoroughly and allow suff NEVER operate the rotary hoe when fatigued.
Need help?
Do you have a question about the C100 and is the answer not in the manual?
Questions and answers