Table of Contents
Advertisement
Product Instruction Manual
OpGL
Globe Control Valve
TABLE OF CONTENTS
Description...................................... pg. 1
Specifications ................................ pg. 1
Safety Information ........................ pg. 1
Unpacking ...................................... pg. 2
INSTALLATION ..............................
MAINTENANCE ............................
Body Reassembly .......................... pg. 5
Actuator Disassembly.................... pg. 7
Actuator Reassembly .................... pg. 8
Air-to-Close .................................... pg. 9
INTRODUCTION
Scope of Manual
This instruction manual includes installation,
maintenance, and parts information for the
Optimux OpGL control valve. Refer to separate
manuals for information regarding installation,
operation, and maintenance of additional
features such as the special trim diaphragm
actuator, handwheel, extension bonnets, etc.
Only qualified persons should install, operate,
and maintain an Optimux OpGL valve. Any
questions about these instructions should be
directed to your Optimux sales office or sales
representative before proceeding.
This publication does not contain information on
Optimux positioners. Refer to the appropriate
manual for information on positioner installation,
operation, maintenance, and calibration.
Leading Technologies
For Control
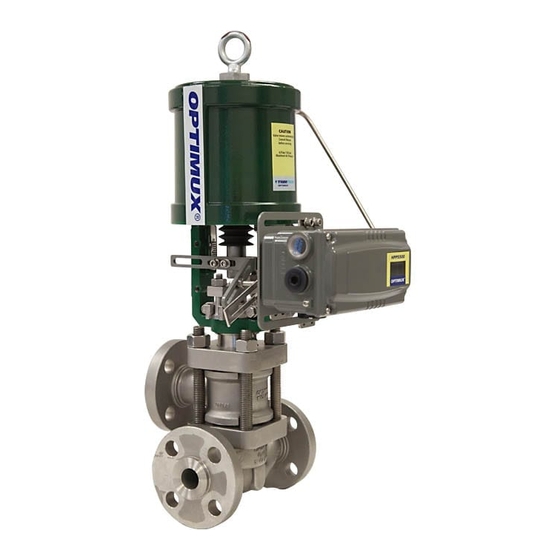
Description
The OpGL is a spring-cylinder actuated globe
valve in which the supply air pressure and the
fluid pressure combine forces to produce an
exceptionally tight shutoff. In addition, self-
aligning seat rings make shutoff easier to
achieve. Valve specifications are as follows:
pg. 2
Diameter
pg. 3
Body Style
Connections
Materials
Bonnet Types
Internals
SAFETY INFORMATION
WARNING: Indicates a potentially
hazardous situation, which, if not
avoided, could result in death or
serious injury.
CAUTION: Indicates a potentially
hazardous situation, which, if not
avoided, could result in minor or
moderate injury and/or property
damage.
Note:
which, if not avoided, may result in an
undesired result or state.
1/2 ''- 42'' : ANSI Class 150-600
Globe, Angle, Three-way, Steam-
jacketed, Y-body
Separable flanges, Internal flanges,
Socketweld, Buttweld
Carbon Steel, Stainless steel, Chrome-
molly, Alloy, Hastelloy, B&C, Titanium,
and others...
Normal, Extended, Cryogenic, Coal box
extended
Flow characteristics, equal percentage,
linear, and quick-open. Seats available
in metal or soft (for "bubble tight" shut
off)
Table 1: Specifications
Indicates a potential situation,
Advertisement
Table of Contents

Related Manuals for Trimteck Optimux OpGL

Summary of Contents for Trimteck Optimux OpGL
-
Page 1: Table Of Contents
Scope of Manual off) This instruction manual includes installation, Table 1: Specifications maintenance, and parts information for the Optimux OpGL control valve. Refer to separate manuals for information regarding installation, SAFETY INFORMATION operation, and maintenance of additional WARNING: Indicates a potentially... -
Page 2: Unpacking
OpGL Globe Control Valve Unpacking insulate CAUTION: 1. While unpacking the valve, check the extension bonnets that are packing list against materials received. provided cold Lists describing valve and accessories are services. in each shipping container. 2. When lifting the valve from shipping 4. -
Page 3: Maintenance
Product Instruction Manual 6. Connect air supply and instrument signal Inspection maintenance frequency (air or mA) lines. Throttling control valves depends on the severity of service conditions. are equipped with a valve positioner. Two This section contains preventive maintenance connections are marked: One for the air steps which can be performed while the valve supply and the other for the instrument is still in-line and, in some cases, still in... -
Page 4: Assembly And Disassembly Body Disassembly
OpGL Globe Control Valve impede stem movement. 1. If valve is air-to-close, skip to step 2. If valve is air-to-open, apply air under piston 7. Be sure that all accessories, brackets, and to raise the plug off the seat before taking bolts are securely fastened. -
Page 5: Body Reassembly
Product Instruction Manual as shown. Be sure to leave at least 1/8-inch In the case that re- CAUTION: at the top of the packing box for the top machining is necessary, be guide to enter. Different spacer lengths sure to protect the stem during allow wide variety... - Page 6 OpGL Globe Control Valve Note: For ANSI Class 900 and above valves, possible to wriggle the flange. If improper valve sizes up through 1.5-inch, the seat seating occurred, the bonnet flange can be retainer window should be placed in the body wriggled with light hand force.
-
Page 7: Actuator Disassembly
Product Instruction Manual Note: Concerning on/off valves, the bottom Do not allow the plug CAUTION: of the stem clamp should be lined up with the to drop and collide against the bottom of the actuator stem (± 1/16- seat after turning the actuator inch/1.60mm). -
Page 8: Actuator Reassembly
OpGL Globe Control Valve Note: The actuator stem bushings are Note: For air-to-open configurations, be sure pressed into the yoke; it is not necessary to that the hole in the spring button is directly remove the bushing in order to replace the centered under the adjusting screw. -
Page 9: Air-Action Reversal Air-To-Open
Product Instruction Manual 10. Apply air over the piston to drive the plug 2. Reassemble the actuator with the spring, and lift the yoke off of the bonnet. The actuator stem spacer, and spring button yoke will lift approximately 1/16-inch over the piston. - Page 10 OpGL Globe Control Valve Adjusting Screw (Item No. 210) Spring Adjusting Screw Gasket (Item No. 229) (Item No. 248) Spring Button Piston Stem O-ring (Item No. 227) (Item No. 272) Actuator Stem Locknut Cylinder (Item No. 348) (Item No. 202) Actuator Stem Spacer Piston (Item No.
- Page 11 Product Instruction Manual Standard Twin Twin V-packing V-packing V-packing w/ Lantern Ring Twin Square Twin Square Standard Twin Square Packing Packing Square Packing Packing w/ Lubricator w/ Lantern Fitting Ring Graphite Graphite Rings (2) Rings (3) Braided Wiper Rings (3) Braided Wiper Rings (2)
- Page 12 OpGL Globe Control Valve Air-to-Open Air-to-Close Figure 3: Air-action Configurations...
- Page 13 Product Instruction Manual Packing Box Nut (Item No. 117) Gland Flange (Item No. 80) Upper Guide (Item No. 87) Stem Guide Liner (Item No. 86) Clamp Bolt Anti-Extrusion Spacer Clamp Nut (Item No. 107) (Item No. 93) (Item No. 118) Yoke Clamp Female Ring (Item No.
- Page 14 OpGL Globe Control Valve Lifting Ring (Item No. 209) Adjusting Screw (Item No. 210) Adjusting Screw Gasket (Item No. 248) Cylinder (Item No. 202) Spring Button Actuator Stem (Item No. 227) Lock Nut (Item No. 348) Spring Spring Button (Item No. 229) (Item No.
- Page 15 Product Instruction Manual Troubleshooting OpG Globe Control Valve Problem Probable Cause Corrective Action Stem motion 1. Overtightened packing 1. Adjust packing box nuts to slightly over finger-tight impeded 2. Service temperature is beyond 2. Reconfirm service conditions and contact factory operating limits of trim design 3.
- Page 16 Optimux is continually improving and upgrading its product design, the specifications, dimensions and information contained herein are subject to change without notice. Should any question arise concerning these provisions, the purchaser/user should contact TRIMTECK, LLC at any of its worldwide operations or offices. For more information about Trimteck and its products, For more information, contact: contact www.trimteck.com or call USA (954) 753-5545...
Need help?
Do you have a question about the Optimux OpGL and is the answer not in the manual?
Questions and answers