Table of Contents
Advertisement
Quick Links
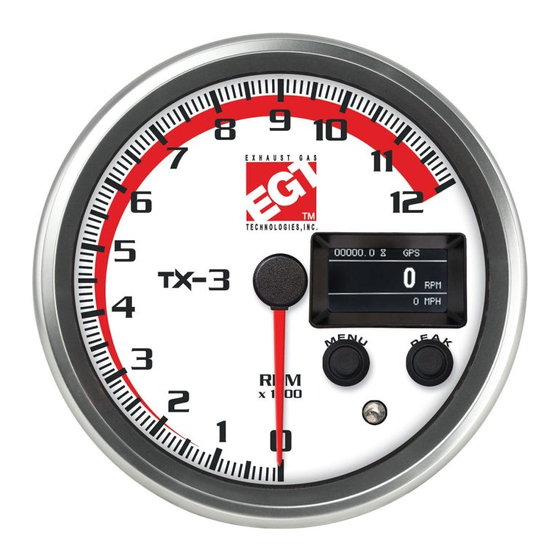
TX-3 (Playback Tach) Instructions (4-1/2")
GPS Antenna (1x)
A-140
When mounting, ensure that wire con-
nections in back of tachometer are
protected from wet conditions. Front
of tachometer is water resistant.
WHITE: +12v Dash Lighting
(Gauge lighting)
BLACK: Ground
RED: +12v Accessory Power
(Main Gauge Power)
ATTENTION: Power Draw = 0.2 amp.
5 amp In-Line Fuse recommended for
+12v Keyed Ignition.
TACHOMETER SIGNAL WIRE
The vehicle's type of ignition system
determines the correct Pulses Per
Revolution (PPR).
Identify your vehicle's ignition system by
comparing the total # of spark plugs to the to-
tal # of engine coils, or by checking the ECU.
Use the table on page 3 to determine the
ignition type and PPR.
⚠
WARNING: HIGH VOLTAGE CAN
BE PRESENT ON IGNITION WIRES.
Ensure engine is OFF before connect-
ing yellow tachometer signal wire to a
coil.
DO NOT SPLICE tachometer signal
wire directly into a spark plug wire.
This will damage the tachometer.
Connecting signal wire to the wrong
coil will NOT damage the tachometer.
Wear eye protection during installa-
tion.
A-325
Tachometer Signal Harness (1x)
A-315
Power Cable (1x)
GREEN WITH STRIPE: Relay
(Figure 2: Relay Wiring Schematic).
Remote Button/Relay Wire (1x)
A-332
BACK OF GAUGE
P P
1 1
1 1
2 2 D D
P
1
D
REMOTE BUTTON: Mount
where convenient.
INSTALLATION
1
DISCONNECT your vehicle's negative
(-) battery cable.
2
CONNECT the gauge wiring.
3
MOUNT your gauge to the panel or
pedestal using the spin lock ring.
4
RECONNECT your vehicle's negative
(-) battery cable.
GPS CONNECTION
The Playback TX-3 will auto-save
your satellite position, allowing the
GPS to acquire signal within 10
seconds after power up. When pow-
ered off for more than 4 hours, GPS
signal will take 30-60 seconds to
acquire due to satellite movement.
The GPS Antenna is waterproof and
magnetic, and can receive signal
through all thin materials except for
metal. Optimal mounting locations
are vehicle roof or top of dashboard.
1
CONNECT GPS Antenna
securely to threaded post on
back of Tachometer.
2
MOUNT GPS Antenna with
maximum exposure to the
sky, with the magnetic side
facing the ground.
DETAIL MONITOR VIEW
Press the remote button to toggle between the
following screens:
Current RPM
Current Speed
00000.0
00000.0
0
RPM
0 MPH
0
MPH
0 RPM
Advertisement
Table of Contents

Summary of Contents for EGT TX-3
- Page 1 TX-3 (Playback Tach) Instructions (4-1/2”) INSTALLATION Remote Button/Relay Wire (1x) DISCONNECT your vehicle’s negative A-332 GPS Antenna (1x) (-) battery cable. A-140 A-325 Tachometer Signal Harness (1x) CONNECT the gauge wiring. MOUNT your gauge to the panel or A-315 Power Cable (1x) pedestal using the spin lock ring.
- Page 2 TX-3 (Playback Tach) Instructions (4-1/2”) MENU BUTTON: SETUP PRESS MENU button to open main menu. PRESS and hold PEAK button to enter Option Settings. TOGGLE through the following options with MENU and PEAK buttons: Playback Speed Recording Time 1:1 plays back in real time.
- Page 3 TX-3 (Playback Tach) Instructions (4-1/2”) PLAYBACK MENU REW: Hold to rewind. Press for frame-by-frame. MENU PLAY/PAUSE: Play/pause run. PLAYBACK END: Exit run. Run stores until next recording. SPEED FF: Hold to fast-forward. Press for frame-by- PREV NEXT frame. PRESS MENU button to open main menu.
Need help?
Do you have a question about the TX-3 and is the answer not in the manual?
Questions and answers