Table of Contents
Advertisement
Quick Links
Advertisement
Table of Contents

Related Manuals for Acon Mission Ultra


Summary of Contents for Acon Mission Ultra
- Page 2 The determination of hemoglobin concentration in whole blood is useful in the clinical diagnosis of diseases such as anemia and polycythemia. ® Welcome and thank you for choosing ACON’s Mission Ultra Hemoglobin Testing System. Intended Use ®...
- Page 3 information, refer to “Guideline for Isolation Precautions: Preventing Trans Mission of Infectious Agents in Healthcare Settings 2007”. http://www.cdc.gov/hicpac/2007ip/2007isolationprecautions.html . Use the equipment only for the purpose described in the instructions for use. Do not use accessories which are not supplied or recommended by the manufacturer.
-
Page 4: Table Of Contents
Table of Contents Getting Started .................... 1 Component Descriptions ................2 ® Mission Ultra Hemoglobin Meter ............3 Meter Display ................... 4 ® Mission Ultra Hemoglobin Test Strips ............. 6 ® Mission Ultra Hemoglobin Control Solution ..........8 Setting up the Meter before Testing ............11 Step 1 - Adjusting Meter Settings ............ -
Page 6: Getting Started
Getting Started Inspect the kit box, meter, and accessories for any visible damage. Remove the meter and other packaging contents from the kit box. The following items are needed to perform a test:... -
Page 7: Component Descriptions
Component Descriptions Hemoglobin Meter: Conduct the hemoglobin test with whole blood and display the test results on screen. Carrying Case: Provides portability for Hemoglobin testing wherever you go. User's Manual: Provides detailed instructions on how to use your Hemoglobin Testing System. Quick Reference Guide: A short set of instructions to get you started testing with your new Hemoglobin Testing System. -
Page 8: Mission ® Ultra Hemoglobin Meter
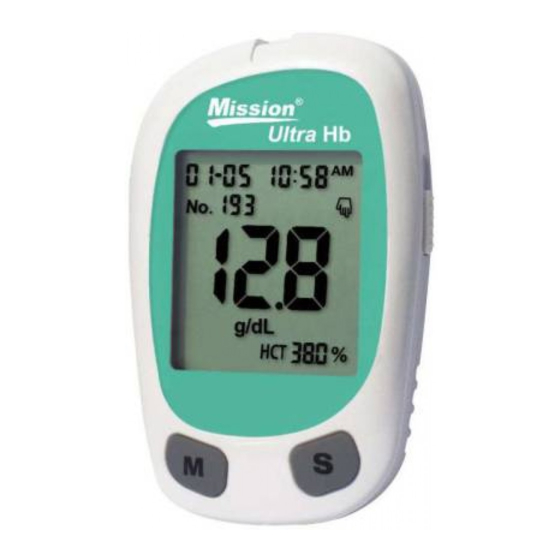
® Mission Ultra Hemoglobin Meter ® The Mission Ultra Hemoglobin Meter conducts the hemoglobin test with whole blood and displays the test results on screen. Use the diagram below to become familiar with all parts of your meter. Battery Cover: Remove battery cover to install two CR2032 coin cell batteries. -
Page 9: Meter Display
<M> Button: Recalls previous test results from the meter memory. <S> Button: Selects meter settings. Strip Port: Test strips are inserted into this area to perform a test. Strip Ejector: Slide the ejector upward to discard the test strip. Note: All meter parts and all objects coming in contact with the blood specimen are deemed as infectious matters. - Page 10 Measurement Units: Indicates the units for the test result. The measurement units can be changed by the user. Battery Symbol: Appears when the batteries need to be replaced. Code: Indicates the digits displayed in the result area are the code number of the test strips.
-
Page 11: Mission ® Ultra Hemoglobin Test Strips
® Mission Ultra Hemoglobin Test Strips ® The Mission Ultra Hemoglobin Test Strips are thin strips with a chemical ® reagent which works with the Mission Ultra Hemoglobin Meter to measure the hemoglobin concentration in fingertip capillary whole blood and venous blood. - Page 12 Do not use your test strips past the unopened expiration date printed on the label. Using test strips past the unopened expiration date may produce incorrect test results. After inserting the test strip in the strip port, the meter will automatically turn off in 4 minutes of inactivity.
-
Page 13: Mission ® Ultra Hemoglobin Control Solution
® Mission Ultra Hemoglobin Control Solution ® This control solution is used to confirm that your Mission Ultra Hemoglobin Testing System is working properly. The control solution also checks that you are performing the test correctly. It is important to run a quality control test regularly to make sure you are getting correct results. - Page 14 Installing the Batteries When you first receive the meter, batteries may not be preinstalled in the meter. Two CR2032 coin cell batteries (3V) are required. The batteries can be found in your carrying case. Install the batteries according to the following steps: Turn over the meter to locate the battery cover.
- Page 15 automatically enter the test mode. If a strip is inserted into the meter but the meter doesn’t turn on, following the steps below: Check if the strip is facing up, same as the meter. If not, remove the strip and reinsert the strip into the port with the correct side facing up. ...
-
Page 16: Setting Up The Meter Before Testing
Setting up the Meter before Testing Before using your meter for the first time, you will need to adjust the settings that are listed in detail below. Step 1 - Adjusting Meter Settings The meter will automatically enter the setup mode when turned on for the first time by battery installation. - Page 17 Press the <M> Button until the correct Year is displayed, then press the <S> Button to save the setting. Day, month and Year (Euro mode): The Day will appear at the top of the display. Press the <M> Button until the correct Day is displayed and press the <S>...
- Page 18 HCT: HCT result is turned on as the initial default. The meter will display the HCT result when it is turned on. Press the <M> Button to switch between turning the beep function “On” or “Off”. Press the <S> Button to save the setting.
- Page 19 Note: The added blood specimen must be the same as the selected blood type. If venous blood is selected, the meter will allow the user to select between EDTA K2 and K3. The initial default is K2. Press the <M> Button to switch between displaying P2 (EDTA K2) or P3 (EDTA K3).
-
Page 20: Step 2 - Coding The Meter
Step 2 - Coding the Meter Every time a new box of test strips is opened, the code chip used with the meter must be replaced with the new code chip from the test strip box. Take the code chip out of the test strip box to compare the code number on the code chip with the code number printed on the test strip canister label. - Page 21 Note: If a test strip is inserted without a code chip already inserted into the meter, the display will flash “---” and “CODE”. If the code chip is incorrect for the current meter or changed during measurement, the meter will display “E07”.
-
Page 22: Performing A Quality Control Test
Performing a Quality Control Test Perform as if a normal hemoglobin test is being run. Refer to “Step 2 - Testing for Hemoglobin” in “Performing a Hemoglobin Test” and follow the operation steps: Insert a test strip, check the display, observe the meter self-check, wait for the meter to display correct code number. - Page 23 The display should show a control symbol indicating this test was a control test. The control symbol will also be displayed when reviewing results stored in the memory. If the result falls outside the indicated control range, the Hemoglobin Testing System is not working properly. Slide the strip ejector to eject the test strip.
- Page 24 For results confirmation, all control solution 0, control solution 1 and control solution 2 should fall within the respective range. If the control test results do not fall within the respective ranges, DO NOT use the system to test blood specimen, as the system may not be working properly. If you cannot resolve the problem, contact your distributor for help.
-
Page 25: Performing A Hemoglobin Test
Performing a Hemoglobin Test The following instructions describe the use of the meter, test strips, lancing device and sterile lancets together to measure the blood hemoglobin concentration. Do not perform a hemoglobin testing in an area with wind as this could affect the accuracy of the test results. - Page 26 do not use the specimen for testing. Collect new specimen and conduct the test immediately or in a shorter time. Gently mix the venous blood for at least 15 minutes before testing. Do not stir the specimen excessively or mix the specimen too long to avoid blood lysis.
- Page 27 Using the Lancing Device and Lancets For fingertip sampling, adjust the depth penetration to reduce discomfort. Unscrew the lancing device cover from the lancing device Body. Insert a sterile lancet into the lancet until it comes to a complete stop in the lancing holder.
- Page 28 setting that still produces an adequate drop of blood. Use settings 1 and 2 for delicate skin, 3 and 4 for normal skin, 5 and 6 for calloused or thick skin. Note: Greater pressure of the lancing device against the finger will also increase the puncture depth.
- Page 29 fingertip. You should hear a click as the lancing device activates. Gently massage from the base of the finger to the tip of the finger to obtain the first drop of blood. Wipe away the first drop of blood. Apply light pressure to obtain a second drop of blood.
-
Page 30: Step 2 - Testing For Hemoglobin
Use caution whenever the lancet needle is exposed. In order to reduce the risk of infection from prior use of the instrument, always use a new, sterile lancet. Do not reuse lancets. Avoid getting the lancing device or lancets dirty with hand lotion, oils, dirt or debris. - Page 31 If the strip is not damaged and is correctly inserted into the port but the meter is not turning on, remove the strip and replace with a new strip. If the meter still don’t turn on, remove the battery cover, check if two batteries are in the meter.
- Page 32 Adding specimens Before adding specimens, make sure the specimens you added is same as the specimen type shown on the display. The hand symbol shown on the display indicates fingertip blood specimen; otherwise, if the hands symbol is not shown on the display, it indicates venous blood specimen. Prepare enough specimen sample (≥4μL or one drop) before adding the sample to the strip.
- Page 33 Reading the test result Hemoglobin and hematocrit are measured concurrently to provide the physician with a more complete diagnostic profile. Our Mission Ultra Hemoglobin Testing System directly measures hemoglobin and hematocrit. The hemoglobin result is shown with big bold numbers in the middle of the...
-
Page 34: Hi" Messages
bottom of the display following “HCT”. You may choose to have the "HCT" result display or not display on the result screen by switching the option on or off during the meter set up process. Please refer to the "Adjusting the Meter Settings"... -
Page 35: Precautions And Limitations
Precautions and Limitations Mission ® Ultra Hemoglobin Meters, test strips and other components of the ® Mission Ultra Hemoglobin Testing System have been designed, tested and proven to work together effectively to provide accurate blood Hemoglobin measurements. Do not use components from other brands. The system is designed to accurately read the measurement of Hemoglobin in whole blood within the range of 0-26.0 g/dL (0 -16.1 mmol/L or 0-260 g/L). -
Page 36: Using The Memory
Using the Memory The meter automatically stores up to 500 test records. Each record includes the test result, time and date. If there are already 500 records in the memory, the oldest record will be erased to make room for a new one. Viewing Stored Records To view stored records: Press the <M>... -
Page 37: Clearing The Memory
Clearing the Memory When the meter is off and the <M> Button is pressed and held for 2 seconds, the “MEM” symbol is displayed and “dEL” is displayed on the large display. All the records in the log can be erased by pressing and holding <M> and <S>... - Page 38 Note: The PC must have suitable software installed to receive and process the data being transmitted from the meter. Press <S> and <M> buttons together and the meter will enter PC communication mode. Press <M> button again and the meter will show the PC symbol on the display and start to transfer the data to the PC.
-
Page 39: Maintenance
Maintenance Proper maintenance is recommended for best results. Replacing Batteries When the battery icon ( ) is displayed, it means the battery is running low and it should be replaced as soon as possible. An “E00” error message will appear if the battery is too low to perform any more blood hemoglobin tests. The meter will not function until the batteries are replaced. -
Page 40: Cleaning
Cleaning Hemoglobin Meter For best results, the meter should be cleaned after each test. A cotton cloth can be used to clean the surface of the meter. Use a damp cotton cloth only if necessary. A dry, soft cloth may be used to clean the LCD and the strip port area. -
Page 41: Suggested Target Goals
Suggested Target Goals The reference hemoglobin and hematocrit values are listed in the following table: Hemoglobin Unit Hematocrit g/dL mmol/L 13.0-17.0 130-170 8.1-10.5 40%-50% Women 12.0-15.0 120-150 7.4-9.3 36%-46% Children (≥2 years) 11.0-14.0 110-140 6.8-8.7 32%-42% The data in the above table are from Dacie and Lewis Practical Hematology Reference ranges may vary between laboratories. -
Page 42: Comparing Meter And Laboratory Results
Comparing Meter and Laboratory Results ® The Mission Ultra Hemoglobin Testing System results report fingertip blood hemoglobin concentrations converted to plasma concentrations, while laboratories can report both serum and plasma hemoglobin concentrations. However, the results may differ somewhat due to normal variation. To ensure a reasonable comparison, follow these guidelines. -
Page 43: Troubleshooting Guide
Troubleshooting Guide Display Causes Solution Battery Meter fails damaged or not be Replace battery. to turn on charged Temperature is too Move to a cooler environment and wait at high (>40℃) least 30 minutes before repeating the test. Temperature is too Move to a warmer environment and wait at low (<10℃) least 30 minutes before repeating the test. - Page 44 Display Causes Solution Test strip contaminated or used Repeat test with a new test strip. before Insufficient specimen volume or specimen Repeat the test and apply enough specimen application error due to fill the test strip check window. late specimen re-dosing Remove battery for 90 seconds, put the Memory error...
-
Page 45: Specification
Specification Feature Specification Measurement Range 0-26.0 g/dL (0-16.1 mmol/L or 0-260 g/L). Result Calibration Plasma-equivalent Minimum Specimen Size 4 μL Test Time <12 seconds On/Off Source Two CR2032 coin cell batteries (3V) Battery Life Minimum of 1,000 measurements Millimoles per liter (mmol/L) or grams per Hemoglobin Units of Measure deciliter (g/dL) or grams per liter (g/L) Memory... -
Page 46: Warranty
During the stated two years period, ACON shall replace the meter under warranty with a reconditioned meter or, at its option, repair at no charge a meter that is found to be defective. ACON shall not be responsible for shipping charges incurred in the repair of a meter. -
Page 48: Index Of Symbols
Index of Symbols vitro Consult instructions diagnostic for use only Catalog # Serial number Authorized Manufacturer representative Lot number Use by Contains sufficient for Store between <n> tests 2-30°C Sterilized using Code number irradiation Do not discard along This side up with household waste Fragile, handle with Keep dry...
Need help?
Do you have a question about the Mission Ultra and is the answer not in the manual?
Questions and answers