Advertisement
Advertisement
Table of Contents

Summary of Contents for Amazfit AirRun
- Page 1 AirRun User Guide...
- Page 2 01 WARNING It is recommended that you consult a professional physician before starting any exercise program. Your physician’s advice is essential if you are taking any medication that may affect your heart rate, blood pressure, or cholesterol level. Be aware of your body’s signals. Incorrect or excessive exercise can damage your health. Stop exercising if you experience any of the following symptoms: pain, tightness in your chest, irregular heartbeat, shortness of breath, lightheadedness, dizziness, or nausea.
- Page 3 GROUNDING METHODS: This product must be grounded. Grounding provides the least resistance for electrical current and will reduce the risk of electric shock. The plug must be plugged into an appropriate outlet that is properly installed and grounded in accordance with all local codes and ordinances. Ensure that the product is connected to an outlet which contains the same configuration as the plug.
-
Page 4: Important Safety Instructions
02 IMPORTANT SAFETY INSTRUCTIONS Before using the treadmill, make sure the clamp of the safety switch is fastened to your clothes or belt. Do not power on the treadmill when a person stands on the running belt. After the power is turned on, there may be a pause when the running belt starts. - Page 5 03 IMPORTANT OPERATING INSTRUCTIONS Please do not insert any other item in any part of the equipment, as it will damage the equipment. And do not place fingers or objects into the moving parts of the equipment. Put the treadmill in a clean and flat place. Do not put the treadmill on items such as thick carpets; otherwise, it affects the air circulation under the treadmill.
- Page 6 NEVER walk backwards NEVER walk sideways NEVER put pets on NEVER use the treadmill on the treadmill. on the treadmill. the running belt. by more than one person at the same time. NEVER step on the head NEVER store the NEVER place the Wear sneakers during of the treadmill.
- Page 7 Keep your sight level Minors must be Keep a distance of The elderly and to avoid dizziness. above 100 cm pregnant women shall accompanied and guided by an adult between the treadmill use it with caution. and its rear object. when using the treadmill.
- Page 8 04 WELCOME Thank you for choosing the Amazfit AirRun Smart Treadmill. Please scan the QR code. Download and install the APP.
-
Page 9: Carton Contents
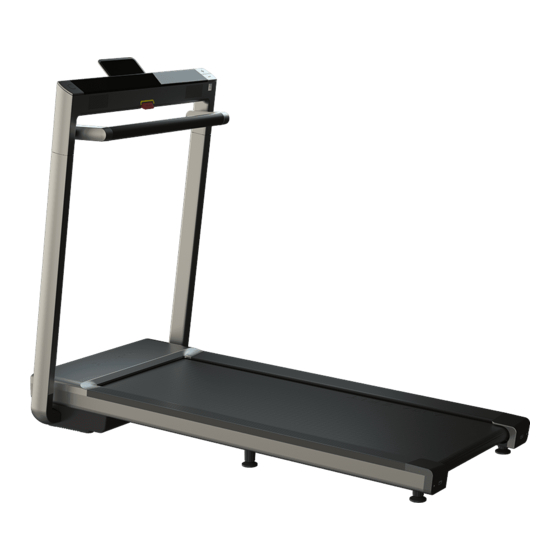
05 CARTON CONTENTS Please check the contents of the package carefully, and contact us if they are missing or damaged. Official website: en.amazfit.com Support: support.amazfit.com Power cord Phone bracket User Guide Treadmill... - Page 10 06 CONFIGURATION Speed + Phone bracket Display panel Speed - START/STOP Folding armrest button Integrated safety switch Speaker mesh Safety rope Column Pedal Overload protector Running belt Power outlet Protective storage cover Adjustable floor mats in the rear corner Power switch Trolley wheels...
- Page 11 07 USER GUIDE How to unfold the treadmill 01. Take out the treadmill from its package, and place it on a flat ground.
- Page 12 02. Pull up the Display Console to completely unfold the columns.
- Page 13 03. Gently shake the armrest, buckle the buttons on both sides to unlock it, pull up the armrest, and lock the columns.
- Page 14 04. Insert the phone bracket into the Display Console. The treadmill is unfolded.
- Page 15 How to fold the treadmill 01. Gently shake the armrest, buckle the buttons on both sides to unlock, and turn the armrest down to unlock...
- Page 16 02. Push the columns down completely. The treadmill is folded.
- Page 17 Pairing your device Power on the treadmill, enable your phone's Bluetooth, and open Amazfit APP to register an account or log in to your account; select "Amazfit AirRun" from "My" > "Add Device", and pair your device as instructed.
- Page 18 Start to use After pairing your device, fasten the clamp of the safety rope to your clothes, and then use the treadmill.
-
Page 19: Get Started
08 GET STARTED Schematic diagram of the display panel APP connection reminder Heart rate Speed Time Distance... -
Page 20: Button Description
Button description Icon Item Description If you press this button when the treadmill is powered on, after a 3-second countdown, the treadmill starts to run at a speed of 1 km/h. If you press this button during workout, the treadmill pauses. If you press this START/STOP button again, after a 3-second countdown, the treadmill gradually resumes to the speed before the pause. - Page 21 Bluetooth list and manually select "Amazfit AirRun Speaker", to complete Bluetooth pairing. 4.3 If you use an iOS phone, choose "Settings" > "Bluetooth" > "Amazfit AirRun Speaker" to complete Bluetooth pairing. 4.4After pairing, go to the Bluetooth list and click to connect it before using the speaker each time.
-
Page 22: Maintenance And Care
09 MAINTENANCE & CARE 1. Clean the treadmill 1.1 Shut down and disconnect the power supply of the treadmill. 1.2 Add some mild detergent to a 100% cotton rag. Do not spray the detergent directly on the running belt or use acidic and corrosive detergent. - Page 23 2. Lubricate the running belt 2.1 Shut down the treadmill and disconnect the treadmill power cable. 2.2 Open the protective storage cover in the rear right corner and pull out the oil bottle, as shown in Figure A below. 2.3 Lift the edge of the running belt and apply silicone oil to the inner surface, as shown in Figure B below. 2.4 Reconnect the treadmill power supply.
-
Page 24: Specification
10 SPECIFICATION Model: A1975 Frequency Range: 2400-2483.5 MHz TX Power: ≤ 20 Db (EIRP) NEW Weight: 63kg Minimum Speed: 1.0 km/h Load limit: 100 kg Gross Weight: 72kg Maximum Speed: 15 km/h Applicable age: 14 to 60 years old Rated Power: 932.5W Size: 1590×810×1250 mm Applicable height: No limit Rated Voltage: 20V~50Hz... -
Page 25: Troubleshooting
11 TROUBLESHOOTING The treadmill enters the emergency stop state. When you press the START/STOP button, the treadmill cannot start. When the dashboard shows the above state, the treadmill has entered the emergency stop state. In this case, pull the safety rope again to release the treadmill from the emergency stop state, and press the START button on the left again to resume running. - Page 26 Running belt slipping and correction 2.1 Start the treadmill and make it run at a speed of 6-8 km/h. Stand behind the treadmill and be ready for adjustment. 2.2 Open the protective storage cover in the left rear corner and take out the wrench, as shown in Figure A. 2.3 If the treadmill tilts to the right: Turn the right adjusting screw clockwise half a turn, as shown in Figure B below.
- Page 27 Error message code After the treadmill has an error, an abnormal state is displayed, and an error code is displayed in the heart rate window on the electronic display panel. Error or Symptom Possible Cause Solution Communication error because the driver did Contact Customer Service not receive the electronic watch signal Stall protection and explosion protection or...
-
Page 28: After-Sales Service
4.After-sales service The warranty policy: The Amazfit Limited Warranty covers Amazfit products against manufacturing defects beginning on the original purchase date. The warranty period is 12 months as the applicable consumer laws in the consumer’s country of purchase require. Our warranty is in addition to rights provided by applicable consumer laws. Official website: en.amazfit.com Support: support.amazfit.com... -
Page 29: Exploded Drawing
12 EXPLODED DRAWING... -
Page 30: Parts List
13 PARTS LIST Material Name Quantity Material Name Quantity Main frame assembly Drawing cone Lower folding and Wire rope assembly rotating assembly Rotating locking assembly Gas spring Electronic watch Compression spring stand assembly Front armrest assembly Folding limit bolt Armrest side plate assembly 6# Allen wrench Left fixing block assembly Folding pull pin... - Page 31 Material Name Quantity Material Name Quantity Protective cover in the right rear corner Compression spring Protective fixing seat in the left rear corner Tension spring 2 Protective fixing seat in the right rear corner Tension spring Floor mat sleeve 1 Compression spring 3 Floor mat sleeve 2 Motor upper cover...
- Page 32 Material Name Quantity Material Name Quantity Safe lock bracket Rear cover of the electronic watch Left side cover of the electronic watch Rope bracket Right side cover of the electronic watch Bracket locking seat Display panel iPad bracket Running belt Intermediate START/STOP button iPad fixed outlet Foam on the front armrest tube...
- Page 33 Material Name Specifications Quantity Material Name Specifications Quantity Hexagon bolt EVA pad 80*64*3.0 M5*30 full thread Hexagon socket Bracket of the M8*30 thread START/STOP button countersunk head screw length: 15 Hexagon socket M8*20 full Bracket of the + button countersunk head screw thread Hexagon socket M6*25 full...
- Page 34 Material Name Specifications Quantity Material Name Specifications Quantity M6*38 thread Hexagon socket head cap screw length: 15 Internal serrated Cross recessed pan head screw M5*8 lock washer Standard spring Cross recessed pan head screw M5*12 washer M5*8 (with a washer Flat washer Level C Cross recessed pan head screw at the head)
- Page 35 Material Name Specifications Quantity Material Name Specifications Quantity Internal serrated Electronic watch lock washer Control circuit board Running board DC motor Main communication cable Square rocker switch START/STOP keyboard Speed +/- keyboard 3-pin card socket Connection cable of the safe lock Overload protector and stop switch Magnetic loop...
-
Page 36: Special Instructions
14 SPECIAL INSTRUCTIONS This manual is formulated based on existing information. In the principle of continuous improvement and development, the company reserves the right to change product specifications and functions, and to modify and improve any content for any product described in this document. The content of this manual is provided based on the condition of the product at the time of manufacture.
Need help?
Do you have a question about the AirRun and is the answer not in the manual?
Questions and answers