Advertisement
Quick Links
Remote Panic
When the Arm and Disarm buttons on the Nano are
pressed simultaneously, the Alarm I/O will trigger the
Panic output for 2 seconds, and will also drive the Siren
output.
NOTE: The Nano will remain silent for this function and
will not emit a beep.
Stand Alone Siren and LED Outputs
An Askari Nano must be programmed into the Alarm I/O.
When the Arm button is pressed on the Nano the siren
output will be armed for all active zones and the Status
Led (if connected) will switch on.
When the Arm signal is received by the Alarm I/O,
it will confirm receipt (the Nano will beep once) and all the
active zone LED's will automatically reset to solid lights (ie:
those active zones that were flashing due to being trig-
gered will now stop flashing and burn solid).
If an intruder signal is received the siren will run for
30 seconds and the Status LED will start to flash.
While the siren is running, pressing the Disarm button
on the Nano will reset the siren, but will not disarm the
system but will reset Status LED to 'Armed' (on), and the
Alarm I/O will confirm receipt of the signal (the Nano will
beep twice)
When the siren is not running, pressing the Disarm button
on the Nano will disarm the system and turn off the LED,
and the Alarm I/O will confirm receipt of the signal (the
Nano will beep twice).
If the system has been triggered, the disarm signal
confirmation will cause the Nano to beep twice with an
additional high tone to alert the owner that the system
has been triggered.
On receipt of the disarm signal from the Nano, the Alarm
I/O will also send the system zone status to the Nano. The
Nano LED's will now show all the
active and triggered zones on the Alarm I/O. This will alert
the owner of any intrusion, and identify where the intru-
sion took place, allowing the owner to make an informed
decision about re-entering the
property after an intrusion has occurred.
TO ARM , DISARM & PANIC THE ASKARI I/O BOARD
1 ARM – push right hand side button twice.
2 DISARM – push right hand side button & the left
hand side button
3 PANIC – push both side buttons similtamously then
release them to send PANIC signal
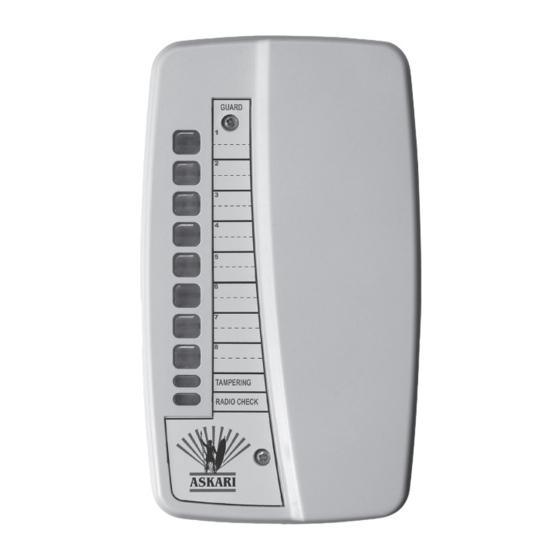
Pin number Description
1
Housing Tamper
2
Housing Tamper
3
12 Volts
4
Ground (Com)
5
Guard 1
6
Com
7
Guard 2
8
Guard 3
9
Com
10
Guard 4
11
Guard 5
12
Com
13
Guard 6
14
Guard 7
15
Com
16
Guard 8
17
Latched Arming Input
18
Pulsed Arming Input
19
Pulsed Arming Output
20
Latched Arming Output
21
Com
22
Guard Tamper
23
Com
24
Panic
25
Speaker -ve
26
Siren -ve
27
Aux + Output
28
Led -ve
NOTE: Disarm does not reset the zone
LED's on the Alarm I/O.
ASKARI ALARM I/O
The Askari Alarm I/O is a
multifunctional receiver/transmitter,
stand-alone alarm system and
Alarm panel I/O Interface
Receiver
• Monitors up to 8 Askari Scouts signals
for intruder, auto-test and tamper
• Receives arm, disarm and panic signals from the
Askari Nano
Transmitter
• Transmits confirmation of receipt of all transmissions
from the Askari Nano, except panic
General
Can be armed and disarmed via a Pulsed or
Latched input
Pulsed from cheap RX and TX set
Latched from GSM modules or Alarm panels
Has an Armed / Disarmed O/P
Pulsed
Latched
www.askaribeams.co.za
Advertisement

Summary of Contents for Askari ALARM I/O
- Page 1 NOTE: Disarm does not reset the zone active and triggered zones on the Alarm I/O. This will alert Latched input LED’s on the Alarm I/O. the owner of any intrusion, and identify where the intru- sion took place, allowing the owner to make an informed Pulsed from cheap RX and TX set decision about re-entering the Latched from GSM modules or Alarm panels property after an intrusion has occurred. Has an Armed / Disarmed O/P TO ARM , DISARM & PANIC THE ASKARI I/O BOARD Pulsed 1 ARM – push right hand side button twice. 2 DISARM – push right hand side button & the left Latched hand side button 3 PANIC – push both side buttons similtamously then release them to send PANIC signal www.askaribeams.co.za...
- Page 2 PROGRAMMING 6. Simultaneously press the Left and the Right side buttons on the Askari Nano. Release the buttons 7. The Alarm I/O will accept the programming and return to standby mode The Askari Scout Detector needs to be programmed into both the Askari Alarm I/O and the 8. The Nano will beep once to confirm programming Askari Nano for systems using both devices. These functions need to be performed sepa- rately for each device. If the Askari Nano has already been programmed with Askari Scout System Operation Detectors, it can clone the information to the Alarm I/O. (See the Askari Scout user manual The Askari Alarm I/O is an alarm panel interface with the following N/C outputs; for Detector data cloning) 8 separate zone outputs There are 3 programming functions for the Askari Alarm I/O: 1 Device tamper outputs A. Programming Askari Scout Detectors 1 Detector tamper outputs B. Deleting zones 1 Remote (Nano) panic outputs C. Programming Askari Nano...
Need help?
Do you have a question about the ALARM I/O and is the answer not in the manual?
Questions and answers