Table of Contents
Advertisement
Quick Links
AccuChrome™
GAS CHROMATOGRAPH
OPERATION MANUAL ADDENDUM 1 – NEMS C9 Module
P/N: MA2963-A1
Revision 1 2021 October 1
Galvanic Applied Sciences, Inc.
7000 Fisher Road S.E.
Calgary, Alberta, T2H OW3
Canada
Phone: (403) 252-8470
Fax: (403) 255-6287
E-mail:
info@galvanic.com
World Wide Web:
http://www.galvanic.com
Advertisement
Table of Contents

Summary of Contents for Galvanic Applied Sciences AccuChrome
- Page 1 AccuChrome™ GAS CHROMATOGRAPH OPERATION MANUAL ADDENDUM 1 – NEMS C9 Module P/N: MA2963-A1 Revision 1 2021 October 1 Galvanic Applied Sciences, Inc. 7000 Fisher Road S.E. Calgary, Alberta, T2H OW3 Canada Phone: (403) 252-8470 Fax: (403) 255-6287 E-mail: info@galvanic.com World Wide Web:...
- Page 2 No part of this manual may be reproduced or transmitted in any form or by any means without the written permission of Galvanic Applied Sciences, Inc. Note: Changes or modifications not expressly approved by Galvanic Applied Sciences, Inc. could void the user's authority to operate the equipment.
-
Page 3: Table Of Contents
Table of Contents ......................7 EPAIRED RODUCTS ..................7 IMITATION OF EMEDY AND IABILITY NEMS C9 M ..............1 ECTION VERVIEW OF THE ODULE 2 ........................... 1 ECTION 2.1 A .................. 1 NALYZER ENERAL ESCRIPTION 2.2 U ....................... 1 SING ANUAL NEMS C9 M .................. - Page 4 Safety Symbols used in Manual The Danger symbol indicates a hazardous situation that, if not avoided will result in death or serious injury. The Warning symbol indicates a hazardous situation that, if not avoided could result in death or serious injury. The Caution symbol with the safety alert symbol indicates a hazardous situation that, if not avoided could result in minor or moderate injury.
- Page 5 Any safety recommendations or comments contained herein are suggested guidelines only. Galvanic Applied Sciences Inc. bears no responsibility and assumes no liability for the use and/or implementation of these suggested procedures.
- Page 6 Manufacturer’s Warranty Statement Galvanic Applied Sciences Inc. (“Seller”) warrants that its products will be free from defects in materials and workmanship under normal use and service in general process conditions for 12 months from the date of Product start-up or 18 months from the date of shipping from Seller’s production facility, whichever comes first (the “Warranty Period”).
-
Page 7: Repaired Products
outside the environmental specifications for the instrument, use by unauthorized or untrained personnel or improper site maintenance or preparation. • Products that have been altered or repaired by individuals other than Seller personnel or its duly authorized representatives, unless the alteration or repair has been performed by an authorized factory trained service technician in accordance with written procedures supplied by Seller. -
Page 8: Section 1 Overview Of The Nems C9 Module
2.2 Using This Manual The user should first become familiar with the AccuChrome manual. This manual is intended to be an addendum to the AccuChrome manual and will highlight the details of operation that are specific to the NEMS C9 Module. -
Page 9: Section 3 Nems C9 Module Design
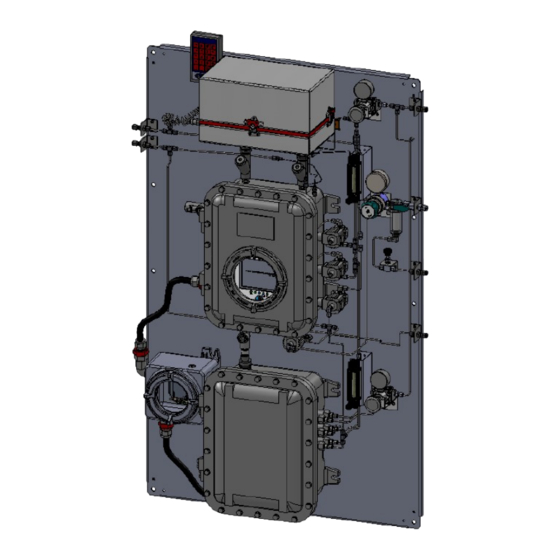
Section 3 NEMS C9 Module Design 3.1 Overview The NEMS C9 Module is driven by an APIX Analytical NEMS device and can be considered to be a standalone gas chromatograph unto itself. The device contains the column, heaters, injectors and detectors required for the measurement within a compact package. Figure A1 shows the APIX NEMS device. - Page 10 Figure A2: APIX Device Mounting Figure A3: NEMS C9 Module assembly shown with explosionproof enclosure for Class I Div 2. Revision 1 2021/10/01...
-
Page 11: Gas Entry / Exit Connections
The sample line is shared between the GC oven and the NEMS C9 Module. Two separate flowmeters are used to control the flow of gas to the AccuChrome GC and to the APIX module. Carrier gas and actuation gas are both shared with the rest of the AccuChrome unit. -
Page 12: Section 4 Installation
Installation 4.1 Dimensions and Space Requirements The size and weight of the AccuChrome Chromatograph with NEMS C9 Module is presented in Table. The installation site should provide adequate room for opening the cabinet doors for maintenance and repair procedures. Complete dimensional information is provided in Figure A4. - Page 13 Figure A4: Physical Dimensions - Class I, Div 1 ACCUCHROME Chromatograph Revision 1 2021/10/01...
-
Page 14: Sampling Considerations
GC and NEMS module sections of the unit. Refer to Section 3.3 of the AccuChrome manual for more information. 4.1 Electrical Requirements The AccuChrome Chromatograph with NEMS C9 Module does not have unique electrical requirements to the AccuChrome GC. Refer to Section 3.4 of the AccuChrome manual for more information. Revision 1 2021/10/01... -
Page 15: Installation Steps
Configure G.C. tab in the righthand side navigation menu, “NEMS Setup” and “NEMS Status”. Modifying the component table, NEMS parameters and viewing the NEMS status requires an administrator login. Refer to Section 5 of the AccuChrome User Manual for more information about setting up and modifying configuration settings. -
Page 16: Setting The Nems Parameters
Figure A6: AccuChrome Component Table User Interface The retention times and peak skimming parameters for the “Nems” components are separate from the other components are and are relative to the start of the “Nems” chromatogram. 5.2 Setting the NEMS Parameters Parameters for the NEMS module can be access from the Configure G.C. -
Page 17: Viewing The Nems Status
Figure A7: Screenshot of NEMS Setup Page. 5.3 Viewing the NEMS Status The status of the NEMS module can be viewed on the “NEMS Status” page found under the Configure G.C. tab on the righthand side navigation menu (shown in Figure A8). This page will display information about the NEMS State, current NEMS Run Time in seconds and the Cabinet Temperature. -
Page 18: Section 6 Using The Instrument
Figure A8: Screenshot of NEMS Status Page Section 6 Using the Instrument 6.1 Chromatogram There are two separate chromatograms, one shows the chromatogram generated by the TCD while the other shows the chromatogram generated by the NEMS module. To view the signal from the NEMS module, select NEMS from the righthand-side navigation menu on the Chromatogram tab as shown in Figure A9. -
Page 19: Section 7 Nems Validation
NEMS Validation Validation of the NEMS C9 Module is performed at the same time as validation of the AccuChrome GC. Refer to Section 7 of the AccuChrome User Manual for more information. 7.1 Performing a Calibration No specific calibration is required for the NEMS C9 Module that is separate from the AccuChrome GC unit. -
Page 20: Section 8 Maintenance
Section 9 Troubleshooting 9.1 Overview For a detailed review of troubleshooting the AccuChrome unit, refer to Section 10 of the AccuChrome User Manual. All potential faults from the NEMS C9 Module will be related to potential faults covered there. Revision 1...
Need help?
Do you have a question about the AccuChrome and is the answer not in the manual?
Questions and answers