Table of Contents
Advertisement
Quick Links
INSTALLATION GUIDE – 203 DISPLAY
Vehicle Types: Straight Trucks, Tractor/Trailers, RVs and Buses
Max Sensing Pressure
188 PSI
Standard Cold Inflation Pressure
72 PSI – 145 PSI
1-800-568-9188
www.valortpms.com
4320 Harvester Rd., Floor 2
Burlington, ON, L7L 5S4, Canada
-203 Tire Pressure Monitoring System
89.6 88.0 88.8
Low Pressure Warning Limit
20% Below Set Pressure
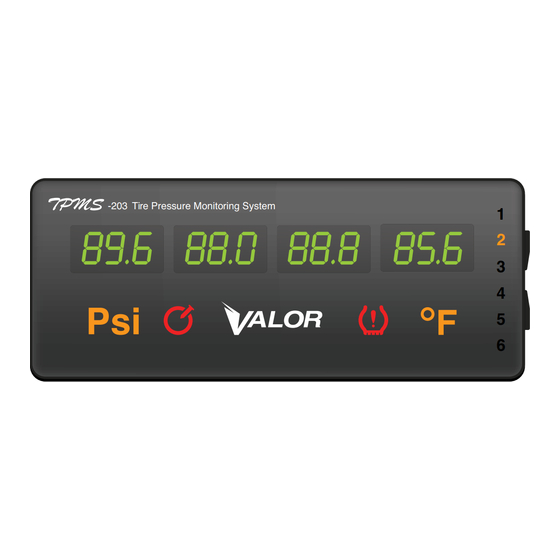
1
2
3
4
5
6
High Pressure Warning Limit
30% Above Set Pressure
Advertisement
Table of Contents

Related Manuals for Valor 203


Summary of Contents for Valor 203
- Page 1 1-800-568-9188 www.valortpms.com 4320 Harvester Rd., Floor 2 Burlington, ON, L7L 5S4, Canada INSTALLATION GUIDE – 203 DISPLAY -203 Tire Pressure Monitoring System 89.6 88.0 88.8 Vehicle Types: Straight Trucks, Tractor/Trailers, RVs and Buses Max Sensing Pressure Standard Cold Inflation Pressure...
- Page 2 Please read this Installation Guide carefully before using this product. TPMS-203 is designed to monitor tire pressure and temperature. It is not designed to provide warning of sudden critical tire damage and blowout caused by external effects. The driver should react promptly to any warning and correct the problem.
-
Page 3: Table Of Contents
INSTALLATION GUIDE – 203 DISPLAY Table of Contents Part 1: System Installation Straight Truck/Tractor Installation ........................Mounting Integrated Display ..........................Installing ID Modules ............................Installing TPMS Sensors ..........................Installing Antennas ............................Trailer Installation ............................Installing Tractor ID Box ..........................Installing Gen II Trailer Box .......................... -
Page 4: Part 1: System Installation
INSTALLATION GUIDE – 203 DISPLAY PART 1 : System Installation 1.1 Straight Truck/Tractor Installation Antenna Sensor Display 1.2 Mounting Integrated Display Mount the integrated display on the windshield using supplied pedestal. Please insure the location is clean and does not impair the driver’s view of the road: Attach pedestal to windshield. -
Page 5: Installing Id Modules
INSTALLATION GUIDE – 203 DISPLAY PART 1 : System Installation 1.3 Installing ID Modules Prior to installing wireless sensor on the rim, remove ID Module (taped to sensor) and insert into back of the display (see below). PRESSURE AND TEMPERATURE... -
Page 6: Installing Tpms Sensors
INSTALLATION GUIDE – 203 DISPLAY PART 1 : System Installation 1.4 Installing TPMS Sensors Once the ID module has been removed, attach sensor to corresponding rim. Suggested mounting location is near the air valve. Wipe the area clean with a cloth, remove the 3M adhesive protector and place on rim. Run steel band through sensor bracket and tighten (max 2ft/lb). -
Page 7: Installing Antennas
INSTALLATION GUIDE – 203 DISPLAY PART 1 : System Installation 1.5 Installing Antennas Locate a place between the rear drive wheels. Attach the 8m antenna pointing downwards. Be sure not to locate near a heat source or where a moving part will be in contact with the antenna. -
Page 8: Installing Tractor Id Box
(Red-positive, Black-negative) Attach antennas (see section 1.9.1) 1.9 Programming Gen II Trailer Box For sensor programming please refer to the instructions: “How to Program Valor Gen II Trailer Box” provided by your Valor Sales Representative. Suggested Tire Locations for Programming: Trailer (2 axle, 8-Wheel) 1A –... -
Page 9: Installing Antennas
INSTALLATION GUIDE – 203 DISPLAY PART 1 : System Installation 1.9.1 Installing Antennas Locate a place between the trailer wheels. Attach the 12m antenna pointing downwards. Be sure not to locate near where a moving part will be in contact with the antenna. -
Page 10: Turning Integrated Display On/Off
INSTALLATION GUIDE – 203 DISPLAY PART 2 : System Programming 2.1 Turning Integrated Display On/Off The ON/OFF switch is located on the back of the Display. PRESSURE AND TEMPERATURE TOGGLE AXLE TOGGLE BUZZER SET KEY ON/OFF SWITCH 2.2 Programming Tire Pressure Baseline Once the sensors have been installed in the tires and ID Modules inserted in the back of the Display, please insure that all tires are at recommended/optimum pressure. -
Page 11: Programming Date & Time
Once the Time and Date are set, press and hold the top toggle until display returns to monitoring mode. *Note: The Integrated Display has an internal time and date function that stores data which can be retrieved using Valor’s SmarTool (for truck fleets only). www.valortpms.com... -
Page 12: Reading The Display
On the right side of the display is a list of numbers indicating axle position. Up to 6 axles are available on the 203 Display. Tire pressure or temperature values are displayed left to right according to tire location. Pressure and temperature values do not appear on screen at the same time. If the PSI indicator is illuminated, the unit displays tire pressure, if the ºF indicator light is illuminated, the unit displays tire temperature values. -
Page 13: Switching Between Pressure And Temperature
INSTALLATION GUIDE – 203 DISPLAY PART 3 : Reading The Display 3.2 Switching between Pressure and Temperature To switch between pressure and temperature, press the bottom toggle located on the right side of the display (see graphic below). The PSI indicator light and the ºF indicator light will illuminate depending on what is selected.
Need help?
Do you have a question about the 203 and is the answer not in the manual?
Questions and answers