
Summary of Contents for TREVIL 5040 EASYFORM
- Page 1 5040 EASYFORM 5050 EASYFORM AC 7.5kW 5055 EASYFORM AC 15kW Usage and Maintenance 50xx Easyform-ed0811...
- Page 2 50xx Easyform-ed0811...
- Page 3 50xx EASYFORM Index Index 1. Introduction 1.1. Content and purpose of this manual 1.2. Safety precautions 1.3. Manufacturer’s liability 2. Description of the machine 2.1. How to identify the machine 2.2. Technical data 3. Installation 3.1. Upon receiving the goods 3.2.
- Page 4 50xx Easyform-ed0811...
-
Page 5: Safety Precautions
50xx EASYFORM Introduction 1. Introduction To prevent fire hazard or explosions do not stand near the machine with explosive or inflammable products. 1.1. Content and purpose of this manual Use of the machine is allowed only to professional operators who have been trained on how to operate the machine. -
Page 6: Description Of The Machine
Description of the machine 50xx EASYFORM 2. Description of the 2.2. Technical data For machine dimensions see Figure 2.1. machine 5040 5050 5055 5042 5052 5057 The machine described in this manual is a form finisher for garments for the upper body. Electrical 400V 50Hz 400V 50Hz... -
Page 7: Installation
50xx EASYFORM Installation 3. Installation WARNING -The electrical line must be properly grounded to insure the safety of the operator. INDICATION - If a Ground Fault Interrupt protection is in- 3.1. Upon receiving the goods stalled: every month test the safety of the circuit by press- The machine is delivered mounted on crate and protected by a plastic ing the Test button of the circuit breaker. - Page 8 Installation 50xx EASYFORM Figure 3.1 - How to move the crated machine Figure 3.2 - Mounting the form Figure 3.3 - Electrical connection 5040: min 10A @ 400V 50Hz 5042: min 10A @ 400V 50Hz 5050: min 25A @ 400V 50Hz 5052: min 25A @ 400V 50Hz 7,5 kW 5055: min 32A @ 400V 50Hz...
-
Page 9: Training Of The Operator
50xx EASYFORM Installation Figure 3.5 - Water connection Only machine with boiler (models 5050-5055-5052-5057) Figure 3.6- Compressed air connectionm (only for models with sleeves tensioning) 6bar (90PSI) 6bar (90PSI) 3.7. Compressed air connection (only for WARNING - The connection to the drainage system must ensure that no leakage of steam or hot water models with sleeves tensioning) occurs during the boiler discharge operation... -
Page 10: Operation
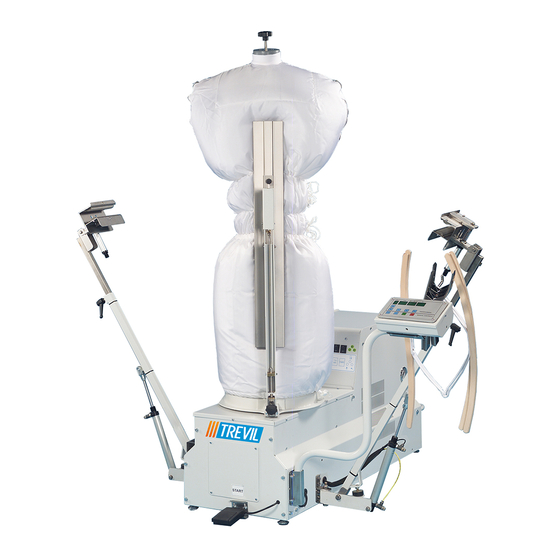
Operation 50xx EASYFORM 4. Operation Position the garment on the form and adjust shoulder width by means of knob (9). If needed, change the shape of the bag using the strings. Close the front and rear clamps (8 and 7). The machine described in this manual is a form finisher for garments Insert sleeve expanders (3) and close any vents with manual for the upper body. - Page 11 50xx EASYFORM Operation Figure 4.1 - Parts of the machine All models: ON/OFF switch Two vent clamps Two sleeve expanders Clamps pressure adjustment knob Blowing strength adjustment lever START pedal Rear clamp Front clamp Shoulder width adjustment knob Only models with boiler (10) Pressure gauge boiler (11) Main boiler switch (12) Heating element switch...
- Page 12 Use of the control board 50xx EASYFORM 5. Use of the control The settings of the advanced parameters remain stored in the memo- board ry associated to the program in which they were entered. For example: if the machine is running program number 5 and the user excludes the photocell, the photocell will remain excluded for future use of program number 5, even after switching off the ma- The microprocessor programmer manages the pressing cycle in all of...
-
Page 13: Maintenance
50xx EASYFORM Maintenance Table 5.1 - Setting mix and pause times What is your need? What you should do How the displays will look I do not need mix or pause Set both times at zero Mix and pause lights are off. times The displays show no numbers. -
Page 14: Every Six Months
Maintenance 50xx EASYFORM Table 6.1 - Maintenance of the boiler group (only for machine with built-in boiler) Heating element Level probes • Unscrew the bolts and • Remove level probes 1 and 2 remove the heating • Remove scaling from the level elements flanche probes •... -
Page 15: Other Controls
50xx EASYFORM 6.2.1. Electrical circuit maintenance • Verify that electrical connections are properly tightened and do not show oxidation; • Verify tightening of solenoid valve coils; • Verify state of cable and electrical wiring conditions. 6.2.2. Steam circuit maintenance Model without boiler •... -
Page 16: Troubleshooting
Troubleshooting 50xx EASYFORM 7. Troubleshooting 7.1. Solution to common problems, allowed to the user Refer to Table 7.1 for solutions to the most common malfunction situations. WARNING - DO NOT SERVICE THE APPLIANCE WITHOUT PROPER ADVICE - In event of a malfunction not anticipated in the table or if the suggested remedy does not solve the problem, do not operate the machine. - Page 17 50xx EASYFORM Troubleshooting 7.2. Solution to failures, for the use of the authorised service center WARNING - This chapter is for the exclusive use of an authorised technician. For maintenance and replacement of compo- nents always refer to a service center. Table 7.2 - Solution to failures Symptom Components likely to...
- Page 18 50xx EASYFORM 50xx Easyform-ed0811...
-
Page 19: Prolonged Stop
50xx EASYFORM Machine stop 8. Prolonged stop, Tran- Figure 8.1. - How to screw the machine to the crate sportation or Decommis- sioning The following explanation refers to all models, follow only the instruc- tions relating to the model you own. 8.1. -
Page 20: Technical Diagrams
Diagrams 50xx EASYFORM 9. Technical diagrams The diagrams in this chapter are for the excludive use of the authirized assistance center. Do not perform maintenance on the machine if not authorized in writing by the Manufacturing Company. 400V 50Hz ELETTROVALVOLA SOLENOID VALVE ELECTROVANNE ELECTROVÁLVULA... - Page 21 50xx EASYFORM Diagrams ELETTROVALVOLA SOLENOID VALVE ELECTROVANNE ELECTROVÁLVULA ELEKTRODAMPFVENTIL VAPORE STEAM VAPEUR VAPOR FILTRO FILTRO CAPACITOR FILTER KONDENSATFILTER FILTRE CONDENSATEUR CONDENSATORE CONDENSATORE FUSIBILE FUSE SICHERUNG FUSIBLE FUSIBLE FUSIBILE PROT. IMPIANTI FUSE SICHERUNG FUSIBLE FUSIBLE INTERRUTTORE INTERRUPTEUR INTERRUPTOR MACHINE SWITCH MASCHINESCHALTER MACCHINA MACHINE MÁQUINA...
- Page 22 Diagrams 50xx EASYFORM 50xx Easyform-ed0811...
- Page 23 50xx EASYFORM Diagrams 50xx Easyform-ed0811...
- Page 24 Diagrams 50xx EASYFORM 50xx Easyform-ed0811...
- Page 25 50xx EASYFORM Diagrams 50xx Easyform-ed0811...
- Page 26 Diagrams 50xx EASYFORM 50xx Easyform-ed0811...
- Page 27 50xx EASYFORM Diagrams 50xx Easyform-ed0811...
- Page 28 Diagrams 50xx EASYFORM 50xx Easyform-ed0811...
-
Page 29: Spare Parts Diagrams
50xx EASYFORM Spare parts 10. Spare parts diagrams Please refer to the following diagrams when ordering spare parts. To avoid mistakes, always provide code and description of the required spare part. Always use original spare parts. L503A SNODO COMPLETO ARTICULATED JOINT GELENK ARTICULATION ARTICULAC.COMPL. - Page 30 Spare parts 50xx EASYFORM F0334008 INTERRUTTORE SWITCH SCHALTER INTERRUPTEUR INTERRUPTOR 0221417 SCHEDA CARD PLATINE CARTE TARJETA 022140501 PANNELLO PANEL PANEEL PANNEAU PANEL 0221405 PANNELLO COMPLETO COMPLETE PANEL PANEELCOMPLETO PANNEAU COMPLET PANEL COMPLETO 0220591FAS CONDENSATORE ELECTRIC CONDENSER KONDENSATOR CONDENSATEUR CONDENSADOR Code Q.ty Descrizione Description...
- Page 31 50xx EASYFORM Spare parts A27415 A1941501 A27385 A1938501 MOTORE SUCTION MOTOR MOTOR MOTEUR MOTOR A27236 A1938601 A1922502 VENTOLA GEBLÄSE ROTOR VENTIL. ROTOR Code Q.ty Descrizione Description Beschreibung Designation Descripción MOTOR GROUP - GRUPPO MOTORE ed 2110 Part of: All models / Tutti i modelli 50091004 PINZA SPACCHI VENT CLAMP...
- Page 32 Spare parts 50xx EASYFORM 0220817 PORTA FUSIBILE FUSE HOLDER SICHERUNGSHALTER PORTE FUSIBLE PORTAFUSIBLE 0220801 FUSIBILE FUSE SICHERUNG FUSIBLE FUSIBLE 0220611 PRESSACAVO CABLE FIXER KABELPRESSEN PRESSE-CABLE FIJA CABLE 0220502 RELE TERMICO THERMAL RELAY THERMO RELAIS RELAIS TERMIQUE RÉLÉ TÉRMICO 0220501 CONTATTORE CONTACTOR SCHUTZSCHALTER CONTACTEUR...
- Page 33 50xx EASYFORM Spare parts 5055 F0334008 INTERRUTTORE SWITCH SCHALTER INTERRUPTEUR INTERRUPTOR 5057 5050 F0334008 INTERRUTTORE SWITCH SCHALTER INTERRUPTEUR INTERRUPTOR 5052 10069004 SPIA ROSSA RED LIGHT ROT ANZEIGER VOYANT ROUGE BOMBILLA ROJA 10069003 SPIA VERDE GREEN LIGHT GRÜNE ANZEIGER VOYANT VERT BOMBILLA VERDE 0220817 PORTA FUSIBILE...
- Page 34 Spare parts 50xx EASYFORM E028235 E028226 ELETTROVALVOLA SOLENOIDVALVE MAGNETVENTIL ELECTROVANNE ELECTROVÁLVULA 50041001 BATTERIA BATTERY BATTERIE BATTERIE BATERÍA GUAINA 0220750 COVER HÜLLE GAINE METALLISEE VAINA METALIZADA METALIZZATA 0160203 RACCORDO CONNECTION ANSCHLUSSSTÜCK RACCORD CODO 0160111 RACCORDO CONNECTION ANSCHLUSSSTÜCK RACCORD CODO Code Q.ty Descrizione Description Beschreibung...
- Page 35 50xx EASYFORM Spare parts VALVOLA SICUREZZA SAFETY VALVE SICHERHEITSVENTIL VANNE SICURITE VÁLVULA DE SEGUR. E028235 ELETTROVALVOLA SOLENOID VALVE MAGNETVENTIL ELECTRVANNE ELECTROVÁLV. D09225 ELETTROPOMPA PUMP PUMPE ELECTROPOMPE BOMBA 25142003 MANOMETRO PRESSURE GAUGE MANOMETER MANOMETRE MANÓMETRO 0280504 PRESSOSTATO PRESSURE SWITCH DRÜCKWACHTER PRESSOSTAT PRESÓSTATO 0280503 PRESSOSTATO...
- Page 36 Spare parts 50xx EASYFORM VALV. DI RITEGNO CHECK VALVE RÜCKSCHLAGVENTIL VANNE NON ETOURN VÁLV. FLUJO SIMPLE E0411002 FILTRO FILTER FILTER FILTRE FILTRO E033225 ELETTROVALVOLA SOLENOID VALVE MAGNETVENTIL ELECTROVANNE ELECTROVÁLVULA D09225 ELETTROPOMPA PUMP PUMPE ELECTROPOMPE BOMBA PQM70 16022002 PORTAGOMMA CABLE HOLDER GUMMISHALTER EMBOUT PORTACABLE...
- Page 37 50xx EASYFORM Spare parts 0230526 RESISTENZA 2.5kW HEATING ELEMENT 2.5kW HEIZSTAB 2.5kW RESISTANCE 2.5kW RESISTENCIA 2.5kW 0250329 GUARNIZIONE GASKET DICHTUNG JOINT EMPAQUETADURA 0250501 GUARNIZIONE GASKET DICHTUNG JOINT EMPAQUETADURA 0270219 FLANGIA 3 HOLES FLANGE FLANSCH FLASQUE 3 TROUS ARANDELA 3 AGUJ Code Q.ty Descrizione...
- Page 38 Spare parts 50xx EASYFORM B0111104 PERNO PIVOT STIFT PIVOT PERNO 0240133 MOLLA SPRING FEDER RESSORT MUELLE 0190505 CLIPS FORCELLA CLIPS DICHTUNGSRING CLIPS CLIPSHORQUILLA 0190504 FORCELLA FORK GABEL FOURCHE HORQUILLA 0190503 TESTINA CONNECTION ANSCHLUSSSTÜCK RACCORD CODO Code Q.ty Descrizione Description Beschreibung Designation Descripción 5050A20...
- Page 39 50xx EASYFORM Spare parts 0220750 GUAINA METALIZZATA COVER HÜLLE GAINE METALLISEE VAINA METALIZADA 0160109 RACCORDO CONNECTION BERBINDUNG RACCORD CODO Code Q.ty Descrizione Description Beschreibung Designation Descripción GROUP CONNECTION (optional feature) L544 ed 0107 GRUPPO ALLACCIAMENTO (optional) Part of: 5050 - EASYFORM 50Hz (with boiler 7.5kW) 5055 - EASYFORM 50Hz (with boiler 15kW) 5052 - EASYFORM 50Hz (with boiler 7.5kW) 5057 - EASYFORM 50Hz (with boiler 15kW)
-
Page 40: Document Identification
Dealer Manufacturer Trevil srl Via Copernico 1 20060 Pozzo d’Adda (MI) ITALY tel. +39 02 9093141 fax +39 02 90968202 www.trevil.com Document identification 0811 Edition: 11/10/2005 Date created: 24/03/2011 Date last edited: Document code: 50xx Easyform-ed0811...
Need help?
Do you have a question about the 5040 EASYFORM and is the answer not in the manual?
Questions and answers