Advertisement
Quick Links
Advertisement

Summary of Contents for AMK AMK501
- Page 1 AMK Rack LCD Console User Reference Manual...
- Page 2 Introduction Thank you for purchasing AMK LCD console drawer. AMK LCD console drawer can save your MONEY, TIME, SPACE, EQUIPMENT and POWER. PCs or Servers can be controlled from One Keyboard, Mouse and LCD Monitor. AMK LCD console drawer is loaded with features such as 19” Rack Mount Size, Daisy Chain up to eight units, On Screen Display Menu, Password security, Searching PC server name, Hot key Control, Front Panel Push Button and Auto Scan Control.
-
Page 3: Package Contents
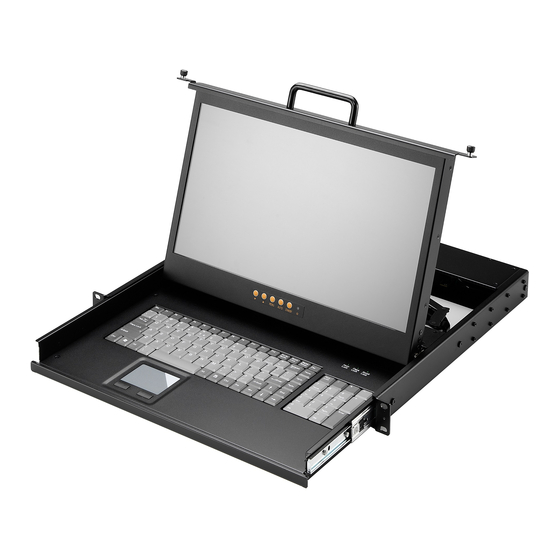
Foam with Box Screw Pack Model No.: AMK516/ AMK716/ AMK816 Package Content AMK 16 port KVM Switch User’s manual Power Cord Bracket KVM Cable Foam with Box Screw Pack Note: AMK models with DC power supply do not include power cord. 3... - Page 4 442 X 44 X 480mm 442 X 44 X 590mm 442 X 44 X 590mm Compliance CE, FCC Class A, RoHS Model No. AMK501 AMK508 AMK516 PC Port Drawer Design 1U, Single Slide Rail self-locking device for 19” rackmount LCD Display 17.3”, 1920x 1080 resolution with tempered glass...
- Page 5 Operation Power Keyboard Lock 1x Num Lock, 1x Caps Lock, 1x Scroll Lock 8x 1.8m USB cable 16x 1.8m USB cable KVM Cable Option: 80W, 24~48 VDC power supply Touch screen: AMK501/ AMK701/ AMK801 DVI interface: AMK501/ AMK701/ AMK801 5...
-
Page 6: Cable Diagrams
PS2 KVM cable: VGA D-sub 15 pin to VGA D-sub 15 pin and PS2 KB/MS connector 1.8m PS2 cable, P/N: 68103-01001-00 3.0m PS2 cable, P/N: 68103-01002-00 5.0m PS2 cable, P/N: 68103-01003-00 Rear Panel of AMK801/ AMK701/ AMK501: Rear Panel of AMK808/ AMK708/ AMK508: Rear Panel of AMK816/ AMK716/ AMK516: 6... - Page 7 1. Find the property position to screw these two extension brackets with the ears and both side onto the server rackmount first. 2. Lift & push the AMK inside the rackmount, and screw between bracket and AMK with 4 screws.
- Page 8 Installation/Operation Before installation, please make sure all of peripherals and computers have been turned off. This example of installation is based on AMK808 and you also can think that all AMK series have the same installation procedures Step 1 Insert the RACK LCD Console Drawer into the 19” rack cabinet in the desired position.
- Page 9 COMBO KVM Connection The rear section of the unit will have a series of connections for connecting to systems 8 Ports 16 Ports AC Power Local Console KVM Ports for Plug Daisy Chain Keyboard / Host Mouse Port Connecting KVM Ports for Host using PS2/ USB connection. Connect single ended D-Sub end to KVM port and other end composing of VGA D-Sub, PS2/ USB Keyboard and Mouse to corresponding ports on the system.
- Page 10 You can connect additional KVM port by adding additional KVM switches and connecting between them a daisy chain cable. The control will be from the primary KVM by changing banks selection. COMBO KVM OSD Operations When powering up the unit it is require that you provide authentication to access the KVM control for all system connected to the unit.
- Page 11 The first page display will show the OSD menu that allows you to choose the main general options you would like to proceed. Following are list of function key to access each of the action. 11...
- Page 12 The bottom right portion of the OSD gives the status of the user login and setting. By going into the menu, you will receive a new list of functions. The language selection allows you to choose the desired display language for reference. **Non- Latin based language are for display purpose only and not for editing 12...
- Page 13 The port name edit allow you to assign naming to each of the port connected to better recognize and categorize based on your needs. The port search allows you to find by the name which you have assign to a port. This is especially useful when you have multiple banks of ports.
- Page 14 The access list allows you to assign user right to each port. Only the supervisor can configure the access list. Use the Enter key to toggle the port right, where O means enable and X means disable. The hot-key menu allows you to set the hot key used to bring up the OSD. The time settings menu allows you to set the auto-scan time for host port by port.
- Page 15 The OSD mouse menu allows you to set the OSD cursor mouse speed. COMBO KVM Hot Key Operation (AMK808/ 816/ 708/ 716-CB) Hot key can be provides convenient short cut to access functions similar to the OSD menu. You can have a full command of the KVM switch through a simple sequence of key. To access, you must press the hotkey (default Caps Lock) twice within 2 seconds.
-
Page 16: Troubleshooting
Troubleshooting Ensure that all cables are well seated. Label all of cables with the number for each respective computer to avoid confusion. The recommended VGA cable distance is 5 meters maximum without ghosting and degradation. Normally, the cable length is based on driver capacity of your VGA card. If you need longer VGA cable, please use VGA extender to accomplish your applications.
Need help?
Do you have a question about the AMK501 and is the answer not in the manual?
Questions and answers