Advertisement
Quick Links
092xxx RevA draft7
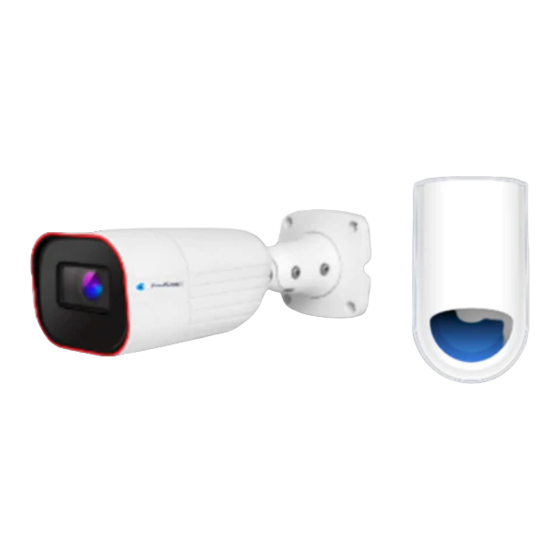
PoolScout
®
Pool Surveillance and Alarm System
Owner's Manual
\
Contents
Before you Begin.....................................2
Installation.............................................3
Operation...............................................8
PSKIT
Hayward Industries
400 Connell Drive, Suite 6100
Berkeley Heights, NJ 07922
Phone: (908) 355-7995
www.hayward.com
USE ONLY HAYWARD GENUINE REPLACEMENT PARTS
Advertisement

Summary of Contents for Hayward PoolScout PSKIT
- Page 1 092xxx RevA draft7 PoolScout ® Pool Surveillance and Alarm System Owner’s Manual Contents Before you Begin........2 Installation..........3 Operation..........8 PSKIT Hayward Industries 400 Connell Drive, Suite 6100 Berkeley Heights, NJ 07922 Phone: (908) 355-7995 www.hayward.com USE ONLY HAYWARD GENUINE REPLACEMENT PARTS...
- Page 2 Home Router to be within 100 feet of mounting point. • Camera should not be placed such that the furthest point of the pool does not exceed 150ft from the camera. Model Input Frequency Watts PSKIT 100-120 VAC 50/60Hz USE ONLY HAYWARD GENUINE REPLACEMENT PARTS...
- Page 3 Broadband Internet with at least 3.0 Mbs upload speed • Available ethernet port on the home’s network router or access point • A mobile device running the Hayward PoolScout app on at least IOS 12 or Android 6.0 • Power drill and drill bits •...
- Page 4 Loosen the locking screws and roughly position the camera in its intended location. Camera should be rotated to align with the horizon Camera to tilt downward towards pool Camera should view as much of the pool and surrounding area as possible USE ONLY HAYWARD GENUINE REPLACEMENT PARTS...
- Page 5 Make sure that it can be centered over the hole and properly fastened to the surface. Also, plan the orientation of the exit fitting and the mounting location of the Alarm Module before drilling. USE ONLY HAYWARD GENUINE REPLACEMENT PARTS...
- Page 6 You may need to coil up excess cable indoors before permanently installing at the Electrical Box. When routing is complete, secure the cable along the run using the supplied cable clips. USE ONLY HAYWARD GENUINE REPLACEMENT PARTS...
- Page 7 Electrical Box. You may need to coil up excess cable indoors before routing to the Elec- trical Box. When routing is complete, secure the cable along the run using the supplied cable clips. Run 100’ Power Cable to Access Hole Plug into 120V Indoor Receptacle USE ONLY HAYWARD GENUINE REPLACEMENT PARTS...
- Page 8 If the included hardware is not suitable for the mounting surface, use appropriate hardware purchased separately. Route the Alarm Cable in manner where it will not get pinched when the Alarm Module is fastened. USE ONLY HAYWARD GENUINE REPLACEMENT PARTS...
- Page 9 Operation Using the home owner’s phone or other mobile device, install the Hayward PoolScout app from the App Store or Google Play ® ® Follow the app instructions to setup the user account and connect the PoolScout app. When finished with the account verification, the app will guide you through the steps and prompt you to scan the QR code.
- Page 10 USE ONLY HAYWARD GENUINE REPLACEMENT PARTS...
- Page 11 USE ONLY HAYWARD GENUINE REPLACEMENT PARTS...
- Page 12 Hayward is a registered trademark of Hayward Industries, Inc. © 2019 Hayward Industries, Inc. All other trademarks not owned by Hayward are the property of their respective owners. Hayward is not in any way affiliated with or endorsed by those third parties.
Need help?
Do you have a question about the PoolScout PSKIT and is the answer not in the manual?
Questions and answers