Table of Contents
Advertisement
Advertisement
Table of Contents

Summary of Contents for Hotspot Franklin T10
- Page 1 Mobile Hotspot User Manual...
-
Page 2: Table Of Contents
Contents Getting Started ................................Overview ........................................System Requirements ................................Components ....................................... Device Display ......................................Battery Management .................................... Using Your Mobile Hotspot ............................Accessing the Network ..................................Using Your Mobile Hotspot for the First Time ..........................System Requirements ................................Instruction how to insert SIM card safely ......................... Instruction how to remove SIM card safely ........................Charging the Battery .................................. Connecting to Your Mobile Hotspot .............................. Wi-Fi Name (SSID) and Password ............................. Connecting to the Internet ..............................Using Your Mobile Hotspot after Setup is Complete ......................Mobile Hotspot to share connections ..........................Wi-Fi Setting (Web UI) page and First time security ....................How to change Web UI admin password ........................ -
Page 3: Getting Started
Body-Worn Operation ................................Safety Hazards ....................................... Glossary ..................................Glossary ........................................Getting Started ................................Overview ........................................System Requirements ................................Components ....................................... Device Display ......................................Battery Management .................................... Using Your Mobile Hotspot ............................Accessing the Network ..................................Using Your Mobile Hotspot for the First Time ..........................System Requirements ................................Instruction how to insert SIM card safely ......................... Instruction how to remove SIM card safely ........................Charging the Battery .................................. Connecting to Your Mobile Hotspot .............................. Wi-Fi Name (SSID) and Password ............................. Connecting to the Internet .............................. - Page 4 About .......................................... Support ........................................Troubleshooting ................................ Overview ........................................First Steps ........................................ Common Problems and Solutions ..............................Regulatory Information ............................Regulatory Statements ..................................FCC Equipment Authorization ID: XHG-RT410 ......................Body-Worn Operation ................................Safety Hazards ....................................... Glossary ..................................Glossary ........................................
-
Page 5: Battery Management
Ge)ng Started Overview Components Device Display Battery Management... -
Page 6: Overview
Thank you for choosing your LTE Mobile Hotspot. Having the Mobile Hotspot at your fingertips will allow you to access LTE network for fast uploads and downloads. You can also connect up to 15 Wi-Fi capable devices to the Internet at once - laptops, tablets, eReaders, Smartphones and possible to tether through USB cable. -
Page 7: Components
Components... - Page 8 Power/Menu Button – Turn on/off Mobile Hotspot. Shows device menu and information Button Operation Operations Actions Turn On Press and hold the button for 3 seconds. Press and hold the button until “Goodbye” message Turn Off appears. Display When the display is off (sleep mode), the first quick press Wake-Up of the button wakes up the display.
-
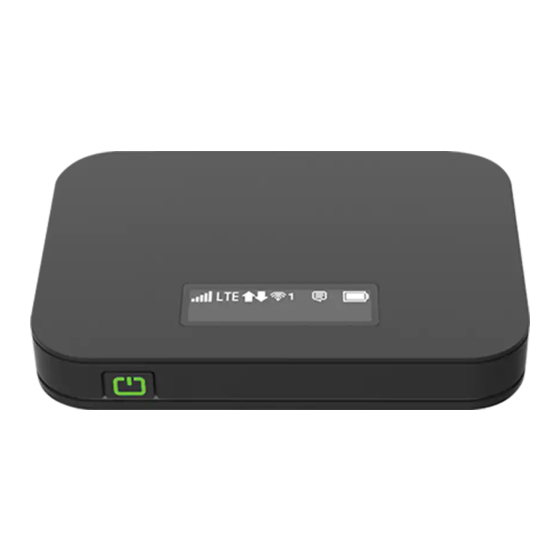
Page 9: Device Display
Device Display... -
Page 10: Battery Management
Ba:ery Management Your Mobile Hotspot is equipped with a replaceable and rechargeable battery. It works from its charged battery alone, or when the device is plugged into a power source. Note: Please do not attempt to open or disassemble your hotspot and the battery pack. Doing so may cause damage that voids your warranty. -
Page 11: Using Your Mobile Hotspot
Using Your Mobile Hotspot Accessing the Network Using Your Mobile Hotspot for the First Time Connecting to Your Mobile Hotspot Using Your Mobile Hotspot After Setup is Complete... -
Page 12: Accessing The Network
Nano SIM card. Charging the Ba=ery Before using your mobile hotspot, ensure that the battery is fully charged. Be sure to use the charger that came with your device. NOTE: Your Mobile Hotspot is equipped with a replaceable rechargeable battery. - Page 13 When charging, keep your device near room temperature. • Never leave the Mobile Hotspot in an unattended vehicle due to uncontrolled temperatures • that may be outside the desired temperatures for your device. It is normal for batteries to gradually wear down and require longer charging time.
-
Page 14: Connecting To Your Mobile Hotspot
ConnecHng to Your Mobile Hotspot Wi-Fi Name (SSID) and Password You can find your Wi-Fi Name and Password any time you need. Just press the power/menu button ( ) shortly when the display is on. Home screen, Device menu guide (Switching every 3 seconds) quickly Press Data usage display... -
Page 15: Connecting To The Internet
Wi-Fi Name of your own. See “Settings”. Using Your Mobile Hotspot aIer Setup is Complete Mobile Hotspot to share connec0ons You can use your Mobile Hotspot as a wireless mobile hotspot to connect to a total of 15 Wi-Fi capable devices to the mobile broadband network. Wi-Fi SeIng (Web UI) page and First 0me security The Mobile Hotspot comes from the factory with security turned on. By default, Web UI password is ‘admin’. -
Page 16: Updating Your Mobile Hotspot Software
UpdaHng Your Mobile Hotspot soIware New software is updated automatically in the following scenarios. 1) Every 48 hours, device will check for new software at Power On phase. 2) If a new update is available it will be downloaded in the background and wait to be applied on the next power down. -
Page 17: Mobile Hotspot Settings
Mobile Hotspot Se)ngs Managing Your Web UI Home Messages Settings About Support... -
Page 18: Managing Your Web Ui
Managing Your Web UI Access the Mobile Hotspot Web UI home page You can access your Mobile Hotspot device information using an internet browse. Access Mobile Hotspot Web UI using a browser 1. Connect your Wi-Fi capable device to the Mobile Hotspot. 2. Open a web browser on your connected device and open your home page by entering either or http://mobile.hotspot... -
Page 19: Home
Home The Mobile Hotspot Web UI home page allows you to quickly access all menu options for your Mobile Hotspot. Messages • Settings • About • Support • Check status of network connection and data usage on the Home page. -
Page 20: Messages
The Message page allows you to view the message contents by pressing the Device Messages menu on your Mobile Hotspot Web UI Admin home page. To delete a selected message, click the trash bin icon to the right of the message date and timeline. To delete all... -
Page 21: Settings
Se)ngs The Settings page has the following menu options. Wi-Fi • Mobile Network • Device • Advanced Router •... -
Page 22: Wi-Fi
Basic : the basic wireless network parameters Multi SSID: Select ON if you like to set up a separate guest Wi-Fi network. Your Mobile Hotspot will broadcast two Wi-Fi Names. Guest Wi-Fi: If ON is selected for Multi SSID, Guest Wi-Fi menu will appear. You can... - Page 23 You can choose Wi-Fi Band depends on your preference. NOTE: if you connect WLAN printer to your Mobile Hotspot, Privacy Separator should be OFF to send file from your PC to the printer SSID Stealth: If ON is selected, the Wi-Fi name won't be found by other devices around it.
- Page 24 2. Click Save Changes to save your settings. NOTE: Default Inactive Time is 10 minutes. If the Mobile Hotspot becomes inactive after this duration with no device connection, it is required to press the power button to connect to Wi-...
- Page 25 Connected Devices - Connected Devices menu contains the following options: Main Wi-Fi Devices – Normally this is the hostname of the connected device as set on the connected device. You can use the pencil tool to change the name of any connected device.
-
Page 26: Mobile Network
Mobile Network Manage your mobile network settings. Mobile Settings 1. From the Web UI, click Settings > Mobile Network > Mobile Settings. The Mobile Settings page is shown in the following figure. - Manage your mobile broadband data connection: Cellular data on or off. - Manage Connection Mode You Prefer: Auto Connect on or off. - Page 27 - Roaming: Turn Data Roaming on or off. Turn it ON to require confirmation before connecting to the roaming network. CAUTION! Allowing roaming could result in additional service charges. 2. Click Save Changes to save your settings. From the Web UI, click Settings > Mobile Network > APN. The default APN parameters are shown in the following figure.
- Page 28 To add a new APN, follow the steps below: 1. Click Add to access the following page. 3. Enter the related parameters as described in the following table. Parameters Description Name Type the profile name. User name User name is used to obtain authentication from the ISP when the connection is established.
- Page 29 Enabled. Once the SIM PIN Lock is enabled, you need to enter SIM PIN to connect to the mobile broadband network each time you power on your Mobile Hotspot. Carrier Unlock: Once Carrier Unlock Status is unlocked, you can use the SIM from various different carriers.
- Page 30 Advanced Advanced Mobile Network Settings should only be used as directed by Carrier’s Customer Service personnel. Certain advanced options will reset your device's connections and programming and will require reactivation. 1. From the Web UI, click Settings > Mobile Network > Advanced to set the mobile network advanced settings on this interface.
-
Page 31: Device
Hotspot display turns off after this timeout period if there is no menu button action. - LED Enable: If ON is selected, the LED indicator next to Your Mobile Hotspot display will blink when the device is on. This LED is a power indicator that shows the device is on when the device display is off. - Page 32 Data Usage 1. From the Web UI, click Settings > Device > Data Usage. 2. Choose Day of Month, Usage Limit and Click Save Changes to save your settings. Web Interface 1. From the Web UI, click Settings > Device > Web Interface. Change Password: - Current Password: Enter the current password.
- Page 33 - New Password: Enter the new password. - Confirm New Password: Enter the new password again. 2. Click Save Changes to save your settings. Software Update From the Web UI, click Settings > Device > Software Update Firmware: Current software version Upload Software: A new software will be updated automatically.
- Page 34 Backup and Restore 1. From the Web UI, click Settings > Device > Backup and Restore to access menus to back up your device settings to your computer, restore from the backup and restore your device to its factory default settings. To back up your device settings to your computer, follow the steps below: a.
-
Page 35: Advanced Router
Advanced Router Configure LAN, Firewall, and Customization settings. 1. From the Web UI, click Settings > Advanced Router > LAN Settings to display the router information shown in the following figure. - IP Address: IP address for Web User Interface. - Subnet Mask: Subnet mask for the IP address. - VPN Pass-through: VPN pass-through must be enabled if you want to allow VPN tunnels to pass through your device’s firewall. - Page 36 DNS Mode From the Web UI, click Settings > Advanced Router > DNS Mode to display the domain name server information shown in the following - DNS Manual Mode: Enable or disable DNS manual mode - UPnP: Enable or disable UPnP function. - Out of Service Notification: Enable or disable Out of Service Notification function.
- Page 37 - Wi-Fi MAC Filtering: You may allow users only on the permitted list. 2. Click Save changes to save your settings. Firewall IPv4 From the Web UI, click Settings > Advanced Router > Firewall IPv4. You may set up firewall rules to protect your network from virus and malicious activity on the Internet. Port Blacklist To set IP Address Filtering rules, follow the steps below: 1.
- Page 38 3. Click Add. 4. Enter the related parameters as described in the following table. Parameters Description Name Enter a name for the rule WAN IP Address Enter the WAN IP address WAN Port Set the WAN port Protocol Set which protocol will be used for filtering Status Set how to handle the packet if it matches with the rule 5.
- Page 39 Port Forwarding To set port mapping rules, follow the steps below. 1. Turn on the Firewall Switch. 2. Turn on Port Forwarding. 3. Click Add.
- Page 40 4. Enter the related parameters as described in the following table. Parameters Description Name Enter a name for the rule WAN Port Set the WAN port LAN IP Address Enter the LAN IP address LAN Port Set the LAN port Protocol Set which protocol will be used for filtering Status...
- Page 41 Port Whitelist To set Port Whitelist, follow the steps below: 1. Turn on the Firewall Switch. 2. Turn on the Port Whitelist. 3. Click Add. 4. Enter the related parameters as described in the following table. Parameters Description Name Enter a name for the rule Port Set the port Protocol...
-
Page 42: About
Status Set how to handle the ports if it matches with the rule 5. Click Save Change to save your settings. About View your device's connection information, firmware information, WWAN information, Wi-Fi details and device information. From the Web UI main screen, click the About tab to view the available information. -
Page 43: Support
Support Obtain support information from the Web UI Support Tab. From the Web UI main screen, click the Support tab to view the available options. -
Page 44: Troubleshooting
TroubleshooHng Overview First Steps Common Problems and Solutions... -
Page 45: Overview
By replacing the battery: If pressing and holding the power button for 10 seconds does not restart the Mobile Hotspot, open the battery cover, take out the battery and re-install the battery after 5 seconds. Put the battery cover back and turn on the Mobile Hotspot by pressing the power button. - Page 46 Wi-Fi name. When you change the Wi-Fi password only for your Mobile Hotspot and keep the same Wi-Fi Name, the devices try to connect to your Mobile Hotspot using the Wi- Fi name and previous Wi-Fi password saved, causing Wi-Fi authentication error.
-
Page 47: Regulatory Information
Regulatory InformaHon Regulatory Statements Safety Hazards... -
Page 48: Regulatory Statements
Regulatory Statements FCC Equipment Authoriza0on ID: XHG-RT410 This device complies with Part 15 of the FCC Rules. Operation is subject to the following two conditions: (1) this device may not cause harmful interference, and (2) this device must accept any interference received, including interference that may cause undesired operation. SAR Information The exposure standard for your device uses a unit of measurement called the Specific Absorption Rate (“SAR”). -
Page 49: Safety Hazards
- Increase the separation between the equipment and receiver. - Connect the equipment into an outlet on a circuit different from that to which the receiver is connected. - Consult the dealer or an experienced radio/TV technician for help. FCC CAUTION: Any changes or modification not expressly approved by the party responsible for compliance could void the user's authority to operate this equipment. - Page 50 Please consult the manufacturer of any electronic equipment that has been installed in your vehicle as RF signals may affect electronic systems in motor vehicles. Please do not operate your device while driving a vehicle. This may cause a severe distraction and in some areas, it is against the law.
-
Page 51: Glossary
Glossary... -
Page 52: Glossary
Domain Name System Firmware A computer program embedded in electronic devices. Firmware usually contains operating code for the device. Gigabyte Hotspot A Wi-Fi (802.11b/g/n/ac) access point or the area covered by an access point. HTTP Hyper Text Transfer Protocol IMEI... - Page 53 Preferred Roaming List Protocol A standard that allows connection, communication, and data transfer between computing endpoints. Proxy A firewall mechanism that replaces the IP address of a host on the internal (protected) network with its own IP address. Router A device that directs traffic from one network to another. Subscriber Identification Module SSID Service Set Identifier...
Need help?
Do you have a question about the Franklin T10 and is the answer not in the manual?
Questions and answers
change password
To change the password on a Franklin T10 Hotspot:
1. Connect your Wi-Fi capable device to the Mobile Hotspot.
2. Open a web browser and enter: http://mobile.hotspot
3. In the Web UI, go to: Settings > Device > Web Interface.
4. Change the Web UI password from there.
If the current password is forgotten:
1. Press the reset button on the bottom of the device to perform a factory reset.
2. The Web UI password will reset to “admin.”
3. You will be required to set a new password on first login.
This answer is automatically generated
How to know if battery fully charged