Advertisement
Quick Links
Advertisement

Summary of Contents for AMP Command Pro iii 9500
- Page 1 Operating Manual Reading manual before operating.
- Page 2 We want to thank you for your purchase of our state of the art new AMP Triplex 3 in 1 . This manual will tell you how to use and maintain the AMP Triplex 3 in 1 . Please read the manual carefully before operating the machine.
-
Page 3: Troubleshooting
Component Identification ....5 ..Preparation.... - Page 5 1. Safety Instruction Please read the manual before operation, failure to comply with the manual could lead to danger of operator, others and the machine. 1 . 1 . Protect yourself and others. Welding can make you and others in danger of many risk factors: Make sure to never weld without a welding mask.
- Page 6 welding machine at any time. Make sure operator and all other have a dry ground insulation protection. Do not let your body touch the ground and the electrode at that same time. 1 .4 Welding fumes and gasses can cause serious harm to operator and all other by standards.
- Page 7 The high temperature produced by the exhaust is capable of igniting any flammables or explosives. 1 .9. It is important that this unit is installed, used and maintained by professionals. Do not tamper or remove any safety or warning signs located on the unit. 1 .10.
-
Page 8: Specifications
overfilled with oil, as this can affect normal operations. In addition make sure to change the oil on a regular basis. 1 .14 Refrain from using the air compressor when welding. Also, it is recommended that you disconnect all sources from the generator as well when welding. 2. - Page 9 Complete (mm) Outer packing: machine 153KG Weight (Kg) IP Grade IP21 Insulation grade 3.Structu re Note: Do not attempt to modify the control panel in any way. This will void your warranty and could present the potential for equipment failure and personal injury.
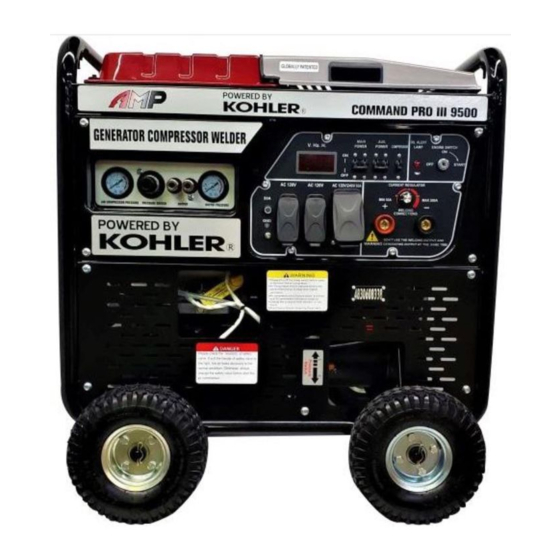
- Page 10 Auxiliary Power Breaker Compressor Breaker Oil Alert Lamp Engine Ignition Switch Welding Current Regulator Welding Output Terminals 120/240VAC Output 120VAC Output 11 . 120VAC Output 12. Ground Terminal...
- Page 11 1 . Engine Cover Plate 2. Fuel Tank 3. Fuel Petcock 4. Engine Pull-Start Assembly 5. Engine Choke Lever 6. Air Filter Assembly 7. Handle 8. Water Drain Valve 9. Muffler Assembly 10. Frame 1 . Air Compressor Oil Drain Plug 2. Oil Sight Glass 3.
- Page 12 5. Safety Valve 4. A/C Switch 2. Oil Fill Dipstick 1 . Pressure Gauge Pressure Regulator 3. Air Outlet Connectors 4. Pressure Gauge 6. Air Hose 5. Air Tank 8. Wheel Axle 7. Air Valve 9. Wheel Preparation 4.1 Read this manual carefully and understand all operating procedures before using the equipment.
- Page 13 4.6Engine oil recommendation 4.6.1 Oil is a major factor for overall performance of the AMP Triad 3 in 1 . Please use 4 stroke oil that exceeds the standards for API service classification S E . Always check the API SERVICE label on the oil container...
- Page 14 4.6.2 Check and change the oil in your machine regularly. This will avoid all problems related to the oil being too low, too high, dirty or thick. 4.6.3 SAE I OW-30 oil is recommended. The SAE viscosity grade shows other viscosities to use in different average temperatures.
- Page 15 4.6.3 SAE10W-30 oil is recommended. The SAE viscosity grade shows other viscosities to use in different average temperatures.
- Page 16 Make sure you securely twist the fuel cap before operating the AMP Triad 3 in 1 . Do not use used, polluted or mixed fuel in the machine.
- Page 17 The fuel valve is between fuel tank and the carburetor. When running the unit, the fuel valve is "on" . when stop the unit ,the fuel valve turn to "off". Fuel switch Fuel switch 5.2 Try to drain all fuel and turn the fuel petcock to the off position when the unit will sit for a long period of time without use.
-
Page 18: Operation
until the unit has started. Gentle let the cord back down to avoid damaging the pull cord. Do not let the cord have friction or the cord may wear easily. 5.2.3 Remote control start Make sure the key is in the "on" location. Then press the button on the remote control that reads "on". -
Page 19: Engine Shutdown
6.6 Welding rods and welding leads chart: For your reference below these are the rods and cables we see the best performance in the AMP Triad 3 in 1 . 1.6-2.5 2.5-3.2 3.2-4 4.0-5.0... -
Page 20: Section 8: Maintenance
Check the bolts and connections are all secure. SECTION 8: MAINTENANCE It is very important to get the best out of your AMP Triad 3 in 1 that you keep up on all maintenance, Regular oil and fluid changes will also ensure you are decreasing the amount of pollution being put into the air. - Page 21 8.1 .2 Make sure the oil is drained completely. Then tighten the bolt and replace the seal. To purchase a new seal please contact AMP Industrial. 8.1 .3 Fill the unit with oil into the crankcase to the recommended level on the oil dipstick plug. Once you...
- Page 22 Using the wrong spark plug will damage the engine. Make sure to contacting a AMP service technician before changing the spark plug. Always remember to...
- Page 23 make sure the unit has had ample time to cool down before you perform any maintenance on the spark plug. 8.3.1 After letting the unit cool down clean a dirty spark plug by first, removing the cap on the plug. Then you must remove the spark plug with the spark plug remover tool that came in the toolbox of your unit.
- Page 24 It is important to avoid any damage that the spark plug is tightened to the correct specifications. If you have any questions, contact a AMP service technician for any information. 8.3.5 Install the spark plug cap.
- Page 25 8.5.3 You must never let fuel sit or be stored for more than 30 days in your AMP Triplex 3 in 1 . 8.6 Taking off fuel tank and carburetor Fuel is highly combustible and explosive. It is important to remember when handling fuel you can easily be burned or hurt.
- Page 26 Drainage bolt 8.6.5 Dismantle sedimentation glass and turn fuel valve to the "on" position. Discharge fuel and remove sedimentation glass. ATTENTION: When using the AMP Triad 3 in 1 and you hear unfamiliar noises coming from the unit it is...
- Page 27 AMP Industrial immediately. 8.7 Compressor maintenance 8.7.1 For any air compressor oil changes please refer to the engine oil change. Do not mix or use the same model lubricating oil. 8.7.2 Compressor oil change should reference engine oil change step 8.1 .
- Page 28 9 Common fault and processing methods fault fault cause failure process phenomenon charge battery( only for electric start) battery low voltage Open fuel cock 2. fuel cock not open Refer step 3 3. Chock valve not open Check oil level, add to the level 4.
- Page 29 1. voltage meter broken After confirm, stop machine and replace 2. Alternator leading wire and Check and repair control panel wire fall off or not Clean slip ring or replace brush or connect well. connect wire 3. Brush and slip ring do not genset no output replace...
-
Page 30: Schematic Diagram
compressor Discharge pressure high reduce discharge pressure heavy compressor positioning bolt reposition loose vibrate or installation out of level Inspect or re- Gas circuit not sealed well seal replace compressor vent valve air leakage pressure replace replace pressure gage broken safety value valve air leakage purge valve replace... - Page 32 SECTIONI 1 — WARRANTES service center as soon as a problem KOHLER EMISSION CONTROL DEFECTS exists. The undisputed warranty WARRANTY COVERAGE repairs should be completed in a Spark ignited small o ff-road engines are reasonable period of time, not to warranted relative to emission control parts exceed 30 days.
- Page 33 technical support group toll free at 800-544- 2444 The emission warranty is a defects warranty and defects are judged on normal engine performance. The warranty is not related to an in-use emission test.
Need help?
Do you have a question about the Command Pro iii 9500 and is the answer not in the manual?
Questions and answers
What size welding quick connector is used on this welder and how can I get some?