Table of Contents

Related Manuals for TestEquity FOV Series

Summary of Contents for TestEquity FOV Series
- Page 1 FOV Series Forced Air Ovens Installation - Operation Manual TestEquity LLC 6100 Condor Drive Moorpark, CA 93021 Support: 877-512-3457, 805-480-0638 Corporate: 800-732-3457, 805-498-9933 http://www.testequity.com Rev, 1.0 – February 17, 2017...
- Page 2 This page left blank P a g e...
- Page 3 FOV Forced Air Ovens 110 – 120 V Installation and Operation Manual Revision: February 17, 2017 These units are TÜV CUE listed as forced air ovens for professional, industrial, or educational use where the preparation or testing of materials is done at an ambient air pressure range of 22.14 – 31.3 inHg (75 –...
-
Page 4: Table Of Contents
TABLE OF CONTENTS INTRODUCTION ..............................5 General Safety Considerations ........................... 5 Engineering Improvements ..........................6 Contacting Assistance ............................6 RECEIVING YOUR UNIT ............................7 Inspect the Shipment ............................7 Orientation Photos............................... 8 Record Data Plate Information .......................... 12 Temperature Reference Sensor Device ......................12 INSTALLATION .............................. -
Page 5: Introduction
INTRODUCTION Thank you for purchasing a TestEquity oven. We know you have many choices in today’s competitive marketplace when it comes to constant temperature equipment. We appreciate you choosing ours. We stand behind our products and will be here if you need us. -
Page 6: Engineering Improvements
ONTACTING SSISTANCE If you are unable to resolve a technical issue with your unit, please contact TestEquity Technical Support. Phone hours for Technical Support are 6 am – 4:30 pm Pacific Coast Time (west coast of the United States, UTC -8). Please have the following information ready when calling or emailing Technical Support: the model number and the serial number (see page 12). -
Page 7: Receiving Your Unit
RECEIVING YOUR UNIT NSPECT THE HIPMENT When a unit leaves the factory, safe delivery becomes the responsibility of the carrier. • Damage sustained during transit is not covered by the manufacturing defect warranty. • When you receive your unit, inspect it for concealed loss or damage to its interior and exterior. If you find any damage to the unit, follow the carrier’s procedure for claiming damage or loss. -
Page 8: Orientation Photos
RECEIVING YOUR UNIT RIENTATION HOTOS Figure 1: FOV5 Main Temperature Chamber Liner Exhaust Port with Gasket and OTL Sensor Sliding Dampener Probes Door Latch Chamber Door Handle Access Port Control Panel Oven Chamber P a g e... - Page 9 RECEIVING YOUR UNIT Figure 2: FOV3 Main Temperature Exhaust Port with Chamber Liner and OTL Sensor Sliding Dampener Gasket Probes Door Latch Chamber Door Handle Access Port Control Panel Oven Chamber P a g e...
- Page 10 RECEIVING YOUR UNIT Figure 3: FOV2 Chamber Liner Main Temperature and Exhaust Port with Gasket OTL Sensor Probes Sliding Dampener (Under Shelf) Door Latch Chamber Door Handle Access Port Control Panel Oven Chamber 10 | P a g e...
- Page 11 RECEIVING YOUR UNIT *Allow 12 inches of clearance between the fan and walls or Figure 4: Unit Back other partitions. Access Port (Stopper Installed) Exhaust Vent Power Cord Inlet with Fuse 11 | P a g e...
-
Page 12: Record Data Plate Information
RECEIVING YOUR UNIT ECORD LATE NFORMATION Locate the data plate on the back of the oven adjacent to the power inlet. The data plate contains the oven model number and serial number. Technical support and your distributor will need these numbers in order to assist you in the future. -
Page 13: Installation
INSTALLATION NSTALLATION HECKLIST Carry out the procedures and steps listed below to install the oven in a new workspace location and prepare it for use. All procedures are found in the Installation section of this manual. Pre-Installation Check that the required ambient conditions, ventilation, and spacing for the oven are met, page 14. -
Page 14: Required Ambient Conditions
INSTALLATION EQUIRED MBIENT ONDITIONS This oven is intended for use indoors, at room temperatures between 15°C and 40°C (59°F and 104°F), at no greater than 80% Relative Humidity (at 25°C / 77°F). Clearances Allow 24 inches (60cm) of vertical headspace clearance above the top of the oven for •... -
Page 15: Power Source Requirements
INSTALLATION OWER OURCE EQUIREMENTS When selecting a location for the unit, verify that each of the following requirements is satisfied: Power Source: The wall power outlet must meet the power requirements listed on the unit data plate. These units are intended for 110 – 120 VAC 50/60 Hz applications at the following amperages: FOV2 12.0 Amps;... -
Page 16: Leveling
INSTALLATION EVELING Install the 4 leveling feet with the 4 corner holes on the bottom of the oven. The oven must be level and stable for safe operation. Note: To prevent damage when moving the unit, turn all four leveling feet so that the leg of each foot sits inside the unit. -
Page 17: Shelving Installation
INSTALLATION HELVING NSTALLATION Perform the following steps to install the FOV shelves: 1. Install 4 clips for each shelf in the slots located on the sides of the chamber interior. a. Squeeze each clip. b. Insert the top tabs first, then the bottom tabs using a rocking motion. 2. - Page 18 INSTALLATION This page left blank 18 | P a g e...
-
Page 19: Graphic Symbols
GRAPHIC SYMBOLS The unit is provided with multiple graphic symbols on its exterior. The symbols identify hazards and the functions of the adjustable components, as well as important notes in the user manual. Symbol Definition Indicates that you should consult your user manual for further instructions. Indique que l'opérateur doit consulter le manuel d'utilisation pour y trouver les instructions complémentaires. - Page 20 GRAPHIC SYMBOLS Symbol Definition Indicates the timer Indique le minuterie Start or Stop the Timer Lancer ou arrêter le minuteur Reset the Timer Réinitialisation de la Minuterie 20 | P a g e...
-
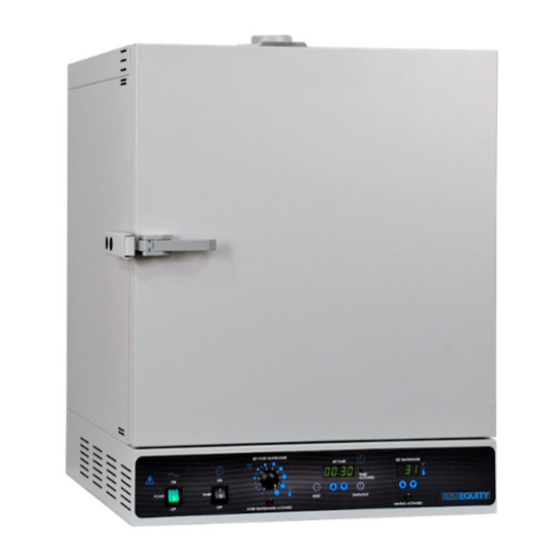
Page 21: Control Panel Overview
CONTROL PANEL OVERVIEW Figure 8: FOV3, FOV5 Control Panel Figure 9: FOV2 Control Panel Power Switch The green Power Switch controls power to the oven and its systems. When in the ON ( I ) position, the switch illuminates and the oven will heat to and maintain the currently temperature set point. Timer Switch The black Timer Switch controls power to the timer system. - Page 22 CONTROL PANEL OVERVIEW Timer Display and Control Pad The SET TIMER display shows the duration of the currently programmed heating profile, or a flashing duration adjustment mode, or the countdown of an active profile to 0. The “//” RESET button is used to place the Timer display in its adjustable duration mode, and then to scroll through the duration time parameters.
-
Page 23: Operation
OPERATION PERATING RECAUTIONS Warning : The oven is not an explosion-proof unit! Avertissement : Ce sont des fours pas résistants aux explosions. 1. The oven is not designed to safely contain combustible gasses. 2. Do not place explosive, combustible, or flammable materials into the chamber. 3. -
Page 24: Theory Of Operation
OPERATION HEORY OF PERATION Heating When powered, the FOV oven chamber heats to and then maintains the currently programmed temperature set point. The oven comes from the factory with a temperature set point of “OFF”. The set point may be adjusted by the end-user using the Set Temperature controls. Heating is controlled by a microprocessor controller board that stores the temperature set point. - Page 25 OPERATION Timed Heating Profile The oven is provided with a Timer subsystem that, when set, runs the oven in a steady-state heating profile at the current temperature set point from 1 minute up to 99 hours, 59 minutes. Allow the oven to heat to temperature prior to launching a profile. Launching a profile with the temperature set point set to 150°C immediately after turning on the oven will result in the first several minutes of the profile spent with the chamber rising from room temperature to 150°C.
-
Page 26: Put The Oven Into Operation
OPERATION Note: The oven may produce light smoking during its first use above 150°C as the remnants of a protective oil coating burn off the heating element. UT THE VEN INTO PERATION Carry out the following steps and procedures to put the oven into operation after installing it in a new workspace environment. -
Page 27: Set The Oven Temperature Set Point
OPERATION ET THE EMPERATURE OINT Adjust the oven temperature set point to that of your application. Turn the OTL dial clockwise to its max setting, if not already set at max. This prevents the heating cutoff system from interfering with this •... -
Page 28: Set The Over Temperature Limit
OPERATION ET THE EMPERATURE IMIT This procedure sets the Over Temperature Limit heating cutoff to approximately 5˚C above the current chamber temperature. Perform the steps below once the oven has run with no temperature fluctuations at your application temperature set point for at least 30 minutes. If you have not done so already, turn the Set Over Temperature Limit control dial clockwise to the maximum position. -
Page 29: Setting The Timer
OPERATION ETTING THE IMER This procedure enters a heating profile duration in the Timer system. When launched, the profile runs the oven for the duration at the present temperature set point. Turn on the Timer system. Set Timer a. Place the black Timer switch in the On ( I ) position. -
Page 30: Drying Racks And Other Accessories
OPERATION Setting the Timer Continued Set Timer Use the Up or the Down arrow key to set the Tens of Minutes parameter value. 1 Hour, 51 Minutes Advance to the Minutes parameter. Set Timer Press and hold the Reset button. The flashing decimal point will advance to •... -
Page 31: Launch A Heating Profile
OPERATION AUNCH A EATING ROFILE The oven can be run in a timed steady-state heating profile at the current temperature set point. Allow the oven to come up to temperature prior to launching a profile. See the Setting the Timer procedure on page 29 for how to set the length of the profile. -
Page 32: High Exterior Temperatures
OPERATION XTERIOR EMPERATURES Note: Allow the oven to cool or use appropriate PPE and tools when adjusting the chamber gasket seating. If the chamber gasket comes out of alignment, oven chamber air may be drawn into the insulating baffle spaces. This can result in heating of the oven exterior surfaces. If the oven is exterior is unusually warm or hot, push the chamber gasket inward along its entire length to restore the integrity of the seal. -
Page 33: User Maintenance
USER MAINTENANCE Warning : Prior to maintenance or service on this unit, disconnect the power feed from the power supply. Avertissement : Avant d'effectuer toute maintenance ou entretien de cet appareil, débrancher le cordon secteur de la source d'alimentation. LEANING AND ISINFECTING If a hazardous material or substance has spilled in the unit, immediately initiate your site’s Hazardous Material Spill Containment protocol. -
Page 34: Calibrate The Temperature Display
USER MAINTENANCE ALIBRATE THE EMPERATURE ISPLAY Note: Please see the Reference Sensor Device entry on page 12 for the minimum device requirements. Temperature calibrations match the temperature display to the actual air temperature inside the oven chamber. The actual air temperature is supplied by a reference sensor device. Calibrations compensate for software drifts in the controller as well as deviations caused by the natural material evolution of the sensor probe in the heated chamber space. - Page 35 USER MAINTENANCE 5 ) Heat up and stabilization period. The oven chamber must be stable at temperature in order to perform an accurate • calibration. The temperature is considered stabilized when the oven chamber has operated at your • calibration temperature for at least 30 minutes with no fluctuations of ±0.3°C or greater. 30 Minute Minimum Stability Period 150°C...
- Page 36 USER MAINTENANCE Calibration continued Place the oven in temperature calibration mode. Set Temperature Press and hold both the UP and DOWN arrow buttons simultaneously. The Temperature Display will show the letters • Set Temperature “C O”, then begin flashing the current temperature value. Note: If an arrow key is not pressed for five seconds, the Temperature Display will cease flashing, and store the last displayed Current Temp.
- Page 37 USER MAINTENANCE Calibration continued Reference Device Once the temperature has stabilized, compare the reference device and the oven display temperature readings. a. If the readings are the same, or the difference between the two falls within the acceptable range of your protocol, the oven is calibrated for temperature.
-
Page 38: Door Components And Seal
USER MAINTENANCE OMPONENTS AND Periodically, inspect the door latch, trim, and catch for alignment. Check the chamber liner gasket located on the oven door frame at least once per year for signs of fraying, brittleness, or tearing. Failure to maintain the integrity of the door system shortens the lifespan of the oven and may adversely impact chamber temperature uniformity and stability. -
Page 39: Unit Specifications
UNIT SPECIFICATIONS These ovens are 110 - 120 volt units. Please refer to the oven data plate for individual electrical specifications. Technical data specified applies to units with standard equipment at an ambient temperature of 25°C and a voltage fluctuation of ±10%. The temperatures specified are determined in accordance to factory standard following DIN 12880 respecting the recommended wall clearances of 10% of the height, width, and depth of the inner chamber. -
Page 40: Shelf Capacity By Weight
UNIT SPECIFICATIONS HELF APACITY BY EIGHT Model Per Shelf Max Total Load Max No. Shelves 50 lbs. / 22.7 kg* 100lbs. / 45 kg** 6 Shelves FOV2 50 lbs. / 22.7 kg* 200lbs. / 91.0 kg*** 7 Shelves FOV3 50 lbs. / 22.7 kg* 200lbs. -
Page 41: Ventilation Rates
UNIT SPECIFICATIONS Recovery Time: From a 30-second door opening. Model Recovery to 80°C Recovery to 150° Recovery to 306°C 14.0 Minutes 4.5 Minutes FOV2 1.5 Minutes 18.0 Minutes 2.0 Minutes FOV3 1.5 Minutes 45.0 Minutes FOV5 2.0 Minutes 4.0 Minutes Recovery Time: From a 60-second door opening. -
Page 42: Parts List
5130890 Ordering If you have the Part Number for an item, you may order it directly from TestEquity. If you are uncertain that you have the correct Part Number, or if you need that specific item, please contact TestEquity Technical Support for help at 877-512-3457, 805-480-0638. Please have the model number and serial number of the unit ready, as Tech Support will need this information to match your unit with its correct part.
Need help?
Do you have a question about the FOV Series and is the answer not in the manual?
Questions and answers