Advertisement
Available languages
Available languages
Table of Contents
H-9467
SMOKE AND CARBON
MONOXIDE DETECTOR,
9V BATTERY
TOOLS NEEDED
Pencil
Hammer
NOTE: This combination smoke/CO detector
was designed to be mounted on the ceiling or
wall. It is not a tabletop device.
Find the pair of self-adhesive
labels included with this smoke/CO
detector. On each label, write in
the phone numbers of emergency
responder (like 911) and a qualified
appliance technician. Place one
label near the smoke/CO detector
and the other label in the fresh air
location that user plans to go if the
detector sounds.
CAUTION! Do not connect this unit to any other
detector or auxiliary device. It is a single-
station unit that cannot be linked to other
devices. Connecting anything else to this unit
may prevent it from working properly.
CAUTION! Do not install this unit over an
electrical junction box. Air currents around
junction boxes can prevent smoke from
reaching the sensing chamber and prevent the
unit from alarming. Only AC-powered units are
intended for installation over junction boxes.
1.
If locking the battery compartment or locking the
smoke/CO detector to the mounting bracket, please
read the "Locking Features (Optional)" section.
PAGE 1 OF 9
1-800-295-5510
uline.com
Drill
3/16" Drill Bit
INSTALLATION
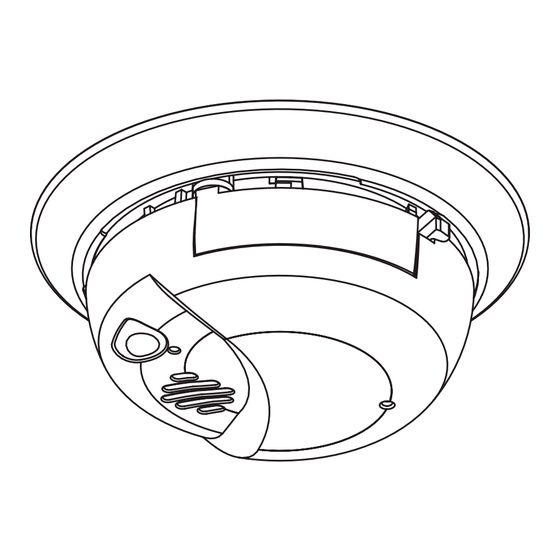
2. Hold base firmly and twist the mounting bracket
counterclockwise to separate it from the unit.
(See Figure 1)
3. Hold the mounting bracket against the ceiling or
wall and trace around the inside of the mounting
slots. (See Figure 1)
4. Use a pencil to make a mark inside each outline for
the drill holes.
5. Set the unit where it won't get covered with dust
when drilling the mounting holes.
6. Using a 3/16" drill bit, drill a hole through each pencil
mark.
7.
Insert the two plastic screw anchors (included)
into the holes. Tap the screw anchors gently with a
hammer, if necessary, until they are flush with the
ceiling or wall.
Pour le français, consulter les pages 7-9.
Flathead Screwdriver
Figure 1
Mounting Bracket
Para Español, vea páginas 4-6.
Mounting Slots
0721 IH-9467
Advertisement
Table of Contents

Related Manuals for U-Line H-9467

Summary of Contents for U-Line H-9467
- Page 1 Para Español, vea páginas 4-6. Pour le français, consulter les pages 7-9. H-9467 1-800-295-5510 uline.com SMOKE AND CARBON MONOXIDE DETECTOR, 9V BATTERY TOOLS NEEDED Pencil Hammer Drill 3/16" Drill Bit Flathead Screwdriver INSTALLATION NOTE: This combination smoke/CO detector 2. Hold base firmly and twist the mounting bracket was designed to be mounted on the ceiling or counterclockwise to separate it from the unit.
- Page 2 INSTALLATION CONTINUED 8. Align the mounting bracket over the plastic screw NOTE: These smoke/CO detectors have two anchors. (See Figure 2) separate locking features: one locks the battery compartment, and the other locks the 9. Screw the mounting bracket to the ceiling or wall smoke/CO detector to the mounting bracket.
- Page 3 INSTALLATION CONTINUED 3. Push the locking pin through the black dot on the LOCKING THE MOUNTING BRACKET label on the back of the smoke/CO detector. Using needle-nose pliers or utility knife, detach one (See Figure 6) locking pin from the mounting bracket. (See Figure 5) Figure 6 2.
-
Page 4: Herramientas Necesarias
H-9467 800-295-5510 uline.mx DETECTOR DE HUMO Y MONÓXIDO DE CARBONO – BATERÍA DE 9 VOLTIOS HERRAMIENTAS NECESARIAS Lápiz Martillo Taladro Broca de 3/16" Desarmador Plano INSTALACIÓN 2. Para separarlo de la unidad sostenga firmemente la NOTA: Este detector con combinación de humo/CO está... - Page 5 CONTINUACIÓN DE INSTALACIÓN 8. Alinee el soporte de instalación sobre los anclajes NOTA: Estos detectores de humo/CO tienen de plástico de los tornillos. (Vea Diagrama 2) dos funciones de bloqueo: una bloquea el compartimiento de la batería y la otra 9.
- Page 6 CONTINUACIÓN DE INSTALACIÓN 2. Retire un pasador de bloqueo del soporte de 5. Retire el detector de humo/CO del soporte de instalación utilizando unas pinzas de punta o una instalación. navaja utilitaria. (Vea Diagrama 5) ¡IMPORTANTE! Cuando reemplace la batería, haga siempre una prueba del detector de Diagrama 5 humo/CO antes de colocar de nuevo el...
-
Page 7: Outils Requis
H-9467 1-800-295-5510 uline.ca DÉTECTEUR DE FUMÉE ET DE MONOXYDE DE CARBONE – PILE DE 9 V OUTILS REQUIS Mèche de Crayon Marteau Perceuse Tournevis à tête plate perceuse de 3/16 po INSTALLATION 2. Tenez fermement la base et tournez le support de REMARQUE : Ce détecteur de fumée/CO a été... - Page 8 INSTALLATION (SUITE) 8. Alignez le support de fixation sur les ancrages à vis REMARQUE : Ces détecteurs de fumée/CO en plastique. (Voir Figure 2) possèdent deux dispositifs de verrouillage distincts : le premier permet le verrouillage du 9. Vissez le support de fixation au plafond ou au mur compartiment de la pile alors que le second à...
- Page 9 INSTALLATION SUITE 2. Détachez une goupille de verrouillage du support 5. Fixez à nouveau le détecteur de fumée/CO sur le de fixation avec une pince à bec effilé ou un support de fixation. couteau universel. (Voir Figure 5) IMPORTANT! Lorsque vous remplacez la pile, testez systématiquement le détecteur Figure 5 de fumée/CO avant de reverrouiller le...
Need help?
Do you have a question about the H-9467 and is the answer not in the manual?
Questions and answers