Table of Contents
Advertisement
Quick Links
Advertisement
Table of Contents

Subscribe to Our Youtube Channel
Related Manuals for Harman Harman/Kardon RADIANCE 2400


Summary of Contents for Harman Harman/Kardon RADIANCE 2400
- Page 1 OWNER’S MANUAL...
-
Page 2: Important Safety Instructions
IMPORTANT SAFETY INSTRUCTIONS Verify Line Voltage Before Use has been designed for use with 100- 240 volt, 50/60 Hz AC current. Connection to a line voltage other than that for which your product is intended can create a safety and fire hazard and may damage the unit. If you have any questions about the voltage requirements for your specific model or about the line voltage in your area, contact your selling dealer before plugging the unit in to a wall outlet. -
Page 3: Table Of Contents
TABLE OF CONTENTS IMPORTANT SAFETY INSTRUCTIONS ..........2 INTRODUCTION ..................4 WHAT’S IN THE BOX ................5 PRODUCT OVERVIEW ................7 PLACEMENT ....................14 CONNECTING TO TV ................18 CONNECTING TO OTHER DEVICES ..........21 POWER ON ....................23 CONNECTING TO INTERNET ............25 USING YOUR RADIANCE 2400 ............27 SOUND SETTINGS ..................31 SETTINGS....................33 SPECIFICATIONS ..................34... -
Page 4: Introduction
Wi-Fi to ensure that your product has the most recent software updates. Design and specifications are subject to change without notice. If you have any questions about these products, their installation or their operation, please contact your Harman Kardon retailer or customer service, or visit us at www.harmankardon.com... -
Page 5: What's In The Box
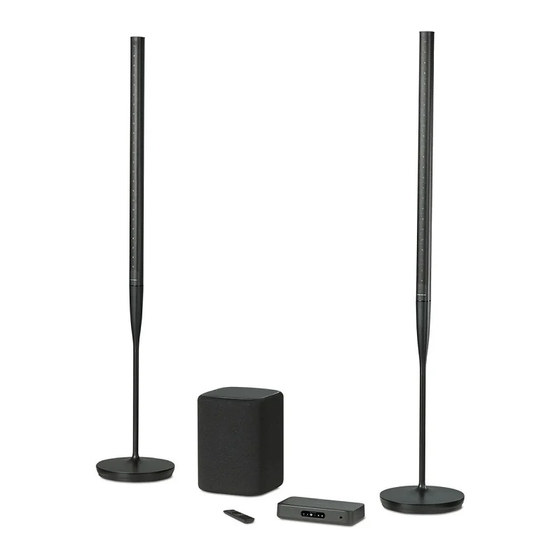
WHAT’S IN THE BOX Carefully unpack the box and check if the following parts are included. If any part is damaged, do not use it, contact your Harman Kardon retailer or customer service. 1. Digital hub 2. Subwoofer 3. Tower speaker (stand) x 2 4. - Page 6 Inserting batteries before using the remote control (AAA batteries x 2) Slide the battery cover in the direction of the arrow until it is completely removed. Insert 2 AAA batteries (1.5V) oriented so that their polarity is correct. Slide the battery cover back into position.
-
Page 7: Product Overview
PRODUCT OVERVIEW Front Panel - Digital Hub 1. Touch screen • : Wi-Fi signal indicator. • : Press to customize speaker setup. • : Press to select a source (Bluetooth / Aux / HDMI / Optical). • : Press to customize the audio settings. •... - Page 8 Back Panel - Digital Hub 4 5 6 7 8 1. ETHERNET • May be used to connect to the Internet (RJ45 connector). 2. SERVICE 1 / SERVICE 2 (for technical personnel only) 3. HDMI IN 1 / HDMI IN 2 / HDMI IN 3 / HDMI IN 4 •...
- Page 9 Tower speakers 1. Connection status indicator Solid white Connected to the digital hub Fast flashing white Pairing / reconnecting Slow flashing white System software updating...
- Page 10 2. + / - • Increase or decrease the volume level. 3. SERVICE (for technical personnel only) 4. POWER • Connect to the AC wall outlet. 5. RESET • Press and hold for 5 seconds to restore the factory settings.
- Page 11 Subwoofer 1. Connection status indicator Solid white Connected to the digital hub Fast flashing white Pairing / reconnecting Slow flashing white System software updating 2. SERVICE 2 (for technical personnel only) 3. RESET • Press and hold for 5 seconds to restore the factory settings.
- Page 12 Remote Control (Power) • Power on or switch to standby. 2. Source zone • Select an input source: OPTICAL / AUX / HDMI TV / HDMI 1 / HDMI 2 / HDMI 3 / HDMI 4. MUTE • Mute or unmute the audio. 4.
- Page 13 9. BASS - / + • Turn bass down or up. 10. AUDIO SYNC - / + • Decrease or increase audio sync delay if the video and audio synchronization is not correct. 11. NIGHT MODE • Turn the night mode (Dynamic Range Control) on or off for Dolby Digital tracks.
-
Page 14: Placement
PLACEMENT NOTE: • Make sure there are AC outlets nearby. Digital Hub Placement Place the digital hub near your TV. Do not place anything on top of the digital hub. Tower Speaker Assembly Align the upper part of each speaker with the stand and turn clockwise until locking into place. - Page 15 Using the Supplied Spikes (Optional) Eight metal spikes are supplied for use when you place the tower speakers on a carpeted surface. 1) Gently lay down each tower speaker on a soft, nonabrasive surface. 2) Screw each spike into the threaded hole. Make sure all spikes are screwed in completely for stability.
- Page 16 Recommended Tower Placement The Radiance tower uses Constant Beamwidth Technology™ (CBT) to create a wide sound stage and wide sweet spot. TIPS: • Place the towers at least 2m (6.5 ft) apart from each other and at least 2m (6.5 ft) from the listening area. •...
- Page 17 TIPS: • Place the subwoofer near the towers along the same wall. This can be (1) in the front of the room between the towers, or (2) outside of the towers. If this is not possible, then place the subwoofer (3) against the side wall, near the towers. •...
-
Page 18: Connecting To Tv
CONNECTING TO TV NOTE: • Before you make or change any connections, make sure that all devices are disconnected from the power outlets. HDMI (Preferred) 1) Connect an HDMI cable from the HDMI OUT (TV ARC) connector on the back of the digital hub to the HDMI IN (ARC) connector on your TV. - Page 19 Optical NOTE: • Make sure you have removed the protective cap from both ends of the optical cable. 1) Connect the connector on the digital hub to the connector of your TV with a digital optical cable (sold separately). 2) Tap on the touch screen or press the button on the remote control to select the OPTICAL mode.
- Page 20 HDMI-CEC If your TV supports HDMI-CEC, enable the functions as instructed in your TV user manual. You can control the volume +/-, mute/unmute and power on/standby functions on your through the TV remote control. TV remote control learning 1) On the touch screen, tap “Options” > “Universal IR learning”.
-
Page 21: Connecting To Other Devices
CONNECTING TO OTHER DEVICES HDMI (Preferred) Connect a digital device such as a set-top box, DVD/Blu-ray player, or games console to your system through a single HDMI connection. 1) Connect an HDMI cable (sold separately) from the connector on the back of the digital hub to the connector on your digital device. - Page 22 Optical or Analog 1) Connect the OPTICAL IN or AUX IN connector on the digital hub to the OPTICAL OUT or AUDIO OUT jack of the source device by using an optical cable (sold separately) or 3.5 mm audio cable (sold separately). 2) Tap on the touch screen or press the button on the remote control to select...
-
Page 23: Power On
POWER ON NOTES: • Use the provided power cords only. • Before connecting the power cords, make sure all other connections have been completed. • When you disconnect the power cord, always pull the plug, never the cable. • Do not connect this product or other components to an AC outlet until all connections between components are complete. - Page 24 3) Select your language as instructed on the touch screen for the first-time setting.
-
Page 25: Connecting To Internet
CONNECTING TO INTERNET NOTE: • If you want to use the Internet with Ethernet, make sure to connect the Ethernet cable before plugging in the power cord. Through the Google Home app Google Home Google Home (Android™/iOS) > 5 m / 16 ft 1) Make sure your mobile device or tablet is connected to the same Wi-Fi or linked to the same account as your speaker 2) Open the Google Home app. - Page 26 7) To add a device, tap the check next to the device name. 8) You can select multiple devices. Tap Add. 9) You’ll find linked remote devices TVs and speakers section of the Google Home app. *Through AirPlay setup on an iOS device 1) Power on your 2) On your iOS device, go to “Settings”...
-
Page 27: Using Your Radiance 2400
USING YOUR RADIANCE 2400 Chromecast built-in™ With Chromecast built-in, you can stream music / tunes / podcasts / playlists from 300+ music apps to your by simply tapping the Cast button. 1) Check that your smartphone or tablet has been connected to the same network as the 2) Run the Chromecast-enabled app on your smartphone or tablet. - Page 28 AirPlay With AirPlay, you can stream music on your iOS device to the Music Radiance 2400 1) Check that your iOS device has been connected to the same network as the 2) To enter the Control Center on an iOS device, swipe down from the upper right corner (iOS 12 or later) or swipe up from the bottom edge (iOS 11 or earlier).
- Page 29 Bluetooth You connect your to your Bluetooth-enabled smartphone or tablet. Connect a Bluetooth device < 10 m / 33 ft Bluetooth Settings Bluetooth DEVICES Radiance 2400 Connected Now Discoverable 1) Press on the remote control or tap Bluetooth on the touch screen to enter Bluetooth pairing mode.
- Page 30 NOTES: • If you have already connected the to Wi-Fi and changed the device name, then select the new device name. • To exit the Bluetooth mode, choose another source. • This product automatically turns off after 20 minutes of inactivity. •...
-
Page 31: Sound Settings
SOUND SETTINGS This section helps you choose the ideal sound for your video or music. Volume You have three ways to adjust the volume level while playing music. • Press VOL - / + on the remote control. • Adjust the volume via the Google Home app on your smartphone or tablet. - Page 32 Sound Mode Press on the remote control or tap Audio on the touch screen, then select predefined sound modes to suit your music or video. • Virtual Surround: Creates a surround sound effect. • Night Mode: Decreases the volume of loud sounds. (Available only for Dolby Digital soundtracks) •...
-
Page 33: Settings
SETTINGS Display Brightness On the touch screen, tap “Options” > “Brightness”, then softly drag the value bar to adjust the brightness of the touch screen. Software Upgrade The software of your will be automatically upgraded to the latest version when it is connected to the Internet via a Wi-Fi network or Ethernet connection. -
Page 34: Specifications
SPECIFICATIONS General Specification • Total system output power: 450 W RMS • Tower output power: 125 W RMS • Subwoofer output power: 200 W RMS • Tower transducers: 24 x 1.25” (32 mm) • Subwoofer transducer: 10” (250 mm) • Total Harmonic Distortion (THD): < 1 % •... - Page 35 • 5G Wi-Fi transmitter power: ≤23 dBm (EIRP) • 5G Wi-Fi modulation: QPSK, BPSK, 16QAM, 64QAM, 256QAM • 5G Wi-Fi transmitter frequency range: 5.15~5.35 GHz, 5.470~5.725 GHz, 5.725~5.825 GHz • 5G WISA transmitter power: ≤ 14 dBm (EIRP) • 5G WISA modulation: OFDM, BPSK, QPSK, 16QAM •...
-
Page 36: Troubleshooting
TROUBLESHOOTING Never try to repair the product yourself. If you have any problems using this product, check the following points before you request a service. Sound No sound from the tower speakers or subwoofer. • Ensure that all cable connections are secure. •... - Page 37 Distorted sound or echo. • If you play audio from the TV through the system, make sure the TV is muted. Audio and video are not synchronized. • Press to synchronize. • Make sure the TV delay is set to 0.
- Page 38 Remote Control The remote control does not work. • Check if the batteries are drained. If so, replace them with new ones. • The remote control may have failed to connect with the digital hub. In this case: On the touchscreen, tap “Options” > “Remote Control”, then follow the onscreen instructions to pair with the digital hub again.
- Page 39 Bluetooth A device cannot connect with the • Check if you enable the Bluetooth function of the device. • The is already connected to another Bluetooth device. Disconnect the previously connected device first. Poor audio quality from a connected Bluetooth device. •...
-
Page 40: Open Source License Notice
LICENSE NOTICE This product contains open source software. For your convenience, the source code and relevant build instruction for software licensed under the GPL is available at http://www.harmankardon.com/ opensource. You may also obtain this information by contacting us at OpenSourceSupport@Harman.com... -
Page 41: Trademarks
TRADEMARKS The Bluetooth® word mark and logos are registered trademarks owned by Bluetooth SIG, Inc. and any use of such marks by HARMAN International Industries, Incorporated is under license. Other trademarks and trade names are those of their respective owners.
Need help?
Do you have a question about the Harman/Kardon RADIANCE 2400 and is the answer not in the manual?
Questions and answers