Table of Contents
Advertisement
Quick Links
Advertisement
Table of Contents

Summary of Contents for RDI CM794724
- Page 1 7” Wireless System with Night Vision Camera CM794724 USER MANUAL...
-
Page 2: Table Of Contents
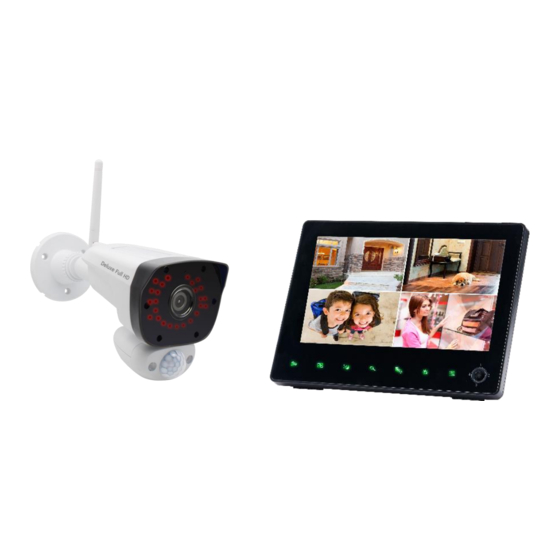
Table of Contents What’s Included in the Box? ..................... 3 Overview ............................. 3 2.1 Wireless Receiver (7” Monitor) ........................3 2.2 Camera ................................5 Set up the Hardware ........................6 3.1 Monitor ................................6 3.2 Camera ................................6 3.2.1 General..............................6 3.2.2 Placement Considerations ........................ -
Page 3: What's Included In The Box
1. What’s Included in the Box? 2. Overview 2.1 Wireless Receiver (7” Monitor) Front Panel Buttons:... - Page 4 1. LCD Panel. 2. Channel Select: Change channel. In Menu operation, press to go back to live view. 3. Quad / Sequence Viewing: Switch between Split/Quad mode (up to 4 channels) and Auto Sequence mode (automatically cycles through channels). In Menu operation, press to go back to live view in Quad mode. 4.
-
Page 5: Camera
1. Motion Recording: Activate/deactivate motion recording. 2. Manual Recording: Activate/deactivate manual recording. 3. Volume Down 4. Volume Up 5. Talk: Press and hold to talk to camera in single channel mode. Release to hear audio from camera. 6. Power Switch: Power monitor on/off. 7. -
Page 6: Set Up The Hardware
IR LED Infrared LEDs provide viewing in no/low light conditions. Use the bracket to mount the camera on a wall or other flat Bracket surfaces. Camera antenna Receives & Sends signals to or from the Monitor. The pair button is located on the back of the camera. Press pair Pair button button when monitor is in pairing mode. -
Page 7: Placement Considerations
are used outdoors, they should be mounted under some type of cover like a patio overhang or eave. As rainwater drops on the camera glass, it may create spots that will reflect the light from the infrared LEDs used for night vision, thus causing lower quality video. -
Page 8: System Operation
4. System Operation Live Screen Icons Signal Strength: Shows how strong the camera's signal is. Signal ranges from 4 bars down to 0 bars (out of range). Camera Number: Displays the current channel number you are currently viewing. If viewing multiple cameras at once, the camera indicator will appear above each video display. - Page 9 Remote Connection: This icon shows someone is remote connecting to the system via App. SD Card Overwrite: If this icon appears means the SD card is allowed to overwrite files when it is full. Recording Indicator: When this icon flashes red, it indicates that recording is in progress.
-
Page 10: Menu
5. Menu Go to Menu for more system setup. 5.1 Setting Go to Setting for basic system setup. 1. Date & Time. Set up date & time manually. You can also synchronize system time with... -
Page 11: Camera Setup
Internet time server. 2. Default Settings. Set the system back to default setting. 3. Format Memory. Format micro SD card used to record video. Please note that formatting will delete all recorded files. 4. Time Zone. Choose Time Zone manually. You can also set up automatic DST (Daylight Saving Time) here. -
Page 12: Record
1. Pairing. This system comes with cameras already paired. Use Pairing to assign these cameras to different channels or to pair additional new cameras to the monitor. 2. Camera On/Off. Make the cameras visible to the monitor. 3. Brightness. Adjust camera brightness for different camera separately. 4. -
Page 13: Alert
5.4 Alert Alert settings for Monitor and Camera. 1. Monitor Alert. a. Camera ON/OFF. Set up alert on monitor for each camera separately. b. Volume. Adjust alert volume on monitor. c. Alert Mute Schedule. Setup schedules for muting alert on monitor. 2. -
Page 14: Detect
Set up alerts (Deterrent Light & Voice Message) for each camera. 5.5 Detect Set up video motion detection sensitivity and mask area for each camera. 5.6 Light Settings *Please note that the Light Setting is not available for this model. It is available only when monitor connects to floodlight camera. -
Page 15: Monitor Basic Operation (Quick Guide)
camera and monitor to each other so they can communicate). • If a camera is already assigned to the channel you want to assign the new camera to, the monitor will overwrite the existing camera and link with the new one. •... -
Page 16: Operating The Deluxecam App
Set up automatic 1. From Menu—Record—Schedule recording. recording The Schedule Recording Overview screen displays. schedule 2. Go to Setup to set up schedules and view the Recording Setup screen. Delete recording 1. From Menu—Record—Schedule recording. schedule Tap the Setup and the schedule overview displays. 2. -
Page 17: Android
8.1 Android 8.1.1 Add Camera 1. Start DeluxeCam and tap on the icon or on the respective text. 2. There are three ways to add the camera: • Enter the UID number (below the QR code on the back of the monitor) in the UID input field. -
Page 18: Operating The App
8.1.2 Operating the APP While the live image is displayed, you can use the icons at the bottom of the display to access the following functions: - Access to the snapshots / photos (which you have triggered with the app). - Take a snapshot. -
Page 19: Iphone / Ipad (Ios)
8.2 iPhone / iPad (iOS) 8.2.1 Add Camera Start DeluxeCam and tap the icon. 1. There are two ways to add the camera: Tap Add to Enter the UID number (below the QR code on the back of the monitor) in the UID input field. -
Page 20: Operating The App
8.2.2 Operating the APP While the live image is displayed, you can use the icons at the bottom of the display to access the following functions: - Access to the snapshots / photos (which you have triggered with the app). - Take a snapshot. -
Page 21: Maintenance
9. Maintenance • Clean the housing surfaces with a soft, fluff−free cloth. • Never use cleaning agents or solvents. 10. Technical Data Monitor Screen size 7" LCD Screen Resolution 1024(H)×600(V) Video input 4x1008p\4x720p Video Video format Audio output Built-in speaker Audio Audio format Two-way audio... - Page 22 Operating temperature 0° C-- 40° C Operating humidity 10%--90% 191.5 x 130.5 x 32.5mm Size ≤500g Weight Camera Resolution 2MP 1920x 1080 1/2.9” CMOS sensor Sensor Minimum illumination 0.02Lux @(F2.1,AGC ON) , 0 Lux with IR Lens & Angle 2.8mm Horizontal view angle:100° , Diagonal 118° Camera Day &...
-
Page 23: Important Safety Instructions
11. Important Safety Instructions This manual contains important information about this product’s operation. If you • are installing this product for others, you must leave this manual or a copy with the end user. • Prevent excessive exposure to smoke, dust, vibration, chemicals, moisture, heat and direct sunlight. -
Page 24: Not Recording
12.2 Not Recording Make sure motion recording feature is turned on. Motion recording on/off button on top of the monitor. When motion trigger recording is on, the pedestrian icon will appear on monitor. Check the color of the SD card icon (the top left one, the one you can use to play back). -
Page 25: Fcc Regulations
FCC Statement This equipment has been tested and found to comply with the limits for a Class B digital device, pursuant to part 15 of the FCC rules. These limits are designed to provide reasonable protection against harmful interference in a residential installation.
Need help?
Do you have a question about the CM794724 and is the answer not in the manual?
Questions and answers