
Related Manuals for Flexitron Mtx MTX-STARENERGY-M


Summary of Contents for Flexitron Mtx MTX-STARENERGY-M
- Page 1 #WeAreConnectivity SMART SOLUTIONS FOR A CHANGING WORLD MTX-STARENERGY-M SO FT WAR E MANUAL USER www.mtxm2m.com...
-
Page 2: Table Of Contents
INDEX GENERAL NOTES ........................4 IMPORTANT INFORMATION ....................4 SERVICE AND SUPPORT ......................4 INTRODUCTION ........................5 SOFTWARE ..........................6 1. Configuration Step by Step ........................6 1.1 Minimum Requirements ......................6 1.2 USB driver installation .........................6 2. Configuration .............................9 2.1 WAN ..............................9 2.1.1 WAN: Status ........................9 2.1.2 WAN: Basic Settings .......................10 2.1.3 WAN: Keep Online ......................12... - Page 3 2.5.11 Other: Tacacs+ ......................28 2.5.12 Other: Firmware Upgrade .....................29 3. AT Commands ............................30 ANNEX 1: CONNECTION QUICK GUIDE ................32 1. Connectors/indicators ..........................32 2. Start Up ..............................33 3. Accesories ..............................34 ANNEX 2: CONFIGURATION EXAMPLES ................35 Example Scenario 1.1: Configuration to access an IEC60870-5-102 electric meter through IP connection and GSM data call (CSD).
-
Page 4: General Notes
GENERAL NOTES Product is deemed accepted by recipient and is provided without interface to recipient’s products. The documentation and/or product are provided for testing, evaluation, integration and information purposes. The documentation and/or products are provided on an “as is” basis only and may contain deficiencies or inadequacies. -
Page 5: Introduction
INTRODUCTION The MTX-StarEnergy-M modem/router is a device belonging to the Titan router family. It has been specially designed to be used in remote reading scenarios for energy meters. We support all users of our MTX modems and routers when they need it with free, fast-response and efficient technical support. -
Page 6: Software
SOFTWARE 1. Configuration Step by Step The configuration of the MTX-StarEnergy-M is done through a web environment. The MTX-StarEnergy-M uses its USB port to create a network connection through which it has access to said web configuration environment. 1.1 Minimum Requirements •... - Page 7 2. Check if you are using a 32-bit or 64-bit system. To do this, go to Windows start menu and type directly “System Information”, and a window like the following will appear: 3. Unzip the file “2_quectel_ecm_drivers_v1.02.0505.zip”. Run ecm_driver_setup.exe for 64 or 32 bits depending on your system and select option “1”...
- Page 8 7. Open a browser and access the MTX-StarEnergy-M configuration web interface at http://192.168.1.2. The default user is “admin” and the password is “admin” In Annex II of this manual you will find a step-by-step example of how to configure the MTX-StarEnergy-M for remote access to an Energy meter through IP communications and CSD calls.
-
Page 9: Configuration
2. Configuration 2.1 WAN The WAN section refers to everything related to the MTX-StarEnergy-M 2G/3G/4G configurations, from the connection status, network configuration parameters and connection supervision. 2.1.1 WAN: Status This screen shows the general status of the MTX-StarEnergy-M. • Firmware Version: firmware version •... -
Page 10: Wan: Basic Settings
2.1.2 WAN: Basic Settings This section is used to configure the parameters of the WAN connection (2G/3G/4G). You will need to know some information about your SIM card, such as the APN, the username and the password. Your provider must provide them to you. •... - Page 11 • Remote TCP Port: indicates the remote configuration TCP port. For example, if you specify 8080, the configuration URL will be http: //x.x.x.x: 8080 ADDITIONAL NOTES • Once the configuration is finished, press the “SAVE CONFIG” button to save the changes. Remember that you must restart the device for the new changes to take effect MTX-StarEnergy-M | 2020/10 MTX by ©...
-
Page 12: Wan: Keep Online
2.1.3 WAN: Keep Online From this screen you can configure a PING to ensure the connectivity of the MTX-StarEnergy-M. In case of PING failure three consecutive times, the 2G/3G/4G connection will restart. • Enabled: check the box to allow the MTX-StarEnergy-M to send a periodic PING to verify connectivity •... -
Page 13: Lan
2.2 LAN The “LAN” configuration section refers to the local network configuration part. 2.2.1 LAN: Basic Settings This section allows you to configure the basic network parameters of the network connection (emulated via the USB port). • Static IP: a static IP address will be assigned. Only option available on this device •... -
Page 14: Firewall
2.3 Firewall Section to configure security aspects of the MTX-StarEnergy-M related to IP connectivity. 2.3.1 Firewall: Authorized IPs This screen allows you to define, if you wish, up to 3 IP addresses authorized to make connections to/ from the WAN port (2G/3G/4G interface) for the different MTX-StarEnergy-M services. For example, if you specify an authorized IP address 90.166.108.200 (for example, your office), certain services will only be accessible from that IP address. -
Page 15: Serial Settings: Serial Portx
• PING: specifies whether to only respond to PING requests made from authorized IPs • Outgoing Connections: allows you to specify if from the MTX-StarEnergy-M it is possible to give Internet access to all IP addresses or only to authorized IP addresses ADDITIONAL NOTES •... - Page 16 • RTS Line: allows you to select whether the RTS line will be active as long as a socket is connected. By default Always on. RTS line is not usually used in metering applications • Socket timeout: specifies the time, in seconds, that must elapse to close an IP-RS232/485 gateway in the case of no traffic on it ADDITIONAL NOTES •...
-
Page 17: Other
2.5 Other 2.5.1 Other: AT Command From this section it is possible to send an AT command directly to the internal modem of the MTX- StarEnergy-M. For example, it can be interesting to check coverage, identify the surrounding telephone cells, etc. On the other hand, it is also possible to configure up to 5 special AT commands with which to configure the MTX-StarEnergy-M at startup time (that is, they are self-executing each time the device is started). -
Page 18: Other: Sms Control
2.5.2 Other: SMS Control This section allows you to configure the control of the MTX-StarEnergy-M by SMS. For example, you can configure so that the MTX-StarEnergy-M connects to 2G/3G/4G after receiving an SMS command, or make configuration changes/readings of status by SMS command, being able to specify the authorized telephone numbers for this. - Page 19 • AT header: write the header text for command SMS messages here. For example, if you write in this box “mtx”, when you send an AT command by SMS, let’s imagine the command AT + CSQ to know the general level of coverage, you would need to send an SMS message with the text “mtx AT + CSQ”...
-
Page 20: Other: Periodic Autoreset
2.5.3 Other: Periodic Autoreset From this section you can configure a scheduled autoreset. • Autoreset not enabled: activate the option if you do not want the device to reset automatically • Autoreset every X hours: activate the option if you want the device to autoreset every certain number of hours. -
Page 21: Other: Time Server (Ntp)
2.5.4 Other: Time Server (NTP) The MTX-StarEnergy-M has a real-time clock inside that allows it to keep the time even after power loss. Periodically, this internal clock needs to be synchronized with time servers through the NTP protocol if you want to keep the device on time. •... -
Page 22: Other: Remote Console (Tcp Server)
2.5.5 Other: Remote Console (TCP Server) If at any time you need to perform a special remote operation on the MTX-StarEnergy-M, you can also do it through a “Telnet or SSH type” connection, you can do it by configuring this section. That is, with this special connection you can, by sending AT commands through a telnet-type connection, make a device configuration change, reset it, etc. -
Page 23: Other: Passwords
2.5.6 Other: Passwords It is possible to set three users to access the MTX-StarEnergy-M configuration, each with a level of privileges. From the “admin” user you will have access to all the MTX-StarEnergy-M configuration, the “user” user will have access to the configurations that are selected from the admin user for this, and the “guest”... -
Page 24: Other: User Permissions
2.5.7 Other: User Permissions From this section the user “admin” can configure the permissions to which the user “user” and “guest” will have access. The configuration options that you do not select will not appear in the menu on the left of the configuration environment when you log into the MTX-StarEnergy-M with the username “user”... -
Page 25: Other: Backup/Factory
2.5.8 Other: Backup/Factory You can perform a full backup of the MTX-StarEnergy-M configuration from this menu. You can save the configuration to a file and write it back to the device when you need it. It also allows you to configure the MTX-StarEnergy-M with the factory settings. -
Page 26: Other: Snmp
2.5.9 Other: SNMP The MTX-StarEnergy-M device allows to execute SET and GET operations through SNMP protocol from standard SNMP applications. • Enabled: select if you want to enable the SNMP service of the MTX-StarEnergy-M • SNMP Version: can be selected between SNMPv2c and SNMP v3 •... -
Page 27: Other: Https
• Auth Protocol: protocol for authentication (MD5 or SHA) • Priv Protocol: encryption protocol (DES, AES128, AES192, AES256) • Traps – UDP Port: allows you to specify the port for SNMP TRAPS • Traps – IP: IP address for sending SNMP TRAPS •... -
Page 28: Other: Tacacs
ADDITIONAL NOTES • Once the configuration is finished, press the “SAVE CONFIG” button to save the changes. Remember that you must restart the device for the new changes to take effect • When you try to connect to MTX-StarEnergy-M via HTTPS your browser will probably show you a warning message regarding the self-signed digital certificate. -
Page 29: Other: Firmware Upgrade
• Keep in mind that the MTX-StarEnergy-M will allow you to use the username and password assigned to the user “admin” locally, so that if the route does not have internet connectivity (change of operator, etc.) it has an option to enter the team. Therefore keep the local password of the user “admin”... -
Page 30: At Commands
3. AT Commands The MTX-StarEnergy-M firmware allows you to send AT commands directly to the internal modem (QUECTEL) through multiple interfaces: 1. By SMS 2. Via Telnet/SSH (remote console) 3. Using webserver 4. Via SNMP Therefore, at your own risk, you can send AT commands to the MTX-StarEnergy-M. The accepted AT commands are those indicated in the QUECTEL module AT command manual plus some additional ones listed below: AT^MTXTUNNEL=REBOOT... - Page 31 AT^MTXTUNNEL=GETTIME Action: returns the current time Example: AT^MTXTUNNEL=GETTIME AT^MTXTUNNEL=GETTIME 21/05/2016 10:56:52 AT^MTXTUNNEL=GETPARAM,paramName Action: allows reading the value of the MTX-StarEnergy-M configuration parameters. For example, you can check the APN field you have configured, the speed of the serial port, etc.) via AT commands.
-
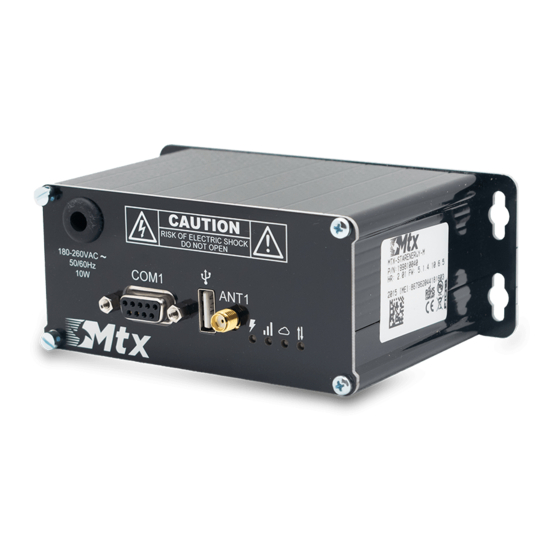
Page 32: Annex 1: Connection Quick Guide
ANNEX 1: CONNECTION QUICK GUIDE 1. Connectors/indicators STATUS Power Power LED: lights up when the equipment is properly powered. (orange) Network LED: it lights up when the equipment gets the IP address from LTE signal/IP the operator. Solid blue when coverage is good, flashing blue when (blue) coverage is poor. -
Page 33: Start Up
SIGNAL LEVEL RS232 RS232 RS232 RS485 RS485 RS485 RS485 2. Start Up Step 1 To power the device, the front must first be removed, unscrewing the 4 corner screws. Then, pass the power cables through the grommet located in the upper left corner of the front. And connect the cables to the female terminal, supplied with the equipment. -
Page 34: Accesories
The device connects directly to the mobile phone network assigned to it by the IP indicated on the side label. Afterwards, the team waits for the Iberdrola platform to initiate communication. Confirm the correct operation of the equipment indicated by the status of the LEDs on the front (see table above). Step 3 The device is supplied without a SIM card. -
Page 35: Annex 2: Configuration Examples
ANNEX 2: CONFIGURATION EXAMPLES Example Scenario 1.1: Configuration to access an IEC60870-5-102 electric meter through IP connection and GSM data call (CSD). Details of the example scenario: There is an electrical meter with the IEC60870-5-102 protocol which is intended to be read periodically remotely through a modem. - Page 36 Step 1. Access the configuration environment To access the MTX-StarEnergy-M configuration, you must have the corresponding USB drivers installed as detailed in the “SOFTWARE” section of this manual. Once the steps have been followed, it is possible to access the MTX-StarEnergy-M configuration through a browser, by detecting it through the url http://192.168.1.2 The default username and password is “admin”, “admin ”.
- Page 37 Step 2. Configuring the WAN section The next step is the WAN configuration, adjusting it to the parameters of the SIM card to be used. To do this, go to the “WAN> Basic Settings” section of the side menu. As the following image shows, there are several main sections to fill out.
- Page 38 Step 3. Serial port configuration In this section the parameters related to the serial port will be configured and that must correspond to those of the meter to which it will be connected. To do this, access the section “Serial Settings > Serial Port1-232/485”...
- Page 39 Step 4. SMS access configuration To configure the MTX-StarEnergy-M to have access by SMS for configuration changes, remote resets, etc., go to the configuration section “OTHER > SMS control”. In this section we activate the “AT” box that will allow the sending of AT commands by SMS. The “AT header”...
- Page 40 Step 5. Autoreset configuration every 24h Although it is not necessary, it is typical for many users who use modems in telemetry scenarios, to schedule a daily reset every 24 hours to completely restart the terminal. The MTX-StarEnergy-M also has that option.
- Page 41 Step 6. Restarting the MTX-StarEnergy-M Once all the necessary options have been configured, simply restart the MTX-StarEnergy-M. This can be done from the Other > Reboot menu and pressing the “REBOOT” button. Step 7. Testing the configuration Once rebooted, after about 30-40 seconds, it is possible to check that the device has obtained an IP from the configuration menu from the “Wan >...
Need help?
Do you have a question about the Mtx MTX-STARENERGY-M and is the answer not in the manual?
Questions and answers