Table of Contents
Advertisement
Quick Links
Advertisement
Table of Contents

Summary of Contents for PPS RTAP2U
- Page 1 RTAP2U GNSS Receiver User Guide Version 1.1.0 Last Revised September 2, 2021 All materials contained in this document are protected by the copyright law and may not be reproduced in any form without prior written permission from PP-Solution Inc.
-
Page 2: Table Of Contents
Contents 1. Overview ················································································································· 3 1.1 Receiver Overview ····································································································· 3 1.2 Receiver Features ······································································································ 4 2. Receiver Operation ······························································································· 6 2.1 Powering On and Off ······························································································· 6 2.2 Setting Up Connectivity ···························································································· 6 2.3 Receiving RTCM Messages ·················································································· 13 2.4 Checking Performance ···························································································· 16 2.4.1 Positioning Mode ····························································································... -
Page 3: Overview
The receiver is controllable with a mobile device and a desktop through a user-friendly web interface “RTAP2U Viewer”. It does not require an app download, and is designed for both the general public and professionals. -
Page 4: Receiver Features
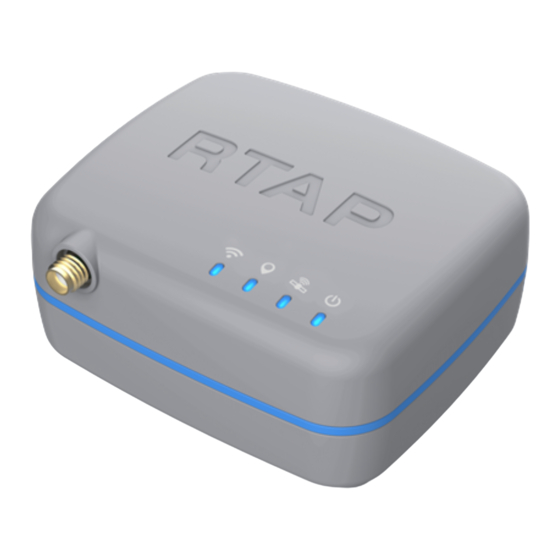
1.2 Receiver Features RTAP2U has an antenna connector for GNSS antennas in the front. The power button is located on the back side, and UBX , NMEA data are receivable through the USB port. Power GNSS Antenna Connector Four LEDs are visible on the top and provide Wi-Fi, Positioning, GPS, and Power status. - Page 5 The physical dimension of RTAP2U is 80.00 × 68.81 × 36.00 mm as described in the image below. RTAP2U received the KC certification (Registration of Broadcasting and Communication Equipments) and the Japan MIC (Requirement for wireless radio communication devices) certification.
-
Page 6: Receiver Operation
2. Receiver Operation 2.1 Powering On and Off Users can turn on RTAP2U by pressing the power button on the back side. The LED indicator changes by each step as described in the table below. When the device is completely booted, the Power LED (... - Page 7 Establish connection with an external Wi-Fi network ③ The following steps (1) through (6) illustrates how to access the RTAP2U Viewer, connect to the external Wi-Fi network, and receive RTCM messages. ※ This document is based on firmware (v1.1.0_kernel.fw), made in September, 2021.
- Page 8 <Mobile Device> When connecting to the network by a mobile device, follow the three steps below. The receiver connects to your mobile hotspot for the external network. Also note that the images may differ depending on the user’s mobile device type, operating system, and settings.
- Page 9 Type in the below User ID and Password in the RTAP2U Viewer login window. Then click SIGN IN. User ID: root • Password: rtap2u • (4) Check the connection status with RTAP2U RTAP2U connection status is visible on the bar at the top left of RTAP2U Viewer.
- Page 10 (5) Connect to the external network (Station mode) The Station mode should be set up through RTAP2U Viewer to connect to an external network. ① Click Config on the bottom bar and select WI-FI on the top bar. ② Enter the Wi-Fi name (SSID) and password (Security Key), and then click SUBMIT.
- Page 11 ③ Click CONFIRM on the Warning window to proceed with the changes. ④ A green notice “Submission was successful.” will pop up on the top right of RTAP2U Viewer. (6) Check the external network (Internet) connection status...
- Page 12 Click Info on the RTAP2U Viewer bottom bar and select DEVICE on the top bar. If the Station IP wlan0 under General Info is 0.0.0.0, it indicates that the external network is not connected. The network is connected if a valid IP address is visible as the above image.
-
Page 13: Receiving Rtcm Messages
(1) Enter server information for correction messages <Using NTRIP> ① Click Config on the RTAP2U Viewer bottom bar and select RTCM on the top bar. ② Tap on NTRIP as the Connection Type. ③ Enter your NTRIP server information in the NTRIP Server Setting section. - Page 14 <Using TCP/IP> Click Config on the RTAP2U Viewer bottom bar and select RTCM on the top bar. ① Tap on TCP/IP as the Connection Type. ② Enter your TCP/IP server information in the TCP/IP Setting section. ③ Information to fill out are as the following: ...
- Page 15 ⑤ A green notice “Submission was successful.” will pop up on the top right of RTAP2U Viewer. (2) Check the positioning status The LEDs indicate the receiver’s positioning status according to the correction data received. Positioning Standalone DGPS RTK-Float RTK-Fix...
-
Page 16: Checking Performance
2.4 Checking Performance Quality of the real-time and high-precision positioning by RTAP2U is visible on the device LED and on the RTAP2U Viewer. The RTAP2U Viewer provides the satellite signal status, positioning mode, accuracy, and map view in a user-friendly interface. - Page 17 Geoidal Height: meter Velocity 2D: km/h DOPs: Dilution of Precision (PDOP, HDOP, VDOP) Local time: hh:mm:ss Receiver date: yyyy-mm-dd Users can confirm the positioning mode on the top right part of the RTAP2U ③ Viewer bar.
-
Page 18: Accuracy
The comparison is visible through a graph and numerical data on DEVIATION PLOT in the RTAP2U Viewer. ① Click Info on the RTAP2U Viewer bottom bar and select DEVIATION PLOT on the top bar. ② Choose the Input Type of the Reference Position. Click ENTER and type in the coordinate needed to calculate the accuracy. -
Page 19: Satellite Tracking
RTAP2U Viewer. ① Click Info on the RTAP2U Viewer bottom bar and select SATELLITE on the top bar. ② Information available in the first table is as the following. - Page 20 ③ Information available in the second table is as the following. PRN: Satellite identification code EL: Satellite elevation angle (degree) AZ: Satellite azimuth angle (degree) SNR: Signal to noise ratio (dB) Status: Satellite tracking status...
- Page 21 ④ Click Skyplot on the RTAP2U Viewer bottom bar ⑤ Users can observe the skyplot with the RTAP2U’s location as the center point. Select the check box to choose GNSS constellations to display.
-
Page 22: Map
2.4.4 Map Click Map on the RTAP2U Viewer bottom bar to see the user location, which is based on the receiver’s precise coordinate. Note that this is available only when the Internet is connected. -
Page 23: Managing Log Files
2.5.1 STOP and GO logging ① Click Log on the RTAP2U Viewer bottom bar and select STOP & GO on the top bar. ② Real-time logging is visible in the NMEA panel. Click CLEAR to remove logs in the NMEA panel and FREEZE to pause logging. -
Page 24: Saving Log Files
2.5.2 Saving Log Files ① Click Log on the RTAP2U Viewer bottom bar and select SYSTEM LOG on the top bar. ② Choose the log file format between NMEA and UBX in Message Types. ③ Select the Log Interval and enter the File Prefix to set the logging period and file name. -
Page 26: Updating Firmware
RTAP2U’s latest firmware is available on the PP-Solution Inc. website. Users can easily download the firmware file and update the receiver. The firmware includes updates on the device and RTAP2U Viewer functions so it is highly recommended for the receiver’s best performance. The following steps (1) through (4) illustrate how to download the firmware and update the receiver. - Page 27 (3) Upload the firmware ① Click Config on the RTAP2U Viewer bottom bar and select SYSTEM on the top bar. ② Click UPLOAD FIRMWARE and choose the latest firmware file. This may take up to three minutes depending on the network environment.
-
Page 28: Specifications
3. Specifications General Power DC 5V 1A Size 80 mm × 69 mm × 36 mm Weight 160 g Operating Temp. -20 °C ~ 55 °C Ingress Protection IP 54 GNSS Receiver Specifications 184 Channels ㆍ GPS L1 C/A, L2C ㆍ... -
Page 29: Service
4. Service 4.1 Customer Service Please contact your dealer to receive technical support and service. If you need to obtain information regarding your dealer’s contact, reach out to PP-Solution Inc. at the following address: Website: www.ppsoln.com Telephone: +82-2-6925-1516 ... - Page 30 This exterior label can use wording such as the following: “Contains Transmitter Module FCC ID: 2A4BV-RTAP2U Or Contains FCC ID: 2A4BV-RTAP2U When the module is installed inside another device, the user manual of the host must contain below warning statements;...
- Page 31 606 Seobusaet-gil #B-2311, Seoul, South Korea 08504 Phone: +82-2-6925-1516 Fax: +82-2-6455-4305 Copyright PP-Solution Inc. All rights reserved. ⓒ...
Need help?
Do you have a question about the RTAP2U and is the answer not in the manual?
Questions and answers