
Summary of Contents for JC LAB BIMC-A03A-W2
- Page 1 ® I N T E R N A T I O N A L Ver.3.2.5 Digital wi-fi eyepiece BIMC-A03A-W2 OPERATION MANUAL JC LAB Microscope - JAPAN www.jc-lab.jp info@jc-lab.jp...
- Page 2 INDEX 1.0 Copyright Page 1 - 3 2.0 Wi-Fi Eyepiece at a Glance Page 4 - 6 3.0 Introduction Page 7 4.0 Unpacking and Assembly Page 7 5.0 Installation of JC CAM Software for Windows PC Page 8 - 10 6.0 Installation of JC CAM Software for Android/IOS Page 11 - 12 7.0 Connection of JC CAM for Windows PC...
-
Page 3: Eu Declaration Of Conformity
© 2012 by JC LAB Corporation. All rights reserved. Under the copyright law, this manual cannot be reproduced in any form without the prior written permission of JC LAB. No patent liability is assumed, with respect to the use of the information contained herein. -
Page 4: Information For Wireless Devices
Because Wireless products operate within the guidelines found in radio frequency safety standards and recommendations, JC LAB believes Wireless products is safe for use by consumers. These standards and recommendations reflect the consensus of scientific community and result from deliberations of panels and committees of scientists who continually review and interpret the extensive research literature. -
Page 5: Canada - Industry Canada (Ic)
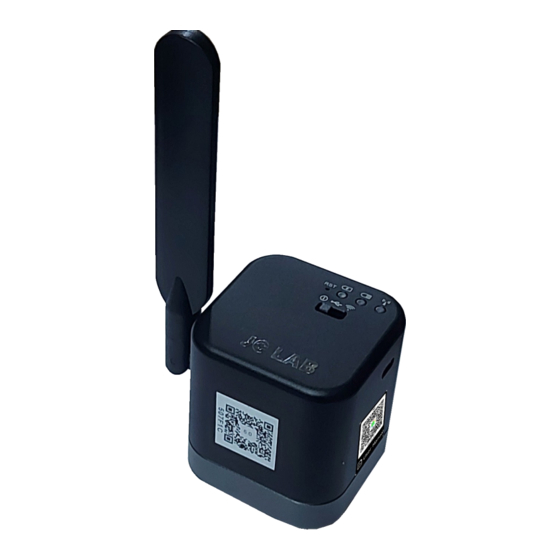
JC LAB Support If you require any additional help your devices or if you are having problems operating devices, you may need to contact JC LAB for additional technical assistance. Before you call Some problem you experience may be related to software, apps or the operating system so it is importance that you investigate other sources of assistance first. - Page 6 2.0 Wi-Fi Eyepiece at a Glance 2.1 Wi-Fi Eyepiece at a Glance 1 2 3 4 ① Wi-Fi signal reset button hole Short press: press 1-3 seconds to switch Wi-Fi signals (2.4G to 5G) Long press: more than 10 seconds, restore the default Settings. ②...
- Page 7 2.0 Wi-Fi Eyepiece at a Glance ④ Wi-Fi lamp The Wi-Fi indicator is on when in wireless working mode, When the output signal is 2.4G Wi-Fi, the Wi-Fi indicator is green. When the output signal is 5G Wi-Fi, the Wi-Fi indicator is blue. Note: the default Wi-Fi output signal is 5G Wi-Fi.
- Page 8 2.0 Wi-Fi Eyepiece at a Glance 2.2 Accessory Adapter Ring and Eyepiece: Wi-Fi Digital Camera can be equipped into microscopes of different calibers through adapter ring and eyepiece. The Camera eyepiece body is of Standard C Port; 0.5X eyepiece is of 23.2mm;...
-
Page 9: Unpacking And Assembly
It is built to high optical and mechanical standards and to withstand daily classroom and laboratory use. JC LAB reminds you that this manual contains important information on safety and maintenance, and that it must therefore be made accessible to the instrument users. - Page 10 5.0 Installation of JC CAM Software for Windows PC 5.1 Put the appendant disc into the DVD driver of your computer, Double click the file “JC Cam for Window Install.exe ” under the disk catalogue. When the following window pops up, please select the installation guide language and press the button“ ”.
- Page 11 5.0 Installation of JC CAM Software for Windows PC 5.4 When following window appears, select the shortcut you need, and then click the button“ ”. 5.5 Confirm information like “the target location” of software installation. After confirmation, please click the button“ ”.
- Page 12 5.0 Installation of JC CAM Software for Windows PC 5.7 An installation progress bar will appear during the software installation procedure. When the following window appears, the software has been installed successfully. Then click the button “ ” to complete the installation.After closing the window, check the icon “...
- Page 13 6.0 Installation of JC CAM Software for Android/IOS We have Two App for you to choose which one suitable. UCAM PLUS Installation 6.1 Go to google play store or apple app store search “ucam plus” scan the QR code (Android Device) (IOS Device) 6.2 Click install “ucam plus”...
- Page 14 KoPa WiFi Lab app is JC LAB new developing app. It contain many annotation tools for you do in the app. Not only for direct show image, photo capture and video recording. It also can measurement, drawing and Labelling in preview mode.
- Page 15 7.0 Connection JC CAM for Windows PC We have two connection method for you to choose which one suitable. USB Mode 7.1 Connect the Type-C port of the USB cable to the USB port of the computer. (if desktop computer, suggest you insert to USB port (back side of computer). 7.2 Turn the Wi-Fi Digital Camera work mode switch to USB work mode.
- Page 16 7.0 Connection JC CAM for Windows PC Wi-Fi Mode 7.6 Please switch the hardware switch of Wi-Fi camera to Wi-Fi working state in advance Switch to Wi-Fi work mode 7.7 Connect your computer to the Wi-Fi camera, please confirm that your computer has a wireless network in advance.
- Page 17 8.0 Connection UCAM Plus/KoPa Edu for IOS/Android We have Two App for you to choose which one suitable. Ucam plus 8.1 Ensure you app is installed. Go to Setting of you android phone/tablet or IOS iphone/ipad. (Android Device) (IOS Device) 8.2 Go to Wi-Fi selection page and search for Wi-Fi name (WiFiCamera_5G_xxxx)in the network connection.
- Page 18 8.0 Connection UCAM Plus/KoPa Edu for IOS/Android KOPA WIFI LAB 8.4 Ensure you app is installed. Go to Setting of you android phone/tablet or IOS iphone/ipad. (Android Device) (IOS Device) 8.5 Go to Wi-Fi selection page and search for Wi-Fi name (WiFiCamera_5G_xxxx)in the network connection.
- Page 19 9.0 JC CAM Software Instruction 9.1 JC CAM Software Operation Interface and Instruction 9.2 Manu panel Page 18 - 19 9.3 Shortcut toolbar Page 20 - 22 9.4 Working mode Page 23 - 24 9.5 Camera control Page 25 - 27 9.6 Measuring tool Page 28 - 29 9.7 Drawing tool...
- Page 20 9.0 JC CAM Software Instruction 9.2 Manu Panel The menu Functions are as follows: ★Depth-of-field fusion and image stitching are only available for specific models of products. If there is no display of these functions on the software, it means that the product does not have these two functions.
- Page 21 9.0 JC CAM Software Instruction The depth-of-field fusion function is to snapshot at least two images and extract the clearest areas of each to fuse into a new image. (The operation interface is shown below) The image stitching function is to snapshot at least two images and find the overlapping areas to stitch the images into a new image.
- Page 22 9.0 JC CAM Software Instruction 9.3 Shortcut Toolbar Page 20...
- Page 23 9.0 JC CAM Software Instruction Page 21...
- Page 24 9.0 JC CAM Software Instruction Page 22...
- Page 25 9.0 JC CAM Software Instruction 9.4 Working mode Microscope type options: Please select your microscope type for better image display. Light source options: According to the actual situation, select the corresponding light source to get better image display effect ★The above functions are only available for specific models. If there is no display, it means the product does not have this function.
- Page 26 9.0 JC CAM Software Instruction Preview options: You can select any of the preview resolutions in this drop-down box to preview as you wish. Note: the higher the preview resolution, the lower the frame rate. When you preview at 1280×720 or 1920×1080, save only 1280×720 and 1920×1080.
- Page 27 9.0 JC CAM Software Instruction 9.5 Camera control According to your needs, you can adjust the corresponding parameters to achieve the desired preview and image effect. As shown in the figure: Manually drag to change the overall brightness of Brightness the screen.
- Page 28 9.0 JC CAM Software Instruction Drag to adjust the exposure parameters of the Manual device according to the use of the environment. exposure: This parameter is adjusted on the basis of automatic exposure. This parameter is only valid if the "automatic exposure" option is not checked. Select an area as the reference for exposure.
- Page 29 9.0 JC CAM Software Instruction Select an area as the reference for the white Areal white balance. balance: Perform a white balance. Single white balance: Manually drag the screen to change the contrast Contrast between light and dark, often used in conjunction adjustment with brightness adjustment for best results.
- Page 30 9.0 JC CAM Software Instruction 9.6 Measuring tool Calibration function and measurement function can accurately measure in editing area. Note: calibration is the first step for accurate measurement. Page 28...
- Page 31 9.0 JC CAM Software Instruction Page 29...
- Page 32 9.0 JC CAM Software Instruction 9.7 Drawing Tools According to the requirements, draw in the editing screen, as shown in the figure: Page 30...
- Page 33 9.0 JC CAM Software Instruction 9.8 Annotation Tools Page 31...
- Page 34 9.0 JC CAM Software Instruction 9.9 Eraser Erase the "object" in preview screen, as shown in the figure: Image Filters ★ Image Filters only available for static images Operate the image in the editing area according to the requirements, as shown in the figure: Page 32...
- Page 35 9.0 JC CAM Software Instruction 9.10 Calibration and Measurement Step 1: Acquire benchmark image. Place a scale ruler in the filed of view. Please use the same conditions (i.e. same objective lens, same camera resolution) as the target observation objects. If a magnification reduction lens is used to measure the target observation objects, then a magnification reduction is also needed to measure the scale bar.
- Page 36 9.0 JC CAM Software Instruction Step 3: Setting scale ruler. Draw a straight line on the scale ruler of benchmark image, pixel value will be automatically updated at "pixel length" on calibration table. Shown as below figure : When drawing the straight line, the longer scale length, the more accurate results. For example, 10 scale lengths accuracy will be better than 1 scale length.
- Page 37 9.0 JC CAM Software Instruction Step 5: click "Add" to save to the calibration table. Page 35...
- Page 38 9.0 JC CAM Software Instruction Step 7: Export the measurement results. Click in the display bar on the right to export the data to Word or Excel. Enter the file name and path, and click "save". As shown in the figures below: Page 36...
- Page 39 9.0 JC CAM Software Instruction 9.11 Thumbnail display area General status Right click the mouse on the thumbnail Page 37...
- Page 40 9.0 JC CAM Software Instruction Page 38...
- Page 41 9.0 JC CAM Software Instruction Page 39...
- Page 42 10.0 Ucam Plus Apps Instruction Ucam Plus Version 4.0 (Android / IOS) (A) Perview Page 41 - 43 (B) Parameter Setup Page 44 (C) File Page 44 (D) Help Page 44 Page 40...
- Page 43 10.0 Ucam Plus Apps Instruction (A) Preview: Click to enter Wi-Fi camera image preview interface Preview screen is as follows: Touch the screen to display the function menu. Touch again to hide the function menu. Back Icon: Return to the previous page. Exposure Reduction Icon: Reduces exposure when the preview screen is too bright or when viewing a darker screen.
- Page 44 10.0 Ucam Plus Apps Instruction Exposure Intensification Icon: Intensifies exposure. Requires manual exposure mode. Zoom Out Icon: Zoom out is divided into 6 degrees with 1 degree minimum. Zoom In Icon: Zoom is divided into 6 degrees. Available for lower resolutions only: 640 x 480, 800 x 600, 1024 x 768, 1280 x 720.
- Page 45 10.0 Ucam Plus Apps Instruction Saturation: Adjusts the image saturation. Sharpness: Adjust the image sharpness. When over adjusted, it will increase the noise ratio. Auto White Balance: Auto white balance when checked. Hue: Adjusts the hue. Gain: Adjusts the gain. Gamma: Adjust the gamma.
- Page 46 10.0 Ucam Plus Apps Instruction (B) Parameter Setup: Set parameters relevant to camera Not available in this model (C) File: Image and video file browsing Go to the main menu and select to see your photos and videos. (D) Help: Reference for solve problems In the main menu, click help button to check App instruction manual, App version and firmware version...
- Page 47 11.0 KoPa WiFi Lab Apps Instruction KoPa WiFi Lab (Android / IOS) (A) Preview (B) Parameter Setup (C) File (D) Help (E) User Instructions (top right corner) Page 45...
- Page 48 11.0 KoPa WiFi Lab Apps Instruction (A) Parameter: Click here to enter the image preview window. Page 46...
- Page 49 11.0 KoPa WiFi Lab Apps Instruction Page 47...
- Page 50 11.0 KoPa WiFi Lab Apps Instruction (B) File Folder: View photo/video files. Page 48...
- Page 51 11.0 KoPa WiFi Lab Apps Instruction Page 49...
- Page 52 11.0 KoPa WiFi Lab Apps Instruction Page 50...
-
Page 53: Cautions And Notes
12.0 Cautions and Notes 12.1 Caution and Notes - To avoid danger or damage incurred to the lens, do not touch the lens or sensor directly with your fingers. - To avoid failure or electric shock hazard and so on, do not disassemble or modify the internal structure of the device. -
Page 54: Software System Requirements
13.0 Software System Requirements 13.1 System Requirements under USB Work Mode Windows 7 (64 bits) / Windows 8 (64 bits) / Windows 8.1 (64 bits) / Windows 10 (64 bits) ● Dual core 3 GHz or higher CPU ● USB 2.0 high-speed interface or USB2.0 compatible interface ●... - Page 55 14.0 Electrics Universal Power: 220 V, 50/60 Hz, DC 5V 2A 15.0 Recycling and Recovery Art.13 Dlsg 25 july 005 N°151. “According to directives 2002/95/EC, 2002/95/ EC and 2003/108/EC relating to the reduction in the use of hazardous substances in electrical and electronic equipment and waste disposal.” The basket symbol on equipment or on its box indicates that the product at the end of its useful life should be collected separately from other waste.
- Page 56 Management System in order to consolidate and improve the Company image, also through the commitment and professionalism of all Company staff. JC LAB Microscope - JAPAN www.jc-lab.jp info@jc-lab.jp v 1.0.0 - JC LAB reserves the right to make corrections, modifications, enhancements, improvements and other changes to its products at any time without notice.
Need help?
Do you have a question about the BIMC-A03A-W2 and is the answer not in the manual?
Questions and answers