
Summary of Contents for HAUSSLER HM 70
- Page 1 Operating instructions Grain mill HM 70 Translation of the original operating instructions...
-
Page 2: Table Of Contents
Inhalt 1 Welcome ......................4 2 For your safety ....................5 List of symbols ......................5 Intended use ......................5 Basic rules ........................ 5 Safety instructions ....................5 Signs and warnings ....................6 3 Product overview ....................8 Product description ....................8 Technical data ...................... - Page 3 13 Commissioning ....................42 Setting up the device ..................... 42 Cleaning the device for the first time ..............45 Connecting the device ................... 45 14 Sifting ......................46 Switching on the machine ..................46 Switching off the equipment ................. 47 Function diagram ....................48 Manual shutdown of the sifting device when the grain mill is running ....
-
Page 4: Welcome
1 Welcome ..to our world of milling, kneading, baking, and pasta making! Häussler stands for doing it yourself. Our devices will give you fabulous delicacies which will treat your taste buds to a truly unique experience. Lose yourself in our world of milling, kneading, baking, grilling, and pasta making. -
Page 5: For Your Safety
For your safety 2 For your safety List of symbols Description of symbol ⚠ Hazard symbol Call to action Notice Bullets Tab. 1:List of symbols Intended use Milling of various types of grain including: wheat, spelt, rye, Khorasan wheat, amelcorn, small spelt, barley, corn, rice, milo, buckwheat (including husks). -
Page 6: Signs And Warnings
For your safety ⚠ Pulling in and severing of limbs by rotating parts Do not leave the device unattended when in operation. Keep the device out of the reach of children younger than 14 years and always supervise children. ... - Page 7 For your safety The series of photographs below shows where the necessary ANSI safety stickers are attached to the machine. “Crush hazard” “Burn hazard” Position: mill, on drive belt cover, to Position: mill, on motor, at front, on right of motor. lower cover, center.
-
Page 8: Product Overview
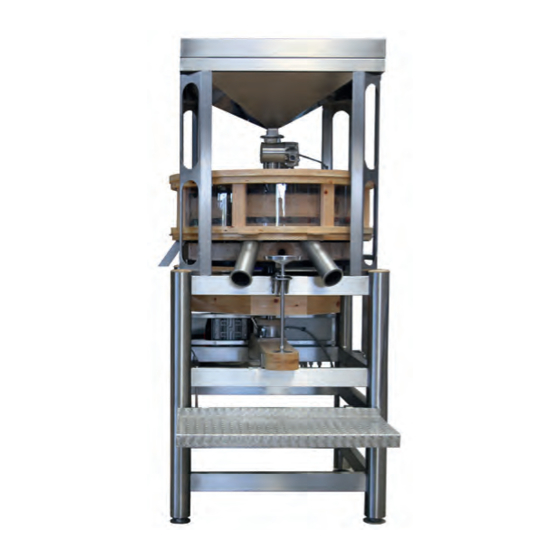
Product overview 3 Product overview Product description The HM 70 is manufactured from a combination of stainless steel and wood. As well as looking good, this design has significant advantages: Thanks to the self-supporting tubular frame construction and the relatively low weight, the carrier structure is extremely stable and torsion-free. -
Page 9: Technical Data
Product overview Technical data Name Value Width 133 cm Height 197 cm Depth 103 cm Weight 1150,6 kg Motor output 5,5 kW Power supply 480 V 60 Hz Stone revolutions/min Funnel content approx. 108 kg Stone diameter 70 cm Output fine wholegrain, approx. 70 kg/h Tab. -
Page 10: Scope Of Supply
Scope of supply 4 Scope of supply Designation Designation Designation Funnel Slider for sack Outfeed for sifting filling device Rotary air lock Adjusting wheel Slider for sifting device Wooden cover Outfeed for sack Perspex ring filling Millstone Tubular frame Tab. 3: Scope of supply... -
Page 11: Setting Up The Device
Scope of supply Setting up the device ⚠ CAUTION Risk of crushing when setting up the mill Injuries to limbs The device is heavy; take care during transport. Prior to lifting, check that the weight can be borne safely. ... -
Page 12: Milling
Milling 5 Milling ⚠ WARNING Risk to life from flour dust explosion Burns, serious injuries, death. Material damage to machine and building Avoid flour dust turbulence. There must be no ignition sources in the hazardous area. The entire mill and its surroundings must be cleaned at regular intervals to remove flour and dust. -
Page 13: Hm 100 Control Panel
Milling ⚠ CAUTION Risk of injury due to heavy weight Damage to the motor system due to heavy weight When carrying loads, check that the weight can be borne safely. Adopt the correct ergonomic posture when filling the mill. ... -
Page 14: Hm 100 Adjusting Wheel
Fixing bolts Adjusting wheel Pointer for fineness Tab. 5: HM 70 adjusting wheel In the event of faults and/or imminent danger, press the “EMERGENCY OFF switch” Toactivate the “EMERGENCY OFF switch”, A press it in. To deactivate the “EMERGENCY OFF switch” A , turn the “EMERGENCY OFF switch”... -
Page 15: Switching On The Machine
Milling Switching on the machine The names of the parts are listed in Tab. 3 on page 10, Tab. 4 on page 13, and Tab. 5 on page 14. Before switching on the machine, turn the adjusting wheel to move the millstone 6 up. -
Page 16: Maximum/Optimum Fineness
Milling Maximum/optimum fineness Once the grain to be milled has been fed in and the adjusting wheel 6 has been set to “Fine”, the top millstone is supported by the grain. Maximum/optimum mil- ling fineness is recognizable because the adjusting wheel 6 can be moved to this setting easily, with a little play. -
Page 17: Functional Diagram
Milling Functional diagram The switch-on and shutdown cycles are illustrated in the schematic functional dia- gram below. Switch-on sequence Shutdown sequence... -
Page 18: Cleaning
Cleaning 6 Cleaning ⚠ WARNING Danger to life from mains voltage 480 V / 60 Hz Electric shock Disconnect the device from the power supply. The device can be cleaned with a damp cloth only. ⚠ CAUTION Danger of crushing by rotating parts Injuries to limbs ... -
Page 19: Cleaning The Millstones
Cleaning There should be virtually no traces of grain or flour between the stones after run- ning empty. In this case, cleaning is not necessary. However, if you do need to clean the millstones to resolve a fault, follow the instructions under “Cleaning millsto- nes”. - Page 20 Cleaning Removing the runner stone Set the adjusting wheel Release Set the adjusting wheel to “Fine” until Turn the connecting bolts one revolution the wheel has some play. to release. Unscrew fully Hammer strike Fully unscrew the connecting bolt once ...
-
Page 21: Maintenance
Maintenance 7 Maintenance ⚠ WARNING Danger to life from mains voltage 480 V / 60 Hz Electric shock Always disconnect the device from the power supply before commencing maintenance work. Only qualified specialist personnel are permitted to carry out maintenance work on electric components. -
Page 22: Checking And Setting The Tension Of The Drive Belt
Maintenance Checking and setting the tension of the drive belt Check the tension of the drive belt after the first 5 hours of operation. Retension the belt if necessary. Check the drive belt after every 50 hours of operation. You need a Phillips screwdriver to remove and assemble the cover. -
Page 23: Troubleshooting
Troubleshooting 8 Troubleshooting In the event of a fault, the machine will automatically switch itself off according to a predefined shutdown sequence (metering device, mill, sifting device) and the “Error RESET” button flashes. Unload the mill by setting the adjusting wheel 6 to “Coarse”. ... - Page 24 Troubleshooting Fault Cause Solution Motor or millstone Very hard grain, e.g., Switch off the mill. jammed corn Set the adjusting wheel to “Coarse”. Switch the mill back on. With the mill running, slowly set the required fineness.
- Page 25 Troubleshooting Fault Cause Solution Mould in the mill Ambient air or grain is Switch off the mill. too moist Dismantle the mill as de- scribed in the “Cleaning” chapter. Lift off the millstone. Wipe the moisture from the affected parts with vinegar water.
-
Page 26: Disposal
Disposal 9 Disposal Used equipment contains valuable materials that can be recycled and put back into circulation. Therefore, you should suitable collection systems to dispose of used equipment. -
Page 27: For Specialist Personnel: Circuit Diagrams And Parts Lists
For specialist personnel: Circuit diagrams and parts lists 10 For specialist personnel: Circuit diagrams and parts lists ⚠ WARNING The following pages are intended for trained technical personnel only! Do not undertake work on the equipment without seeking assistance. Take the operating instructions with you to your specialist dealer. - Page 28 For specialist personnel: Circuit diagrams and parts lists...
- Page 29 For specialist personnel: Circuit diagrams and parts lists...
- Page 30 For specialist personnel: Circuit diagrams and parts lists...
- Page 31 For specialist personnel: Circuit diagrams and parts lists...
- Page 32 For specialist personnel: Circuit diagrams and parts lists...
- Page 33 For specialist personnel: Circuit diagrams and parts lists...
- Page 34 For specialist personnel: Circuit diagrams and parts lists...
- Page 35 For specialist personnel: Circuit diagrams and parts lists...
-
Page 36: Parts List
For specialist personnel: Circuit diagrams and parts lists Parts list... - Page 37 For specialist personnel: Circuit diagrams and parts lists Item no. Name Funnel Wooden cover acrylic glass Adjusting wheel Platform with steps Pointer for fineness Mill frame Sack tray Large flour box Base frame Medium flour box Medium flour box Small flour box Flour sifting device Electric control box Motor...
-
Page 38: Accessories
Accessories 11 Accessories Sifting device The flour sifting device separates freshly milled wholegrain flour into 3 sections (various fine flours, semolina and bran) depending on the sifting method selected. The flour sifting device can be connected at any time. Weight without boxes: 176 kg Weight with boxes: approx. - Page 39 Accessories Base frame The base frame provides a safe and secure means of raising the mill for operation with the sifting device. Weight: approx. 74 kg Product ref.: 303355 Empty detector You can use the empty detector to monitor the fill level of the funnel.
-
Page 40: Sifting Device
Sifting device 12 Sifting device Product description The flour sifting device separates freshly milled wholegrain flour into 3 sections (various fine flours, semolina and bran) depending on the sifting method selected. The flour sifting device can be connected at any time. -
Page 41: Technical Data
Sifting device Technical data Name Value Width 1920 mm Height 670 mm Depth 800 mm Weight without boxes approx. 180 kg Weight with boxes approx. 218 kg Motor output 6.6 kW Power supply 480 V / 60 Hz Max. capacity Large flour box approx. -
Page 42: Commissioning
Commissioning 13 Commissioning Designation Designation Designation Flour infeed frame Medium flour box 1 Safety door Flour chamber Medium flour box 2 Sifting ele- with sifting device ment Large flour box Small flour box Housing Tab. 8: Scope of supply A list of the mill parts appears in Tab. 3 S10. Setting up the device ⚠... - Page 43 Commissioning to raise the mill. Use suitable lifting gear, e.g., a crane or lift truck, for assembly. Ensure that the load is sufficiently secured to prevent crashing down. Work in twos when lifting attachments. Platform Base frame Lift the platform for assembly on the ...
- Page 44 Commissioning Left-hand steps Rail Use the two bolts and washers supplied Use the four bolts and washers supplied to screw the left-hand steps to the to screw the rail to the mounts. mount. Right-hand steps Align the steps ...
-
Page 45: Cleaning The Device For The First Time
Commissioning Sifting device assembly Position the sifting device so that the “Outfeed for sifting device” (mill) and “Mill infeed” (sifting device) openings are located one above the other. Slide the flour infeed frame back over the sifting device and screw the frame tight. -
Page 46: Sifting
Sifting 14 Sifting ⚠ WARNING Risk to life from flour dust explosion Burns, serious injuries, death; material damage to machine and building Avoid flour dust turbulence. There must be no ignition sources in the hazardous area. The entire mill and its surroundings must be cleaned at regular intervals to remove flour and dust. -
Page 47: Switching Off The Equipment
Sifting Then switch on the sifting device. Press the “Mill ON/OFF” switch E . Wait for the machine to reach full speed.The controller prevents metering from being activated so that the millstones are not blocked by grain when the motor starts up. -
Page 48: Function Diagram
Sifting Function diagram The switch-on and shutdown cycles are illustrated in the schematic functional dia- gram below. Switch-on sequence Shutdown sequence... -
Page 49: Manual Shutdown Of The Sifting Device When The Grain Mill Is Running
Sifting Manual shutdown of the sifting device when the grain mill is running Open the slider for sack filling 5 on the grain mill. Close the slider for the sifting device 10 . Allow the sifting device to run until the sifting element is empty. The sifting process takes approx. -
Page 50: Cleaning
Cleaning 15 Cleaning ⚠ WARNING Risk to life from flour dust explosion Burns, serious injuries, death; material damage to machine and building Avoid flour dust turbulence. There must be no ignition sources in the hazardous area. The entire mill and its surroundings must be cleaned at regular intervals to remove flour and dust. -
Page 51: Maintenance
Maintenance 16 Maintenance ⚠ WARNING Danger to life from mains voltage Electric shock Always disconnect the device from the power supply before commencing maintenance work. Only qualified specialist personnel are permitted to carry out maintenance work on electric components. ⚠... -
Page 52: Replacing The Sifting Elements
Maintenance Check the tension of the drive belt Take hold of a drive belt with one hand and turn it through 90 degrees. To turn the drive belt through more than 90 degrees, you must retighten the drive belt. Tension the drive belt ... -
Page 53: Troubleshooting
Troubleshooting 17 Troubleshooting Thus far, we are not aware of any faults affecting the sifting device. Should further problems occur, please call our service team on the following num- ber: +49 73 71/93 77-13... -
Page 54: Disposal
Disposal 18 Disposal Used equipment contains valuable materials that can be recycled and put back into circulation. Therefore, you should suitable collection systems to dispose of used devices. -
Page 55: Accessories
Accessories 19 Accessories Sifting elements Sifting elements with mesh of varying lengths. -
Page 56: Ec Declaration Of Conformity
EC Declaration of Conformity 20 EC Declaration of Conformity... -
Page 57: Warranty
Warranty 21 Warranty Your device is supplied with a 12-month factory warranty commencing on the date of invoice. The device has been built by Karl-Heinz Häussler GmbH in accordance with the state of the art. All of the devices that leave our factory are made from high-quality materials and have undergone thorough checks. -
Page 58: For Your Notes
Visit our Baking Village... At HÄUSSLER, we have been focusing on enjoyable do-it-yourself for over 35 years. A family business with more than 90 employees, we are based in Heiligkreuztal in the Upper Swabia region of Germany. This is where we manufacture our products, such as our wood burning ovens, ourselves. - Page 59 Our service to you Information about nearby tourist attractions and overnight accommodation Comfortable consulting spaces Children's play area Visitor toilets with baby-changing facilities Seating areas Shipping service On-site service for your equipment at our premises We can also offer you ...
- Page 60 Karl-Heinz Häussler GmbH Nussbaumweg 1 88499 Heiligkreuztal, Germany Phone +49 73 71/93 77-0 Fax + 49 73 71/93 77-40 e-mail: info@backdorf.de Publication date: January 17, 2017...
Need help?
Do you have a question about the HM 70 and is the answer not in the manual?
Questions and answers