Table of Contents
Advertisement
Advertisement
Table of Contents

Related Manuals for signia miniPocket

Summary of Contents for signia miniPocket
- Page 1 User Guide...
-
Page 2: Table Of Contents
Content Your remote control Components Key lock Pairing hearing instruments Function overview Further information Cleaning Replacing the battery Troubleshooting ... - Page 3 Service Adjusting the signal strength Important safety information Personal safety Product safety Important information Intended use Symbols Operating, transport, and storage conditions Disposal information Conformance information Country-specific information ...
-
Page 4: Your Remote Control
Your remote control miniPocket is a remote control for hearing instruments. It works with our specific hearing instruments. Your Hearing Care Professional will advise you on the compatible models. CAUTION Read this user guide thoroughly and completely and follow the safety information in this document to avoid damage or injury. ... -
Page 5: Components
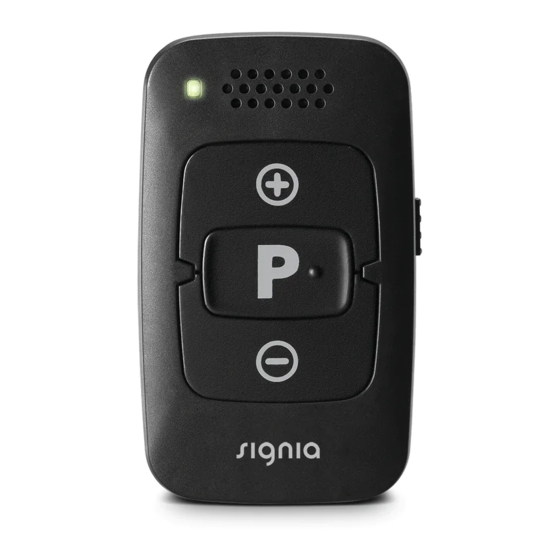
➊ Components ➊ Status LED ➍ ➋ Volume buttons ➋ ➌ Keyring ➎ ➍ Key lock switch ➌ ➎ Program change button ➏ Battery door remover tool ➏... -
Page 6: Key Lock
Key lock To prevent any accidental operation while the remote control is in a pocket or bag, move the key lock switch to the lock position (red color visible). When the key lock is active, all buttons on the remote control are disabled. -
Page 7: Pairing Hearing Instruments
Pairing hearing instruments Your hearing instruments need to be paired with your remote control. After that, the pairing is saved in the hearing instruments and remembered each time they are turned on. Lock the remote control (red color visible). First turn the hearing instruments off: Open the battery compartments. If your hearing instruments do not have a battery compartment, turn them off as described in the hearing instruments' user guide. Then turn the hearing instruments on: Close the battery compartments. If your hearing ... - Page 8 instruments do not have a battery compartment, turn them on as described in the hearing instruments' user guide. The hearing instruments are now in pairing mode. You have 3 minutes to complete the pairing. Follow the steps below. Insert the hearing instruments into your ears. Hold down the button on the remote control while switching the key lock to the unlock position (green color visible). Release the button. The remote control is now in setup mode, the LED will be...
- Page 9 While the remote control is in setup mode, do not press . This would change other settings. Hold down the button until the pairing confirmation sound is played in the hearing instruments. It takes approximately 2 seconds for the sound to start playing. Ensure that the confirmation sound is heard in both hearing instruments. When heard, the pairing will be complete.
- Page 10 The remote control will remain in setup mode for an additional 30 seconds. The confirmation sound can be played again by pressing during these 30 seconds. To exit the setup mode of the remote control, wait 30 seconds or move the key lock switch to the lock position (red color visible). When pairing is finished, the remote control is ready for use. Ensure that it is unlocked (green color visible). If the hearing instruments could not be paired, refer to "Troubleshooting" section.
-
Page 11: Function Overview
Function overview Function Description Volume Press once to adjust the volume one level at a time. Or, press and hold until desired volume is reached. Hearing short press program ➧ Switches to the next hearing program. Turn on/off long press (2 seconds) (standby) ➧ Turns your hearing instruments on or off. ... - Page 12 Function Description Reset long press (2 seconds) ➧ Switches to hearing program 1 and sets the default volume level. ...
-
Page 13: Further Information
Further information Cleaning NOTICE Do not put your remote control in water! Do not clean your remote control with alcohol or benzine. Clean the remote control as necessary with a dry or slightly damp soft cloth. Use only distilled water to dampen the cloth. Avoid any cleaning agents. -
Page 14: Replacing The Battery
Replacing the battery The remote control uses a CR 2450 button cell battery. Aim the point of the tool to the keyhole above the battery ➊ compartment cover Press the tool vertically into the hole and at the same time slide the battery compartment cover in the direction of Note: Please use the ... - Page 15 Insert the battery with the "+" symbol facing up: Slide it under the holder, then push it down.
- Page 16 Attach the cover by sliding it onto the remote control. To Close; slide the battery compartment cover in and a ‘click’ sound will be heard when the child lock is properly ➌ engaged. ...
-
Page 17: Troubleshooting
The pairing status is remembered by the remote control when replacing the battery. There is no need to pair the hearing instruments again after battery replacement. Troubleshooting If the device does not work: ● Ensure that the battery is inserted correctly. Refer to section "Replacing the battery". ● Ensure that the keys are not locked. Refer to section "Key lock". ● Ensure that there is nothing between the hearing instruments and the remote control. - Page 18 ● Increase the signal strength. Refer to section "Adjusting the signal strength". ● Pair the hearing instruments again. Refer to section "Pairing hearing instruments". ● Ask your Hearing Care Professional if this remote control is compatible with your hearing instruments. If the hearing instruments cannot be paired: ● Increase the signal strength. Refer to section "Adjusting the signal strength". ● Pair the hearing instruments again. Refer to section "Pairing hearing instruments".
-
Page 19: Service
If the LED is no longer activating: ● Ensure that the keys are not locked. Refer to section "Key lock". ● The battery may be low. Replace the empty battery. Consult your Hearing Care Professional if you encounter further problems. Service If you have technical problems with the device, consult your Hearing Care Professional for service purposes. Do not service or maintain the device while in use. -
Page 20: Adjusting The Signal Strength
Adjusting the signal strength The remote control works by emitting a high‑frequency audio signal. This signal may be heard by those under 30 years old. Two signal strength levels of the control signal are available. By default, the remote control uses the strongest setting to ensure a reliable connection with your hearing instruments. A lower signal strength can be chosen if the control signal disturbs others. Be aware that this can affect the reliability of the connection. To adjust the signal strength: Lock the remote control (red color visible). Hold down the button on the remote control while switch‑ ing the key lock to the unlock position (green color visible). - Page 21 Release the button. The remote control is now in setup mode, the LED will be on and the signal strength can now be changed. To switch to the lowest signal strength, press until the LED flashes slowly. To switch to the strongest signal strength, press until the LED flashes quickly. To exit the setup mode of the remote control, wait 30 seconds or move the key lock switch to lock position ...
-
Page 22: Important Safety Information
Important safety information Personal safety WARNING Choking hazard! Your device contains small parts which can be swallowed. Keep hearing instruments, batteries and accessories out of reach of children and mentally disabled persons. If parts have been swallowed consult a physician or hospital immediately. - Page 23 WARNING Risk of injury! Do not use obviously damaged devices and return them to point of sale. WARNING Note that any unauthorized changes to the product may cause damage to the product or cause injury. Use only approved parts and accessories. Ask your Hearing Care Professional for support.
-
Page 24: Product Safety
WARNING Risk of explosion! Do not use your remote control in explosive atmospheres (e. g. in mining areas). Product safety NOTICE Protect your devices from extreme heat. Do not expose them to direct sunlight. NOTICE Protect your devices from high humidity. - Page 25 NOTICE Do not dry your devices in the microwave oven. NOTICE Different types of strong radiation, e. g. during X-ray or MRI head examinations, may damage devices. Do not use the devices during these or similar procedures. Weaker radiation, e. g. from radio equipment or airport security, does not damage the devices.
- Page 26 NOTICE Your remote control is programmed to exclusively communicate with your hearing instruments. If you experience problems with another person's remote control, consult your Hearing Care Professional.
-
Page 27: Important Information
Important information Intended use The remote control is intended to operate hearing instruments. Use the remote control only as described in this user guide. This device is not intended for use and operation by children under the age of 12 years or persons with a developmental age of under 12 years. -
Page 28: Symbols
Symbols Symbols used in this document Points out a situation that could lead to serious, moderate, or minor injuries. Indicates possible property damage. Advice and tips on how to handle your device better. - Page 29 Symbols on device or packaging Read and follow the instructions in the user guide. CE compliance label, confirms compliance with certain European Directives. Refer to section "Conformance information". Do not dispose of the device with household waste. Refer to section "Disposal information".
-
Page 30: Operating, Transport, And Storage Conditions
Operating, transport, and storage conditions Operating conditions Temperature 0 to 45 °C Relative humidity 5 to 93 % During extended periods of transport and storage, please observe the following conditions: Storage Transport Temperature 10 to 40 °C -20 to 60 °C Relative humidity 10 to 80 % 5 to 90 % For other parts, such as batteries, other conditions may apply. -
Page 31: Disposal Information
Disposal information Within the European Union, the marked equipment is covered by "Directive 2002/96/EC of the European Parliament and of the Council of 27 January 2003 on waste electrical and electronic equipment." Amended by "Directive 2003/108/EC" (WEEE). NOTICE Recycle hearing instruments, accessories and packaging according to national regulations. -
Page 32: Conformance Information
NOTICE To avoid environmental pollution, do not throw batteries into household trash. Recycle or dispose of batteries according to national regulations or return them to your Hearing Care Professional. Conformance information The CE mark indicates conformity with the following European directives: 93/42/EEC concerning medical devices and 2011/65/EU RoHS concerning the restriction of hazardous substances. -
Page 33: Country-Specific Information
Country-specific information Important information: Australia and New Zealand If battery is swallowed contact the Poisons Information Hotline on 13 11 26 for Australia and 0800 764 766 for New Zealand. For other countries, please contact the local Poisons Information Hotline. - Page 36 Legal Manufacturer WSAUD A/S Nymøllevej 6, 3540 Lynge Denmark Document No. 02984-99T03-7600 EN Order/Item No. 109 407 19 Master Rev04, 10.2020 © 01.2021, WSAUD A/S. All rights reserved www.signia.net...
Need help?
Do you have a question about the miniPocket and is the answer not in the manual?
Questions and answers
how to reset minipocket (remove pairing with hearing aid) in order to set it up with another hearing aid