Advertisement
Quick Links
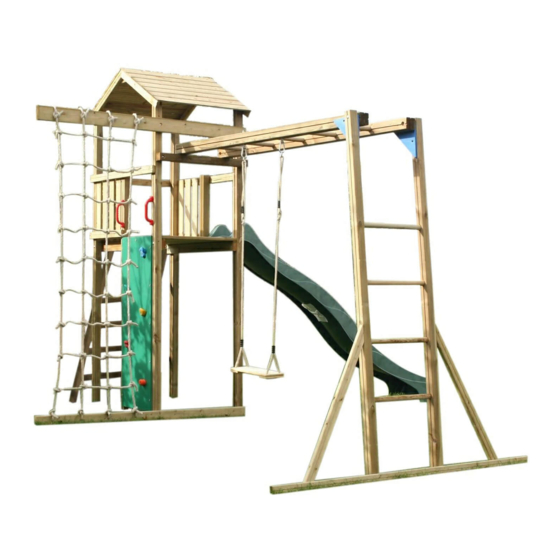
Technical Information:
Number of people required for assembly: 2 to include a good handyman
Guide time for assembly: approx 6-8 hours for the full unit
The Monmouth Monkey needs 3 bags of instant mix concrete (post-Crete) or similar allowing 1/2
bag per hole. (available from most hardware shops or builders merchants)
NOTE: USE THE DRILL BIT PROVIDED TO PRE-DRILL ALL THE SCREW HOLES TO AVOID SPLITTING THE
TIMBER. You may want to use a countersink drill bit to give the screw holes a superior finish
Your climbing frame can be stored outside until you are ready to assemble the unit, we recommend
storing it near the place you are looking to build it.
To allow trapped moisture to evaporate cut back the shrink wrap packaging but be careful not to
lose any parts. Slight cracks may appear in the wood at any time after delivery, this is due to the
natural working of the wood and is normal. If moisture is trapped under the plastic you will
sometimes find mould spots present, this will wipe away and have no long term effects.
Contents:
1) Construct the Tower
2) Attach the Commando Net
3) Attach the Climbing Wall
4) Attach the Slide
5) Attach the Monkey Bars
6) Attach the Swing Seat
NB: Cracking will not affect the tower's structural stability. Surfaces of the wood have been planed
but you may find small splinters around drill holes which can easily be sanded away.
Packs Required:
JE2152/1
JE2152/2
JE2152/3
JE2153
JE2154
JE2515
JE2805
JE2806
(boxed)
Advertisement

Related Manuals for Action MONMOUTH MONKEY

Summary of Contents for Action MONMOUTH MONKEY
- Page 1 Number of people required for assembly: 2 to include a good handyman Guide time for assembly: approx 6-8 hours for the full unit The Monmouth Monkey needs 3 bags of instant mix concrete (post-Crete) or similar allowing 1/2 bag per hole. (available from most hardware shops or builders merchants) NOTE: USE THE DRILL BIT PROVIDED TO PRE-DRILL ALL THE SCREW HOLES TO AVOID SPLITTING THE TIMBER.
- Page 2 Contents:...
- Page 3 Where to start: Firstly dig the holes for the tower: It is now time to dig the holes, for the uprights of your tower to stand in. Lay your platform base on the ground at your chosen position. Using a spirit level find the highest corner, this will be your first hole. If the difference in height between one side of the platform and the other is greater than 75mm you should level off the ground or consider putting your climbing frame in a more level place.
- Page 4 Building the Tower: Fix the floor (part D) to the corner uprights (part A) using bolts, washers and nuts (parts 1, 2 and 3). Then fix the additional uprights (parts B and C) in position again using bolts, washers and nuts (parts...
- Page 5 1, 2 ad 3. Building your tower is best accomplished lying on its side. Lay out the four uprights in pairs with their ends close to the holes you have prepared. Align the platform in the same direction as the slide will end up when you have finished, this then orients the uprights and their bolt-holes.
- Page 6 Attach the two outside left & right balustrade rails (part H) to the top rail (part E) and bottom rail (part G) first following the measurements in the diagram above. Use only one screw (4x40mm) at each end for now. Then check for squareness. To do this measure the diagonal distance from top left to bottom right of the outer balustrade rails.
- Page 7 Before attaching the balustrades you must decide on your final layout of the attachments. Then with the tower still lying on the ground, attach balustrades to the sides of the platform you want to close off using 5x60mm screws. Attach the further support rail Part F to line up with the balustrade support rails.
- Page 8 Attaching Commando Net:...
- Page 9 Attach the top rail (part A) to the two uprights of the tower (X), using 2 x m10x110mm bolts, washers and nuts. Tie the commando net to the top rail , making sure the gap between the top rung of the net and the rail is less than 90mm. Use a double knot on each rope to give extra strength. Now fit the bottom rail (part B) with 4x60mm screws.
- Page 11 Attaching the Slide: Attach the slide to the platform using 2 4x25mm screws. Attach the slide to the front of the platform with the platform flooring at right angles to the direction of the slide. Leave gaps of an equal distance either side of the slide between the slide and the tower uprights.
- Page 12 Attaching the Monkey Bars:...
-
Page 16: Maintenance
You should now have completed your Monmouth Monkey Climbing Frame. It is now time to check all screws and bolts to ensure they are fully tightened. Also check that all platforms are level and all posts are upright. Ensure the two towers line up with each other. Once you are fully happy with the above, it is time to concrete (Post-Crete) the uprights and the bottom of Monkey Bars.
Need help?
Do you have a question about the MONMOUTH MONKEY and is the answer not in the manual?
Questions and answers