
Summary of Contents for Hangzhou Aihua instrument AH58F
- Page 1 Mobile Dot Matrix Printer AH58F User Manual V1.00 Hangzhou Aihua instruments Co.,Ltd.
-
Page 2: Table Of Contents
CONTENT CONTENT ..............................2 PRECAUTIONS ............................3 1 OVERVIEW ............................. 5 2 FEATURES ............................. 5 3 SPECIFICATIONS ..........................5 3.1 Printing ................................5 3.2 Power Charging ..............................6 3.3 Connection ................................6 3.4 Physical Parameters ............................6 3.5 Environmental Parameters ..........................6 3.6 Other Features ..............................6 4 APPEARANCE ............................ -
Page 3: Precautions
Precautions Please read this manual carefully before using the printer. Safety Precautions Be sure to use the specified battery and power supply provided by our company. Otherwise it may cause fire, explosion or damage printer, meanwhile, the battery also may be damaged. - Page 4 The battery shall be charged upon it stored more than 3 months, otherwise it may be damaged by self-discharging. Statement This product is Class A. In a normal environment, this product may cause radio interference. In this case, users may be required to take practical measures against interference.
-
Page 5: Overview
1 Overview Mobile Dot Matrix Printer AH58F is newly designed with common use. Each line supports 40 characters. The AH58F has small size and light weight with good-looking appearance and in-built lithium battery. One time of charing can support the printer to work for a long time. -
Page 6: Power Charging
3.2 Power Charging DC12V/2A power adapter or 7.4V / 2000mAh Power rechargeable polymer lithium battery 3.3 Connection Connection RS232,USB, 4.0 Dual mode Bluetooth 3.4 Physical Parameters Dimension 120(L)×97(W)×49(H)mm 250g( Excluding paper and battery ) Weight ≤40mm Roll diameter 3.5 Environmental Parameters Operating 0℃~50℃... -
Page 7: Appearance
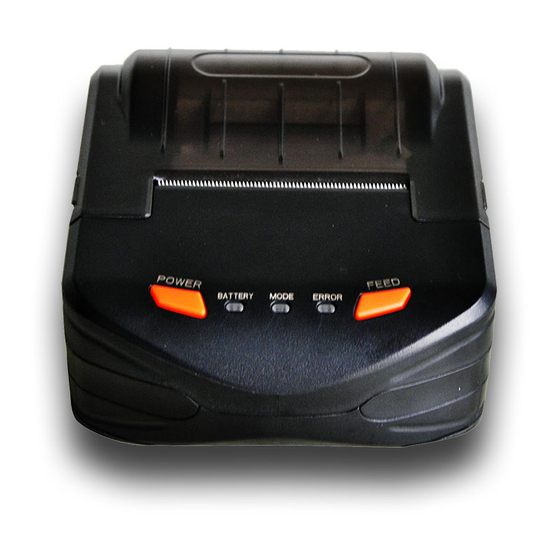
4 Appearance Paper Case RS232 connection Paper slot out Power port USB connection Feed button Error indicator Mode indicator Power button Power indicator 5 Preparation before Using Preparation 5.1.1 Battery Installation 1.Put the battery into the battery slot. 2.Cover with the battery case. 5.1.2 Paper Installation 1.Power on the printer. -
Page 8: Self -Test
Users need to check the battery installation and connection. 5.3 Interface Connection 5.3.1 USB Connection The USB socket for AH58F is the standard MICRO USB-B type, follow the USB printer class protocol. 5.3.2 Serial Connection AH58F serial interface is compatible with RS232C. Support RTS/CTS and XON/XOFF handshaking protocol, socket model is MICRO USB-B. -
Page 9: Bluetooth Connection
5.3.3 Bluetooth Connection The devices, such as hand-held device, laptop and other handheld data terminal with Bluetooth can drive AH58F to print by Bluetooth. AH58F is compatible with Bluetooth4.0 standard(4.0 includes BR/EDR and BLE). Power class is CLASS 2, effective communication distance is 10m. -
Page 10: Indicator And Buzzer Description
5. Finish pairing Note: a. When pairing, printer must be kept power on. b. When the Bluetooth of printer and host device are well-paired, printer Bluetooth will not be available for other host device connection till the printer Bluetooth disconnected from the paired host device c. - Page 11 flash 8 times: Temperature detecting circuit errors 【BATTERY】indicator: Power indicator has 3 colors, to indicate battery charge status Green: Full power Blue: Medium power Red: Low power Red light flash: low power, need to recharge right away 3 color off: power off or mis-installed battery. Printer has a buzzer which can give prompt message.
-
Page 12: Annex 1 Pre-Printed Black Mark Description
Annex 1 Pre-printed Black Mark Description If user want to position black mark printing, pls. follow the guidelines below otherwise it may cause the printer does not recognize the black mark. Pre-printed black mark specification: Print position: Black mark should be printed on the left or right edge of the paper, the same as the drawing above.
Need help?
Do you have a question about the AH58F and is the answer not in the manual?
Questions and answers