Table of Contents
Advertisement
This equipment has been tested and found to comply with the limits of a Class B digital device,
pursuant to Part 15 of the FCC Rules. These limits are designed to provide reasonable protection
against harmful interference in a residential installation. This equipment generates, uses, and can
radiate radio frequency energy and, if not installed and used in accordance with the instructions,
may cause harmful interference to radio communications. There is no guarantee that interference
will not occur in a particular installation.
The vendor makes no representations or warranties with respect to the contents here and
specially disclaims any implied warranties of merchantability or fitness for any purpose. Further
the vendor reserves the right to revise this publication and to make changes to the contents here
without obligation to notify any party beforehand.
Duplication of this publication, in part or in whole, is not allowed without first obtaining the
vendor's approval in writing.
The content of this user's manual is subject to be changed without notice and we will not be
responsible for any mistakes found in this user's manual. All the brand and product names are
trademarks of their respective companies.
FCC Information and Copyright
Dichiarazione di conformità sintetica
Ai sensi dell'art. 2 comma 3 del D.M. 275 del
30/10/2002
Si dichiara che questo prodotto è conforme
alle normative vigenti e soddisfa i requisiti
essenziali richiesti dalle direttive
2004/108/CE, 2006/95/CE e 1999/05/CE
quando ad esso applicabili
Short Declaration of conformity
We declare this product is complying with the
laws in force and meeting all the essential
requirements as specified by the directives
2004/108/CE, 2006/95/CE and 1999/05/CE
whenever these laws may be applied
Advertisement
Table of Contents

Related Manuals for Biostar B560M-SILVER


Summary of Contents for Biostar B560M-SILVER
-
Page 1: Fcc Information And Copyright
FCC Information and Copyright This equipment has been tested and found to comply with the limits of a Class B digital device, pursuant to Part 15 of the FCC Rules. These limits are designed to provide reasonable protection against harmful interference in a residential installation. This equipment generates, uses, and can radiate radio frequency energy and, if not installed and used in accordance with the instructions, may cause harmful interference to radio communications. -
Page 2: Table Of Contents
Table Of Contents FCC Information and Copyright ������������������������������������������������������������������������������� 1 Chapter 1: Introduction ������������������������������������������������������������������������������������������� 3 1.1 Before You Start ........................3 1.2 Package Checklist ........................ 3 1.3 Specifications ........................4 1.4 Rear Panel Connectors ......................6 1.5 Motherboard Layout ......................7 Chapter 2: Hardware installation �����������������������������������������������������������������������������... -
Page 3: Chapter 1: Introduction
B560M-SILVER Chapter 1: Introduction 1�1 Before You Start Thank you for choosing our product. Before you start installing the motherboard, please make sure you follow the instructions below: • Prepare a dry and stable working environment with sufficient lighting. • Always disconnect the computer from power outlet before operation. -
Page 4: Specifications
Support for 10th/ 11th Generation Intel® Core™ i9/ i7/ i5/ i3 processors and Intel® Pentium® processors/ CPU Support Intel® Celeron® processors in the LGA1200 package * Please refer to www.biostar.com.tw for CPU support list. Chipset Intel® B560 Supports Dual Channel DDR4 4000+(OC)/ 3866(OC)/ 3800(OC)/ 3733(OC)/ 3600(OC)/ 3200/ 2933/ 2800/ 2666/ 2400/ 2133 4x DDR4 DIMM Memory Slot, Max. - Page 5 * M.2 (E key) Wi-Fi card is not provided Form Factor uATX Form Factor, 244 mm x 244 mm Windows 10(64bit) OS Support * Biostar reserves the right to add or remove support for any OS with or without notice. Chapter 1: Introduction | 5...
-
Page 6: Rear Panel Connectors
1.4 Rear Panel Connectors Note » DP/ HDMI/ DVI-D ports only work with an Intel® integrated Graphics Processor. » Maximum resolution HDMI: 4096 x 2160 @60Hz, compliant with HDMI 2.0 (11th Gen CPU only) ; 4096 x 2160 @30Hz, (10th Gen CPU only) DP: 4096 x 2304 @60Hz DVI-D: 1920 x 1200 @60Hz » The mainboard supports three onboard display outputs at same time and the display output configuration can be selected in Intel graphics driver utility. » When using the front HD audio jack and plug in the headset / microphone , the rear sound will be automatically Disabled. » The WiFi antenna port allows you to connect to the E KEY module and use the WiFi & Bluetooth function. 6 | Chapter 1: Introduction... -
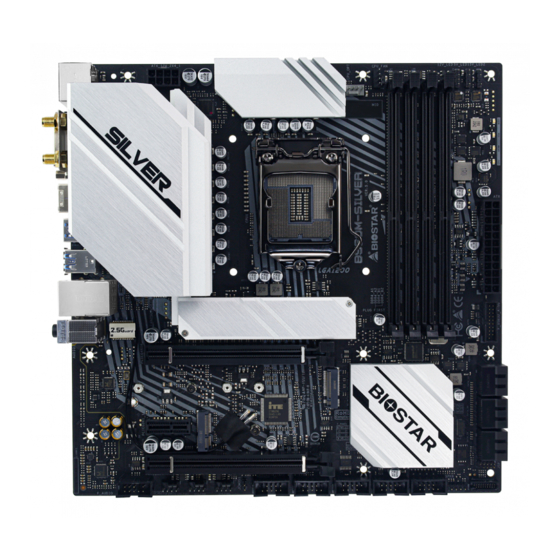
Page 7: Motherboard Layout
B560M-SILVER 1.5 Motherboard Layout Note » represents the 1st pin. Chapter 1: Introduction | 7... -
Page 8: Chapter 2: Hardware Installation
Chapter 2: Hardware installation 2.1 Install Central Processing Unit (CPU) Step 1: Locate the CPU socket on the motherboard Note » Remove pin cap before installation, and make good preservation for future use. When the CPU is removed, cover the pin cap on the empty socket to ensure pin legs won’t be damaged. » The motherboard might equip with two different types of pin cap. Please refer below instruction to remove the pin cap. Step 2: Pull the socket locking lever out from the socket and then raise the lever up. Step 3: Remove the Pin Cap. - Page 9 B560M-SILVER Step 4: Hold processor with your thumb and index fingers, oriented as shown. Align the notches with the socket. Lower the processor straight down without tilting or sliding the processor in the socket. Step 5: Hold the CPU down firmly, and then lower the lever to locked position to complete the installation.
-
Page 10: Install A Heatsink
2.2 Install a Heatsink Step 1: Place the CPU fan assembly on top of the installed CPU and make sure that the four fasteners match the motherboard holes. Orient the assembly and make the fan cable is closest to the CPU fan connector. Step 2: Press down two fasteners at one time in a diagonal sequence to secure the CPU fan assembly in place. -
Page 11: Connect Cooling Fans
B560M-SILVER 2.3 Connect Cooling Fans These fan headers support cooling-fans built in the computer. The fan cable and connector may be different according to the fan manufacturer. CPU_FAN/ CPU_OPT: CPU Fan Header Pin Assignment Ground +12V FAN RPM rate sense... - Page 12 Step 1: Unlock a DIMM slot by pressing the retaining clips outward. Align a DIMM on the slot such that the notch on the DIMM matches the break on the slot. Step 2: Insert the DIMM vertically and firmly into the slot until the retaining clips snap back in place and the DIMM is properly seated.
-
Page 13: Expansion Slots
B560M-SILVER 2.5 Expansion Slots PCIEG4X16: PCI-Express Gen4 x16 Slots (x16 mode) • PCI-Express 4.0 compliant. • The maximum bandwidth of the PCIe slot is 64GB/s. PCIEG3X4: PCI-Express Gen3 x16 Slots (x4 mode) • PCI-Express 3.0 compliant. • The maximum bandwidth of the PCIe slot is 8GB/s. - Page 14 HYBRID_WIFI6: M.2 (E Key) Socket (M.2 (E key) Wi-Fi card is not provided) • Support M.2 socket 2230 type module. • Supports WiFi/ Bluetooth module and Intel® CNVi (Integrated WiFi/ BT). Note » M.2 (M Key) Socket (M2_PCIEG4_64G_11TH_ONLY) support 11th Gen Rocket Lake-S CPU only. » When using SATA SSD module on M.2 slot (M2_PCIEG3_32G_SATA_RST_1), the SATA_6 connector will be disabled. M.2 Slot module sharing status table When M.2 Slot is installed with PCIe or SATA SSD mode interface, the usage status of SATA connector.
-
Page 15: Jumper & Switch Setting
B560M-SILVER Install an Expansion Card You can install your expansion card by following steps: • Read the related expansion card’s instruction document before install the expansion card into the computer. • Remove your computer’s chassis cover, screws and slot bracket from the computer. -
Page 16: Headers & Connectors
2.7 Headers & Connectors ATX: ATX Power Source Connector For better compatibility, we recommend to use a standard ATX 24-pin power supply for this connector. Make sure to find the correct orientation before plugging the connector. Assignment Assignment +3.3V +3.3V -12V +3.3V Ground... - Page 17 B560M-SILVER SPKR: Chassis Speaker Header Please connect the chassis speaker to this header. Pin Assignment Speaker TPM_SPI: Trusted Platform Module Header This header allows you to store cryptographic keys that protect information. Assignment Assignment Ground +3V3_DUAL TSPI_CLK TSPI_MISO TSPI_MISI TSPI_CS#...
- Page 18 F_USB32_A-5G: Header for USB 3.2 (Gen1) Ports at Front Panel This header allows user to add additional USB ports on the PC front panel, and also can be connected with a wide range of external peripherals. Assignment Assignment VBUS0 SSRX1- SSRX1+ Ground Ground...
- Page 19 B560M-SILVER F_AUDIO1: Front Panel Audio Header This header allows user to connect the chassis-mount front panel audio I/O which supports HD and AC’97 audio standards. HD Audio AC’97 Assignment Pin Assignment Mic Left in Mic In Ground Ground Mic Right in...
-
Page 20: Leds
5V_LED1/ 5V_LED2: Addressable RGB LED Device (WS2818B) Header This header providers 5V power and Data control pins for RGB LED Device (WS2818B). Pin Assignment VCC5 Data Note » Ensure proper pin connecting to your LED device, wrong connection may damage your LED device or motherboard. » The 12V_LED connector supports to 5050 RGB LED strips with the maximum power rating of 3A (12V). » The 5V_LED connector supports up to 300 LEDs WS2818B individually Addressable RGB LED strips with the maximum power rating of 3A (5V). » Please use the Vivid LED DJ software to control the LEDs. For detailed software setting information, refer to chapter 3.3 . -
Page 21: Chapter 3: Uefi Bios & Software
The BIOS can be updated using either of the following utilities: • BIOSTAR BIO-Flasher: Using this utility, the BIOS can be updated from a file on a hard disk, a USB drive (a flash drive or a USB hard drive), or a CD-ROM. - Page 22 6. Select the proper BIOS file, and a message asking if you are sure to flash the BIOS file. Click “Yes” to start updating BIOS. 7. A dialog pops out after BIOS flash is completed, asking you to restart the system. Press the <Y> key to restart system.
- Page 23 Then, the BIOS Update is completed. BIOS Update Utility (through a BIOS file) 1. Installing BIOS Update Utility from the DVD Driver. 2. Download the proper BIOS from http://www.biostar.com.tw/ 3. Launch BIOS Update Utility and click the “Update BIOS” button on the main screen.
- Page 24 5. Choose the location for your BIOS file in the system. Please select the proper BIOS file, and then click on “Open”. It will take several minutes, please be patient. 6. After the BIOS Update process is finished, click on “OK” to reboot the system. 7.
-
Page 25: Software
B560M-SILVER 3.3 Software Installing Software Insert the Setup DVD to the optical drive. The driver installation program would appear if the Auto-run function has been enabled. Select Software Installation, and then click on the respective software title. Follow the on-screen instructions to complete the installation. - Page 26 RACING GT EVO RACING GT EVO is an easy-to-use program that integrates several BIOSTAR utilities and allows users to configure these utilities simultaneously and seamlessly. Note » Menu contents of RACING GT EVO will be different slightly, depending on different motherboard of users’ computers. » When the software is installed or removed, restart your computer. System Information This System Information tab provides you an overview of the basic system information.
- Page 27 B560M-SILVER SmartEAR Smart EAR allows you to control system volume and adjust impedance setting (Low/High Gain) to optimize your headphone performance. You can easily enjoy high-quality and awesome sound. Requirements: 1. A chassis with front audio output jacks 2. An earphone or a headphone 3.
- Page 28 GT Touch GT Touch allows you to adjust Normal, ECO and Sport mode when running RACING GT EVO program in Windows environment. 1. Normal Mode: It balances energy consumption and system performance. 2. ECO Mode: It saves energy by slightly reducing system performance. 3.
- Page 29 B560M-SILVER Vivid LED DJ Vivid LED DJ can adjust your color scheme of ARMOR GEAR, RGB LED Device. 1. LED COMMANDER: Allows you to select the LED mode. • Default : Default LED illuminations. (Blue light) • RAZER : Allows you to connect to the RAZER app to sync the motherboard lights.
- Page 30 8. LED SPARKLE: Allows to you choose sparkle of the LEDs. • Permanent: LEDs are constantly lit. • Shine: LEDs flash at a specific frequency. • Breath: LEDs gradually flash on and off. • Shine & Music: LEDs will flash according the music played on your system. »...
- Page 31 B560M-SILVER A�I Fan A.I FAN utility smartly allows PC users to have more customizability of fan operating modes and automatically detects different temperatures to make fan operating at defined speed for optimal cooling performance. 1. Temperature: Shows the current CPU and system temperature.
- Page 32 H/W Monitor The HW Monitor tab allows you to monitor hardware voltage, fan speed, and temperature. 1. CPU Temperature/System Temperature: Shows the current CPU and system temperature. 2. Fan: Shows the current fans’ speed. 3. Voltage: Shows the current voltages of CPU and memory. 32 | Chapter 3: UEFI BIOS &...
- Page 33 B560M-SILVER OC/OV The OC/OV tab allows you to save or load the OC/OV setting profiles, change system frequency and voltage settings. 1. OC: Allows you to adjust overclocking profile values. 2. OV: Allows you to adjust voltage profile values. 3. Default: Restore defaults your changes.
- Page 34 About The About menu to display the Racing GT EVO Utility version information. 34 | Chapter 3: UEFI BIOS & Software...
-
Page 35: Chapter 4: Useful Help
B560M-SILVER Chapter 4: Useful help 4.1 Driver Installation After you installed your operating system, please insert the Fully Setup Driver DVD into your optical drive and install the driver for better system performance. You will see the following window after you insert the DVD The setup guide will auto detect your motherboard and operating system. -
Page 36: Ami Bios Beep Code
4.2 AMI BIOS Beep Code Boot Block Beep Codes Number of Beeps Description Continuing Memory sizing error or Memory module not found POST BIOS Beep Codes Number of Beeps Description Success booting. Display memory error (system video adapter) 4.3 AMI BIOS post code Code Description PEI Core is started Pre-memory CPU initialization is started... - Page 37 B560M-SILVER Code Description South Bridge DXE initialization is started South Bridge DXE SMM initialization is started South Bridge devices initialization South Bridge DXE Initialization (South Bridge module specific) ACPI module initialization Boot Device Selection (BDS) phase is started Driver connecting is started...
-
Page 38: Troubleshooting
4.4 Troubleshooting Probable Solution 1. There is no power in the system. Power LED does 1. Make sure power cable is securely plugged in. not shine; the fan of the power supply does not work 2. Replace cable. 2. Indicator light on keyboard does not shine. 3. -
Page 39: Intel® Optane™ Technology
B560M-SILVER 4.5 Intel® Optane™ Technology (powered by 3D XPoint memory) With Intel® Optane™ technology you can unleash the power of your processor instead of it working at a fraction of its power. Eliminating that bottleneck requires better storage memory that is fast, inexpensive, and non-volatile. Intel® Optane technology has the potential to revolutionize big data, high-performance computing, virtualization, storage, cloud, gaming, and many other applications. -
Page 40: Appendix I: Specifications In Other Languages
Pentium ﻣﻦ ﺍﻟﺠﻴﻞ ﺍﻟﻌﺎﺷﺮ / ﺍﻟﺤﺎﺩﻱ ﻋﺸﺮ ﻭﻣﻌﺎﻟﺠﺎﺕIntel Core™ i9/ i7/ i5/ i3 ﺩﻋﻢ ﻣﻌﺎﻟﺠﺎﺕ ﻗﺎﻋﺪﺓ ﻭﺣﺪﺓ ﺍﻟﻤﻌﺎﻟﺠﺔ LGA1200 ﻓﻲ ﺣﺰﻣﺔ ﺍﻟﻤﺮﻛﺰﻳﺔ ﻟﻘﺎﺋﻤﺔ ﺩﻋﻢ ﺍﻟﻤﻌﺎﻟﺞ www.biostar.com.tw * ﻳﺮﺟﻰ ﺍﻟﺮﺟﻮﻉ ﺇﻟﻰ ﺍﻟﻤﻮﻗﻊ ® Intel B560 ﻣﺠﻤﻮﻋﺔ ﺍﻟﺸﺮﺍﺋﺢ / 3200 /3600(OC) - Page 41 B560M-SILVER اﻟﻤﻮاﺻﻔﺎت (6.0Gb/s) SATA III ﺳﺎﺗﺎ وﺻﻠﺔ ® Intel CNVi و Bluetooth و Wi-Fi ﺗ � ���ﺪﻋﻢ 0322 وﺣﺪة Key E وﺻﻠﺔ آﻞ ﻣﻮزع ﻳﺘﺤﻤﻞ ﻓﺘﺤﺘﻴﻦ ﻧﺎﻗﻞ ﻣﺘﺴﻠﺴﻞ ﻋﺎم ﻧﺎﻗﻞ ﻣﺘﺴﻠﺴﻞ ﻋﺎم ﻣﻮزع (Gen1)3.2 آﻞ ﻣﻮزع ﻳﺘﺤﻤﻞ ﻓﺘﺤﺘﻴﻦ ﻧﺎﻗﻞ ﻣﺘﺴﻠﺴﻞ ﻋﺎم...
-
Page 42: German
Jedes DIMM unterstützt nicht-ECC 4/ 8/ 16/ 32 GB DDR4-Module Unterstützung für Intel® XMP-Speichermodule (Extreme Memory Profile) * Bitte konsultieren Sie www.biostar.com.tw für für Speicherunterstützung Liste. -- Total unterstützt 2x M.2-Sockel und 6x SATA III-Ports (6Gb/s) 6x SATA III-Verbindung (6Gb/s) : Unterstützt AHCI & Intel® Rapid Storage Technology 1x M.2 (M Key) Slot(M2_PCIEG4_64G_11TH_ONLY):... - Page 43 1x Header LED (12V) * M.2 (E Key) Wi-Fi-Karte wird nicht mitgeliefert Formfaktor uATX Formfaktor, 244 mm x 244 mm Windows 10(64bit) OS-Unterstützung Biostar reserves the right to add or remove support for any OS with or without notice German | 43...
-
Page 44: Spanish
Compatibilidad con el Pentium®/ procesadores Intel® Celeron® en el paquete LGA1200 procesador * Por favor consultar con www.biostar.com.tw para la lista de compatibilidad con el procesador. Tipo de Placa Intel® B560 Soporta DDR4 4000+(OC)/ 3866(OC)/ 3800(OC)/ 3733(OC)/ 3600(OC)/ 3200/ 2933/... - Page 45 * No se proporciona la tarjeta Wi-Fi M.2 (E Key) Factor de Forma Factor de Forma uATX, 244 mm x 244 mm Windows 10(64bit) Soporte OS Biostar reserva su derecho de añadir o retirar el soporte para cada OS con o sin notificación. German | 45...
-
Page 46: Thai
ซี พ ี ย ู / โปรเซสเซอร์ I ntel® Celeron® ในแพ็ ค เกจ LGA1200 * เข้ า ชมได้ ท ี ่ www.biostar.com.tw สำ า หรั บ รายการซี พ ี ย ู ท ี ่ ส นั บ สนุ น ชิ พ เซ็ ต... - Page 47 สนั บ สนุ น OS Biostar ขอสงวนสิ ท ธิ ์ ใ นการเพิ ่ ม หรื อ ถอดการสนั บ สนุ น สำ า หรั บ ระบบปฏิ บ ั ต ิ ก าร OS ต่ า งๆ โดยไม่ ต ้ อ งแจ้ ง ให้ ท ราบล่ ว งหน้ า...
-
Page 48: Japan
LGA1200パッケージでの第10/11世代Intel Core™ i9/ i7/ i5/ i3プロセッサーおよびIntel Pentium プ CPU 対応 ロセッサー/ Intel ® Celeron ® プロセッサーのサポート * 対応CPUの一覧は、www.biostar.com.twを参照してください チップセット Intel ® B560 デュアルチャンネルDDR4 4000+(OC)/ 3866(OC)/ 3800(OC)/ 3733(OC)/ 3600(OC)/ 3200/ 2933/ 2800/ 2666/ 2400/ 2133 に対応 4x DDR4 DIMMメモリースロット、最大128 GBのメモリーに対応 メモリ... - Page 49 B560M-SILVER 仕様 6x SATA IIIコネクタ(6Gb/s) 1x M.2 (E Key)コネクタ:2230タイプ Wi-Fi & BluetoothモジュールとIntel ® CNViに対応 2x USB 2.0ヘッダー(各ヘッダーは2台のUSB 2.0ポートに対応) 1x USB 3.2 (Gen1)ヘッダー(各ヘッダーは2台のUSB 3.2 (Gen1)ポートに対応) 1x 8ピン電源コネクタ 1x 24ピン電源コネクタ 1x CPUファンコネクタ 1x CPU水冷コネクタ(CPU_OPT) 3x システムファンコネクタ 内部 I/O 1x フロントパネルヘッダー 1x フロントオーディオヘッダー...
- Page 50 this page intentionally left blank 50 | German...
Need help?
Do you have a question about the B560M-SILVER and is the answer not in the manual?
Questions and answers