Advertisement
Quick Links
Advertisement

Subscribe to Our Youtube Channel
Summary of Contents for ClearClick HD Video Capture Box Ultimate 2.0
- Page 1 User’s Manual & Quick Start Guide 2-Year Warranty & USA-Based Tech Support Email Us At: support@clearclick.tech www.ClearClick.tech Extend Your Warranty To 3 Years For FREE! Get a FREE extra year of warranty just by registering your product www.ClearClick.tech...
-
Page 2: Safety Precautions
Browse All Our Products! If you’re looking for fun, unique, and easy-to-use technology, we’ve got it! Please visit our website to browse all of our products: www.ClearClick.tech Safety Precautions 1. Do not disassemble the unit. 2. Please note that the device and/or plugged in USB drives may become very warm during use. -
Page 3: What's In The Box
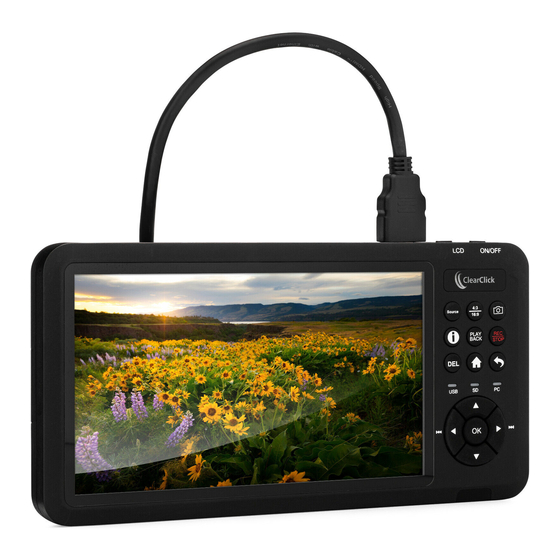
What’s In The Box? • HD Video Capture Box Ultimate 2.0 • Power Adapter • HDMI Cable • AV/MMI Input Cable (for AV, VGA, or YPbPr sources) • Remote Control • USB Cable (for Live Streaming to PC) • Device Carrying Case •... - Page 4 Power Port: Plug in the power adapter (NOTE: The device does not contain a built-in battery. Compatible External Battery Models: Sony NP-F550, NP-F750, NP-F970) TO PC (Micro USB) Port: Connect to PC for recording or live streaming with OBS HDMI OUT Port: Connect to a TV for HDMI pass through EXT.
-
Page 5: Remote Control Diagram
Back Button: Exit current screen or return to capture mode Arrow/OK Keys: Adjusts mic/input volume and makes selections SD Card Slot: Insert an SD card (up to 512GB) with the gold contacts facing up USB Port: Insert a USB drive (up to 512GB flash drive or 8TB HDD) Tripod Mount: Mount the device to a tripod Line In/Mic In/Line Out Ports: 3.5mm audio input/output Remote Control Diagram... - Page 6 Many HDMI video sources are encrypted with content protection called “HDCP,” even if the content is not copyrighted. Complying with laws, the HD Capture Box Ultimate 2.0 does not disable or override content protection. ** Therefore, if you simply plug in a content-protected HDMI video source to the HD Capture Box Ultimate 2.0, it will not detect a signal or allow you to record/stream.
- Page 7 Quick Start Guide – Normal Recording Mode 1. If you are recording HDMI sources, read the note on previous page (page #6) before continuing. 2. Connect the power adapter to the “Power” port of the HD Video Capture Box Ultimate. Plug in the power adapter to any power outlet.
- Page 8 the correct input source (for example, “HDMI,” “AV,” “VGA,” etc., appears at the bottom of the screen). 5. If there is a signal from your video source, you should see video on the LCD screen. !! IMPORTANT NOTE FOR HDMI SOURCES !! If your video source has HDCP (content protection), the video will NOT appear or be recordable.
- Page 9 remove the USB drive or SD card from your HD Video Capture Box 2.0 and plug it into your computer. (NOTE: Make sure you stop recording before removing the USB/SD drive, and give the converter about 30 seconds to save the video file.) Browse the drive and go to the “video”...
- Page 10 Device, and choose your PC’s speaker/sound card. 10. Now you can start recording or live streaming your HDMI video source. How To Control Volume of Input Source, Microphone, and Speaker Use the right and left buttons to adjust the volume of the input source (i.e.
- Page 11 To schedule recordings, choose the last setting category (Schedule Recordings). There are four categories of settings: 1. System Settings 2. Image Settings 3. Audio Settings 4. Schedule Settings...
-
Page 13: Troubleshooting & Faqs
Troubleshooting (FAQ’s) 1. My video doesn’t show up on the LCD / the LCD is black. First, see the important notice on page #6 (HDMI sources only). Please make sure the HDMI or AV source input is connected properly. Make sure the “Video Source” setting is set correctly. Make sure your HDMI cable is plugged into the “IN”... - Page 14 6. The device isn’t recording. First, see the important notice on page #6 (HDMI sources only). Please make sure the proper source input is selected. (See FAQ #1) Please make sure a storage device (USB drive or SD card) is inserted. 7.
- Page 15 PC or Mac with a better CPU and graphics card. 13. I have a question that isn’t listed here, or need further support. No problem! Please email us at support@clearclick.tech with your order number, and we will get back to you as soon as possible.
- Page 16 www.ClearClick.tech...
Need help?
Do you have a question about the HD Video Capture Box Ultimate 2.0 and is the answer not in the manual?
Questions and answers