Table of Contents
Advertisement
Quick Links
ReefKeeper Lite User Guide
Firmware 2.01
Copyright © 2010-2011 Dynon Instruments DBA Digital Aquatics. All rights reserving, no part of
this manual may be reproduced, copied, transmitted, disseminated or stored in any storage me-
dium, for any purpose without the express written permission of Digital Aquatics. Digital Aquatics
hereby grants permission to download a single copy of this manual and of any revision to this
manual onto a hard drive or other electronic storage medium to be viewed for personal use, pro-
vided that such electronic or printed copy of this manual or revision must contain the complete
text of this copyright notice and provided further that any unauthorized commercial distribution
of this manual or any revision hereto is strictly prohibited.
Information in this document is subject to change without notice. Digital Aquatics reserves the
right to change or improve its products and to make changes in the content without obligation
to notify any person or organization of such changes. Visit the Digital Aquatics website (www.
DigitalAquatics.com) for current updates and supplemental information concerning the use and
operation of this and other Digital Aquatics products.
Advertisement
Table of Contents

Subscribe to Our Youtube Channel
Summary of Contents for Digital Aquatics ReefKeeper Lite
- Page 1 Visit the Digital Aquatics website (www. DigitalAquatics.com) for current updates and supplemental information concerning the use and operation of this and other Digital Aquatics products.
-
Page 2: Table Of Contents
Chapter 3 General Interface Appendix A Glossary Getting Around Appendix B Function Examples Home Screen Part 2 Programming Chapter 4 Main Menu Chapter 5 General Menu Standby Night Mode Wave Maker Storm Mode ReefKeeper Lite User Guide ReefKeeper Lite User Guide... -
Page 3: Getting Started
What Is Included A jagged arrow within an equilateral triangle is intended to alert the Depending on what ReefKeeper Lite (RKL) system package was purchased, the kit will have the user of a hazardous warning that involves the possibility of electrical following hardware. -
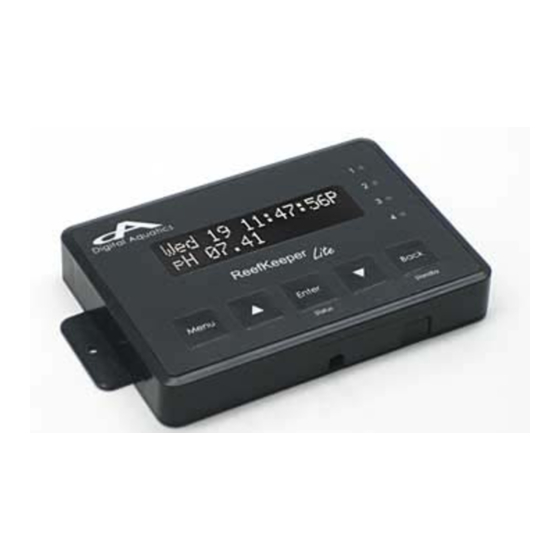
Page 4: Head Unit
Wiring Your System The ReefKeeper Lite (RKL) is a modular system. All modules are connected together via the bus cables included with the system. There is not a specifi c order when connecting modules to the ReefKeeper Lite LCD Screen system, nor is there a required port order. -
Page 5: General Mounting
It is important that electronic equipment never be mounted on the ground or the bottom of a cabinet. All Digital Aquatics modules should be mounted as high as conditions will allow. Also, all bus cables, probe wires, and power cords should use proper drip loops. -
Page 6: General Interface
The previous quick data will take its place. Press the [Up] button to go up through the port list. Press the [Down] button to go down through the port list. ReefKeeper Lite User Guide ReefKeeper Lite User Guide... -
Page 7: Programming
[Enter] and the tempera- item is fl ashing, press [Enter] to make your selection. ture is currently below 80 degrees. ReefKeeper Lite User Guide ReefKeeper Lite User Guide... -
Page 8: General Menu
To navigate to the General menu The LCD screen has a brightness option for both Day Mode and Night Mode. On your ReefKeeper Lite head unit, hit the [Menu] key. To set Night Mode Press [Down] until “General” is fl ashing and press [Enter]. -
Page 9: Wave Maker
You can go back from a save by pressing [Back] when save is fl ashing. The screen will change and show “Save”. Press the [Enter] button to save. You can go back from a save by pressing [Back] when save is fl ashing. ReefKeeper Lite User Guide ReefKeeper Lite User Guide... -
Page 10: System Menu
Press the [Up] or [Down] buttons to change between “On” and “Off ” and press the To navigate to the System menu [Enter] button to confi rm. On your ReefKeeper Lite head unit, hit the [Menu] key. The screen will change and show “Save”. Press [Down] until “System” is fl ashing and press [Enter]. -
Page 11: Lock Keys
The key lock ability allows a system to operate as normal, but will not accept a key press. This feature is intended to be used as a safety measure when kids or guests are present. The unlock button combination is: [Up], [Down], [Up], [Enter] To lock the keys ReefKeeper Lite User Guide ReefKeeper Lite User Guide... -
Page 12: Communication
You can go back from a save by pressing [Back] when save is fl ashing. Info The Info menu shows the current fi rmware version that has been installed on the ReefKeeper Lite. To view info From the System Menu, press [Down] until “Info” is fl ashing and press [Enter]. -
Page 13: Modules Menu
The menu will now show the list of modules that are currently connected to the ReefKeeper Metal Halide ReadyFit Lite system. The fi rst option in the list is the ReefKeeper Lite itself, which is represented as Light (Other) Standard “RKL”. - Page 14 To set up the On/Off function This ReadyFit function uses the iTemp temp probe that came with your ReefKeeper Lite. When using the Heater Function, this cannot be changed. For increased function op- From a Module’s Port Menu, select “Function” and press [Enter].
- Page 15 Controller function should be used. control function can be used. This ReadyFit function uses the iTemp temp probe that came with your ReefKeeper Lite. This ReadyFit function uses the iTemp temp probe that came with your ReefKeeper Lite. When using the Fan Function, this cannot be changed. For increased function options When using the Chiller Function, this cannot be changed.
- Page 16 Press the [Up] or [Down] buttons to choose between the “On” and “Off ” options. Press the [Up] or [Down] buttons to make your selection and press [Enter] to confi rm. The screen will change and show “Save”. ReefKeeper Lite User Guide ReefKeeper Lite User Guide...
- Page 17 Lunar Skimmer This function makes setting up the Digital Aquatics lunar pods quick and easy. Moonlight Pods The Skimmer function is a ReadyFit function. It allows the user to confi gure such options as “Post will automatically follow the natural lunar intensity on any given night. It also allows the intensity SB Delay”.
- Page 18 Press the [Up] or [Down] buttons to set the output to be “On” or “Off ” during the programmed Night Mode. Once the fi eld is set press [Enter] to confi rm. ReefKeeper Lite User Guide ReefKeeper Lite User Guide...
- Page 19 Programming Controller This is the most dynamic control function for the ReefKeeper Lite. The controller function is used The next prompt will be for “In Standby” with the options of On/Off /Ignore. This sets the to take an input such as temperature, pH, ORP, salinity and more to cause an output or channel to state of the output when you enter Standby mode on the head unit change it’s state.
- Page 20 Press the [Up] or [Down] buttons to set the fi rst fi eld (hour), press [Enter] to set and move to the next fi eld. Once the value is set press [Enter] to confi rm. ReefKeeper Lite User Guide ReefKeeper Lite User Guide...
- Page 21 The next prompt will be for “Standby Delay” time with 00:00:00 and the fi rst fi eld (hour) will Press the [Up] or [Down] buttons to set the intensity level for the fi xture and press be fl ashing. [Enter] to confi rm. ReefKeeper Lite User Guide ReefKeeper Lite User Guide...
- Page 22 Press the [Up] or [Down] buttons to select the probe or device that will trigger the switch function and press [Enter] to confi rm. The next prompt will be for “On When” and is referring to the state of the switch. ReefKeeper Lite User Guide ReefKeeper Lite User Guide...
-
Page 23: Output Alarms
Transition the probe to the second packet of calibration solution. Repeat steps 1 through 4 for the second calibration point. Press the [Enter] button to save. You can go back from a save by pressing [Back] when save is fl ashing. ReefKeeper Lite User Guide ReefKeeper Lite User Guide... -
Page 24: Timers Menu
OFF state. It is set just The ReefKeeper Lite has 16 timers that can be used. Timers have a number of settings that allow as a time is, however. -
Page 25: Alarms Menu
The next prompt will be for “Trip When”. Options are “Above” or “Below”. On your ReefKeeper Lite head unit, hit the [Menu] key. When the alarm is set to be on “Above” the alarm will be triggered when the device’s value is Press [Down] until “Alarms”... - Page 26 Press the [Up] or [Down] buttons to set the fi rst character, press [Enter] to set and move to the next option. Continue until all options are set and press [Enter] to con- fi rm. ReefKeeper Lite User Guide ReefKeeper Lite User Guide...
-
Page 27: Support
A chiller is a device that is placed in an aquarium to lower the tempera- ture of the water. EasyFlow™ The new EasyFlow™ menu system from Digital Aquatics walks you through the confi guration of channels and menu items. Other control- lers require you to navigate a complicated maze of menus or learn a programming language to setup the controller. -
Page 28: Appendix B 50 Function Examples
This example covers raising pH and it should be noted that an SL1 is needed to monitor pH. Device Set Point 8.25 On When Below Hysteresis 0.05 No alarms or standby are needed to operate a fan or chiller. ReefKeeper Lite User Guide ReefKeeper Lite User Guide... - Page 29 Digital Aquatics 19825 141st PL NE Woodinville, WA 98072 www.DigitalAquatics.com 11/22/2010 - Rev 2...
Need help?
Do you have a question about the ReefKeeper Lite and is the answer not in the manual?
Questions and answers