Advertisement
Available languages
Available languages
Quick Links
Advertisement
Chapters

Summary of Contents for JollyLine multi compact
-
Page 2: Table Of Contents
Italiano CONTENUTI 1. GUIDA ......................2 1.1 IMPORTANTI ISTRUZIONI DI SICUREZZA ................ 2 1.2 CONTENUTI ..........................2 1.3 PANORAMICA SUL PRODOTTO ..................3 2. CARATTERISTICHE ..................5 3. MENU ......................6 ............................6 ............................8 ............................10 3.4 RICERCA LOOP .......................... -
Page 3: Guida
1. GUIDA 1.1 IMPORTANTI ISTRUZIONI DI SICUREZZA Grazie per aver scelto il nostro prodotto. Prima dell'installazione, vorrem- mo ricordare alcune note, che è molto importante per il funzionamento sicuro e corretto, come segue: Assicurarsi di leggere questo manuale utente prima di iniziare l'operazione. •... -
Page 4: Panoramica Sul Prodotto
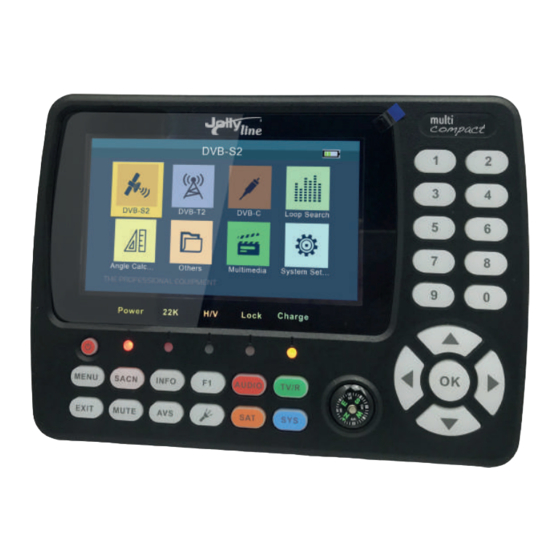
Italiano 1.3 PANORAMICA SUL PRODOTTO Descrizione FUNZONI Tasto di accensione/spengimento Spia di alimentazione Power Spia luminosa 22kHz 22kHz Spia luminosa tensione polarizzazione verticale/orizzontale Spia luminosa lock LOCK Spia luminosa di ricarica Charge Mostra il menu principale sullo schermo o torna al MENU menu precedente dal sottomenu Esci dal menu corrente e salva le impostazioni... - Page 5 Description FUNCTION 22 RF Connettore cavo satellitare 23 ANT Connettore cavo antenna 24 DC OUT Uscita DC 12V per apparecchiature esterne 25 HDMI Porta di uscita HDMI 26 AV OUT Porta di uscita AV 27 AV IN Porta di ingresso AV 28 LED Torcia LED 29 USB...
-
Page 6: Caratteristiche
Italiano 2. CARATTERISTICHE • Schermo LCD TFT da 4,3 pollici ad alta definizione • Completamente conforme DVB-S/S2/T/T2/C • MPEG2, MPEG4, H.264/MPEG4 AVC, H.265/HEVC decodifica hardware • Misuratore digitale per potenza e qualità del segnale • Supporta la scansione automatica e la scansione manuale •... -
Page 7: Menu
3. MENU Se i cavi sono stati installati e collegati allo strumento, premere visualizzare il menu principale. • DVB-S2 • DVB-T2 • DVB-C • Loop Search • Angle Calculation • Others • Multimedia • System Setting Premere i tasti per spostare il cursore verso l'alto o verso il basso nell'interfaccia del menu, quindi utilizzare OK per confermare una selezione. - Page 8 Italiano 3.1.5 FREQUENZA Frequenza del transponder corrente, immettere il valore utilizzando i tasti numerici. 3.1.6 SYMBOL RATE Symbol rate del transponder corrente, immettere il valore utilizzando i tasti numerici. 3.1.7 POLARIZZAZIONE Premere i tasti per modificare la polarizzazione verticale o orizzontale. 3.1.8 22KHz Premere i tasti per attivare o disattivare l'interruttore TONE a 22 KHz.
- Page 9 3.1.13 RICERCA RAPIDA Quando i parametri sono stati impostati, premere OK in ricerca rapida. Sullo schermo verranno visualizzate alcune informazioni segnale. Premere il tasto YZ cambiare il transponder. • Scan: Premere il tasto ENTER per cercare il TP attuale. • Auto Scan: Premere il tasto rosso per cercare automaticamente il satellite attuale.
- Page 10 Italiano 3.2.5 MODO Premere il tasto A B per cambiare lo standard DVB, ci sono tre modalità T/T2/T+T2, si può selezionare quella che si desidera. 3.2.6 ANTENNA ATTIVA Premere il tasto A B per accendere / spegnere l'alimentazione dell'antenna. 3.2.7 TENSIONE LNB Premere il tasto A B per cambiare la tensione dell'antenna, ce ne sono 3 tipi, 5V/12V/24V.
-
Page 11: Ricerca Loop
• S/Q: Premere il tasto blu per ingrandire la visualizzazione della potenza e qualità del segnale. 3.3 DVB-C Selezionare DVB-C, quindi premere OK in Impostazione Scan. 3.3.1 PAESE Premere il tasto A B per cambiare il paese predefinito. 3.3.2 NUMERO DI CANALE Premere il tasto A B per cambiare il numero di canale. -
Page 12: Calcolo Dell'angolo
Italiano Terminerà la ricerca in loop dopo la modifica, quindi la potenza del segnale e la qualità di ciascun TP o canale verranno visualizzati sullo schermo. 3.5 CALCOLO DELL'ANGOLO Immettere longitudine satellite, longitudine e la latitudine locali tramite il tasto numerico e il dispositivo calcolerà... - Page 13 3.6.2 ELENCO SATELLITI Tutti i satelliti verranno visualizzati sullo schermo. Premere il tasto rosso per aggiungere un nuovo satellite. Premere il tasto verde per modificare il satellite attuale. Premere il tasto arancione per eliminare il satellite attuale. Premere il tasto blu per scansionare il satellite attuale.
- Page 14 Italiano Premere il tasto verde per modificare il transponder attuale. Premere il tasto arancione per eliminare il transponder attuale. Premere il tasto blu per scansionare il transponder attuale. 3.6.4 IMPOSTAZIONE MOTORE Ci sono 5 modalità di impostazione del motore: • USALS Controlla il motore in base alla posizione locale, è...
- Page 15 3.7 MULTIMEDIALITA' Sarà necessario riprodurre i file nella memoria USB e inserirla nella porta USB. Selezionare un file e premere OK per riprodurlo. 3.8 IMPOSTAZIONI DEL SISTEMA • Lingua Premere il tasto per cambiare la lingua dell'OSD, l'impostazione predefinita è l'inglese. •...
- Page 16 Italiano Premere il tasto A B per attivare/disattivare il tono dei tasti. • Altoparlante Premere il tasto A B per attivare/disattivare l'altoparlante. • 12V Premere il tasto A B per attivare/disattivare l'uscita CC 12V. • Aggiornamento Aggiornerà il file nell'USB, quindi inserire il dispositivo. Premere OK per aggiornare l'interfaccia, utilizzare il tasto direzionale per selezionare il file di aggiornamento e premere OK per aggiornare.
- Page 17 4. CARATTERISTICHE TECNICHE STANDARD DI TRASMISSIONE DVB-S2/S, DVBT/T2, DVB-C INGRESSO/DEMODULAZIONE DEL SATELLITE Tipo di connessione Tipo F Frequenza d'ingresso da 950 a 2150 MHz Livello di ingresso segnale da -65 a -25 dBm Controllo dell'interruttore di banda 22KHz Fornitura LNB 13V/18V, IMax 400mA Tipo di demodulazione QPSK,8PSK,16APSK...
- Page 18 Italiano Tasso di risoluzione PAL-25 frame@720*576,NTSC-30 frame@720*480 Compatibilità di segnale Supporta la conversione per diversi formati video Formato Video 4:3,16:9 con Pan & Scan e conversione Letter Box Decompressione Audio MPEG-1 Layer I/II, MPEG-2 Layer I/II Modo uscita Audio Stereo, Mono, R/L PORTA SERVIZIO DATI Connettore Protocollo dati...
- Page 19 5. RISOLUZIONE DEI PROBLEMI Problema Possibili cause Soluzione Il display non si Controllare che l'interruttore sia L'interruttore di alimentazione non accende è acceso. Le batterie sono esaurite su ON. Anche sull'adattatore Nessun suono o immagine, Spina AV IN inserita, ma ma la spia di alimentazione nessun ingresso video Estrarre il cavo AV IN...
- Page 20 English CONTENTS 1. GUIDE ......................2 1.1 IMPORTANT SAFETY INSTRUCTIONS ..................2 1.2 UNPACKING ..........................2 1.3 PRODUCT OVERVIEW& ILLUSTRATION ................3 2. OUTLINE ......................5 3. THE MENU OSD INSTRUCTION ..............6 3.1 DVB-S2 ............................6 3.2 DVB-T2 ............................8 3.3 DVB-C ............................10 3.4 LOOP SEARCH ..........................10 3.5 ANGLE CALCULATION ......................11 3.6 OTHERS ............................11 3.7 MULTIMEDIA ..........................14...
-
Page 21: Guide
1. GUIDE 1.1 IMPORTANT SAFETY INSTRUCTIONS Thank you for choosing our product. Before installation, we would like to remind you some notes, which is very important for operating safely and properly, as follows: • Be sure to read this user manual before starting your operation. • You must install the dish with correct direction and angle. -
Page 22: Product Overview& Illustration
English 1.3 PRODUCT OVERVIEW& ILLUSTRATION Description FUNCTION Turn on/off meter Power indicator light Power 22kHz indicator light 22kHz Vertical /Horizontal polarization voltage output light Signal lock indicator light LOCK Charger indicator light Charge Show the main menu on the screen or jump back to MENU previous menu in sub-menu setting conditions Escape from present menu and save the settings... - Page 23 Description FUNCTION 22 RF Connect to satellite antenna cable 23 ANT Connect to antenna 24 DC OUT DC 12V output for extern equipment 25 HDMI HDMI output port 26 AV OUT AV output port 27 AV IN AV input port 28 LED Torch 29 USB...
-
Page 24: Outline
English 2. OUTLINE • 4.3 Inch High Definition TFT LCD Screen • Fully DVB-S/S2/T/T2/C compliant • MPEG2, MPEG4, H.264/MPEG4 AVC, H.265/HEVC hardware decoding • Digital meter for signal strength and quality • Supports Auto Scan and Manual Scan • Sound and Light Alarm for Locking Signal • Auto Calculate Angle of AZ ,EL • Supports DISEQC 1.0/1.1/1.2, Unicable, 0/22kHz Tone • Speaker Integrated... -
Page 25: The Menu Osd Instruction
3. THE MENU OSD INSTRUCTION If you have installed and connected the cables to the finder, pressing MENU to display the Main Menu. • DVB-S2 • DVB-T2 • DVB-C • Loop Search • Angle Calculation • Others • Multimedia • System Setting Press the keys of YZA B to move the cursor up or down in the menu interface, then use OK to confirm a selection. - Page 26 English to select the TP you want. 3.1.5 FREQUENCY Frequency of the current transponder, input the value by using the number keys. 3.1.6 SYMBOL RATE Symbol rate of the current transponder, input the value by using the number keys. 3.1.7 POLARISATION Press AB key to change vertical or horizontal of polarization.
-
Page 27: Dvb-T2
3.1.13 QUICK SEARCH When parameters have been set done, press OK into quick search. There will have some signal information displayed on the screen. Press YZ key to change transponder. • Scan: Press the ENTER key to search the current TP. • Auto Scan: Press the red key to auto blind search the current satellite. - Page 28 English 3.2.5 MODE Press A B key to change the DVB standard, we have there types including T/T2/T+T2, you can select one you want. 3.2.6 ACTIVE ANTENNA Press AB key to switch antenna power ON/OFF. 3.2.7 LNB POWER Press A B key to change the antenna power, there are 3 types including 5V/12V/24V.
-
Page 29: Dvb-C
• S/Q: Press blue key to enlarge showing of the signal strength and quality. 3.3 DVB-C Select DVB-C, then press OK into the Scan Setup. 3.3.1 COUNTRY Press A B key to change the default country. 3.3.2 CHANNEL NO. Press A B key to change the channel number. 3.3.3 FREQUENCY Frequency of the current channel, input the value by using the number keys. -
Page 30: Angle Calculation
English change. It will finish loop search after edition, then singal strenth and quality of each TP or channel will be displayed on the screen. 3.5 ANGLE CALCULATION Input satellite longitude, local longitude and latitude by number key, and device will calculate the polarization angle, azimuth and elevation on the top of the screen. - Page 31 3.6.2 SATELLITE LIST All the satellite will be displayed on the screen. Press the red key to add a new satellite. Press the green key to edit current satellite. Press the orange key to delete current satellite. Press the blue key to scan current satellite. 3.6.3 TRANSPONDER LIST All the transponders under the current satellite will be displayed on the screen, and press AB...
- Page 32 English Press the green key to edit current transponder. Press the orange key to delete current transponder. Press the blue key to scan current transponder. 3.6.4 MOTOR SETTING There are 5 modes in motor setting: • USALS Controling motor according to your local position, you can modify it in Angle Calculation.
-
Page 33: Multimedia
3.7 MULTIMEDIA Will need to play the files in the USB and insert it into the USB port. Select a file and press OK to play it. 3.8 SYSTEM SETTING • Language Press A B key to change the OSD language, default is English. • Country Press AB key to change the country. - Page 34 English Press AB key to switch key tone on/off. • Speaker Press AB key to switch speaker on/off. • 12V Press AB key to switch DC 12V output on/off. • Upgrade Will upgrade the file into the USB, then insert the machine. Press OK to upgrade interface, use the direction key to select update file, and press OK to upgrade.
-
Page 35: Technical Specification
4. TECHNICAL SPECIFICATION TRANSMISSION STANDARDS DVB-S2/S, DVBT/T2, DVB-C SATELLITE INPUT/DEMODULATION Connector Type F Type Input Frequency 950 to 2150 MHz Signal Input Level - 65 to -25 dBm Band Switch Control 22KHz LNB Supply 13V/18V, IMax 400mA Demodulation Type QPSK,8PSK,16APSK Symbol Rate 2<Rs<45Mband(SCPC/MCPC) DVB-T/T2/C INPUT/DEMODULATION... - Page 36 English Resolving rate PAL-25 frame@720*576,NTSC-30 frame@720*480 Signal compatibility Support conversion for different video formats Video Format 4:3,16:9,By Pan & Scan and Letter Box conversion Audio Decompression MPEG-1 Layer I/II, MPEG-2 Layer I/II Audio Output Mode Stereo, Mono,R/L DATA SERVICE PORT Connector Data Protocol USB2.0 interface...
-
Page 37: Trouble Shooting
5. TROUBLE SHOOTING Problem Possible Causes What To Do No display light up Power switch is not Check to make sure power on Run out of batteries on. Even on adapter No sound or picture, AV IN jack insert, but no but the front panel video input Pull out AV IN cable...
Need help?
Do you have a question about the multi compact and is the answer not in the manual?
Questions and answers