Table of Contents
Advertisement
Quick Links
GMPD3
Purpose
Features
The GMPD3 lets you connect and
The GMPD3 uses a simple "Y" or "T"
control an Apple iPod directly from the
harness for installation using factory
controls on your factory GM radio. All
connectors. There is no need to cut or
factory options, including XM, continue
splice any wires, including power and
to operate!
ground!
The GMPD3 works in the following vehicles:
BUICK
GMC
Lucerne*
2006–2008
Sierra/Denali/HD Truck
Yukon/Denali/XL
CADILLAC
Escalade/EXT/ESV* 2007–2008
HUMMER
H2/HUT
CHEVROLET
Avalanche*
2007–2008
PONTIAC
Cobalt*
2007–2008
Torrent*
Equinox*
2007–2008
Impala*
2006–2008
SUZUKI
Monte Carlo*
2006–2008
XL7*
Pickup HD*
2007–2008
*Vehicle must be XM Radio Ready
Suburban*
2007–2008
Note: Your radio must have a
Tahoe*
2007–2008
with the GMPD3.
Check www.soundgate.com for the most current
compatibility information.
Copyright© 2004-2007 SoundGate®. All Rights Reserved.
SoundGate® is a registered trademark of Stillwater Designs, Inc.
All other trademarks are the property of their respective owners.
If you experience problems, call SoundGate Technical Support at 800-256-0808, or email us at sgtech@soundgate.com.
Before You Start
WARNING
DO NOT DISASSEMBLE OR ALTER
Doing so may result in an accident, fi re, or electric shock.
Do not block your view
Do not mount product or any added audio/video equipment where it can block your view through the windshield or block your view
of dashboard indicators and displays.
Do not block safety devices
Do not mount product or any added audio/video equipment where it can obstruct the operation of any safety device, such as the
airbag.
Distraction warning
Do not allow product or any added audio/video equipment to distract you while you are driving.
BEFORE WIRING, DISCONNECT THE CABLE FROM THE NEGATIVE BATTERY TERMINAL
Before starting any installation work , wait 90 seconds after turning the ignition switch to the LOCK position and disconnecting the negative (-) terminal from the battery. The
supplemental restraint system (SRS), or airbag(s) is equipped with a backup power source. If installation work is started less than 90 seconds after disconnection of the negative
(-) battery terminal, the SRS may deploy. When the negative (-) terminal cable is disconnected from the battery, the clock and audio systems' memory may be erased. Before
starting installation work, make a record of the clock and audio systems' memory settings. When installation is complete, reset the clock and audio systems to their previous
settings. Power tilt, power telescopic steering column, power seats, power mirrors, power shoulder belt anchorage, and other power accessories may or may not be equipped
with a memory function; consider keeping a record of these settings as well.
When installation is complete, readjust the features to their previous settings.
Never use a backup power supply (such as another battery) during installation work in an attempt to avoid losing these memory settings.
CAUTION
DO NOT SPLICE INTO ELECTRICAL CABLES
Never cut away cable insulation to supply power to other equipment. Doing so will exceed the current carrying capacity of the wire
and may result in fi re or electric shock.
DO NOT ALLOW CABLES TO BECOME ENTANGLED IN SURROUNDING OBJECTS
Cables or wiring that obstruct or get caught on places such as the steering wheel, shift lever, brake pedals, etc. can be extremely
hazardous.
DO NOT INSTALL IN LOCATIONS WITH HIGH MOISTURE OR DUST
Moisture or dust may result in product failure.
HAVE THE WIRING AND INSTALLATION DONE BY EXPERTS
The wiring and installation of this product requires special technical skills and experience.
USE ONLY SPECIFIED ACCESSORY PARTS
2007–2008
Use of other than specifi ed parts may damage product internally.
2007–2008
FOLLOW THE OPERATIONAL AND INSTALLATION MANUALS.
YOU SHOULD READ AND FAMILIARIZE YOURSELF THOROUGHLY WITH THE FOLLOWING INFORMATION PRIOR TO INSTALLING AND
USING THIS UNIT. IN ADDITION, YOU MUST CAREFULLY READ AND FOLLOW THE INSTALLATION SCHEMATICS AND INSTRUCTIONS
FOR THE PRODUCT AND THE VEHICLE IN WHICH IT IS BEING INSTALLED. FAILURE TO FOLLOW INSTALLATION INSTRUCTIONS MAY
2008
DAMAGE THE PRODUCT AND THE VEHICLE, WILL VOID THE PRODUCT WARRANTY, AND MAY VOID THE VEHICLE WARRANTY.
CHECK YOUR LOCAL LAWS
Some States/Provinces or other governmental jurisdictions (such as cities) may have laws that prohibit the operation of a video
2007–2008
screen within the sight of the driver. If you have purchased such a product, you should use the product only in locations where it is
legal to do so, and if you do use the product, set up the screen so it is only visible to passengers.
TROUBLESHOOTING
2007
Should this product fail to operate properly, please contact your Dealer or SoundGate Technical Support.
BAND
button to be compatible
Simple-fi.
™
www.soundgate.com
Rev 20080624
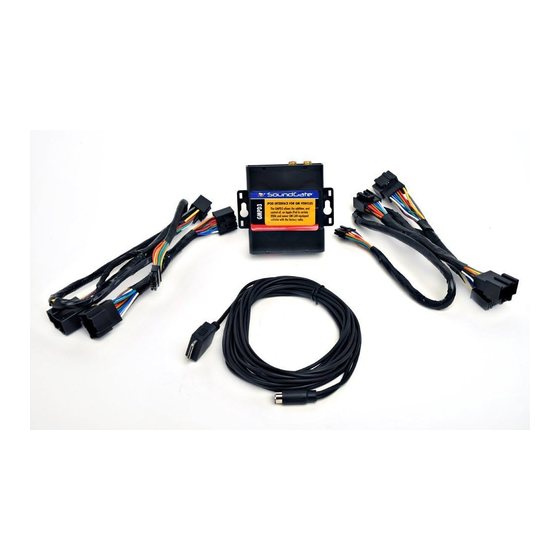
1
– GMPD3 Module
2
– Apple iPod dock connector
3
– "Y" harness (for radios with factory XM)
4
– "T" harness (for radios without factory XM)
Note: More than one "T" harness is included. Please read the INSTALLATION
section for details on which harness you should use for your vehicle.
Before You Start
1
2
3
4
Before You Start
iPOD Details
The GMPD3 is designed to interface only with the GM vehicles listed on the front of this manual and the Apple iPod (4th generation
and later), iPod Mini, iPod Nano, iPod Photo, and iPod Video.
We recommend that you turn on your iPod's SoundCheck option. On certain factory radios, you may experience audible distortion
if SoundCheck is not turned on.
Installation Overview
Please read this section fully and follow these steps closely to ensure that the GMPD3 functions correctly upon installation. The
basic install procedure is outlined below (detailed steps are presented in the INSTALLATION section of this manual).
1.
Confi gure DIP switches on GMPD3 module.
2.
Connect "T" harness to factory radio (or "Y" harness to factory XM module).
3.
Connect "T" (or "Y") harness to GMPD3 module.
4.
Connect iPod dock connector cable (and optionally connect an AUX input source) to GMPD3
module.
5.
Mount the GMPD3 module.
6.
Connect iPod to GMPD3 iPod dock connector cable.
Confi guration
The GMPD3 must be confi gured before installation and use. On the rear side of the GMPD3 module is a series of fi ve small, DIP-style
switches that must be set to a specifi c combination of ON and OFF, depending upon whether or not your vehicle has a factory-
equipped XM tuner. Use the diagrams below to confi gure the DIP settings for your vehicle.
IMPORTANT
During confi guration of the DIP switches, no cables should be connected to the GMPD3 module. If you change
DIP switch settings while cables are connected, you must unplug the cables and reconnect them before the
changes will take effect. This is especially important to remember if transferring the GMPD3 from one vehicle
to another, as re-programming the DIP switches may be necessary.
Five DIP switches are located on the rear of the GMPD3. To confi gure a switch to the ON position, press
the switch downward. Press the switch upward for the OFF position. In this example, switch 1 is turned
ON.
ON
2 3 4 5
DIP
ON
DIP settings for the GMPD3 iPod interface:
For compatible GM vehicles (listed on the front of this manual) equipped with GMLAN 29-bit radios....
Standard Radio
Navigation Radio
WITH Factory XM
WITH Factory XM
1: ON
2: ON
3: OFF
2 3 4 5
2 3 4 5
4: OFF
DIP
ON
DIP
ON
5: OFF
WITHOUT Factory XM
WITHOUT Factory XM
1: OFF
2: ON
3: OFF
2 3 4 5
2 3 4 5
4: OFF
DIP
ON
DIP
ON
5: OFF
2
Escalade Radio (non-Navigation)
WITH Factory XM
1: ON
1: ON
2: OFF
2: ON
3: OFF
3: ON
2 3 4 5
4: OFF
4: OFF
DIP
ON
5: OFF
5: OFF
WITHOUT Factory XM
1: OFF
1: OFF
2: OFF
2: ON
3: OFF
3: ON
2 3 4 5
4: OFF
4: OFF
DIP
ON
5: OFF
5: OFF
3
Advertisement
Table of Contents

Summary of Contents for SoundGate Simple-fi GMPD3
- Page 1 2006–2008 XL7* 2007 Should this product fail to operate properly, please contact your Dealer or SoundGate Technical Support. During confi guration of the DIP switches, no cables should be connected to the GMPD3 module. If you change Pickup HD* 2007–2008...
- Page 2 Select MUSIC to view iPod search options. Your iPod can be navigated by Playlist, Artist, Album, Genre, or All Reserved. SoundGate® is a registered trademark of the U.S. and other countries. compartment in SUVs or in the back deck in cars and “crossover” vehicles. The XM module has a single 16-pin connector Songs simply by selecting one of these categories, then pressing the BACK button.
Need help?
Do you have a question about the Simple-fi GMPD3 and is the answer not in the manual?
Questions and answers