Table of Contents
Advertisement
Quick Links
Advertisement
Chapters
Table of Contents

Subscribe to Our Youtube Channel
Summary of Contents for ECOVACS ROBOTICS ATMOBOT PRO
- Page 1 Instruction Manual 사용 설명서...
- Page 2 Customer Service Center where a technician can address your specific problem or question. www.ecovacs.com For more information, please visit the ECOVACS ROBOTICS official website: The company reserves the right to make technological and/or design changes to this product for continuous improvement.
-
Page 3: Table Of Contents
Contents 1. Important Safety Instructions ...........................4 2. Package Contents ..............................6 3. Operating and Programming ..........................11 4. Maintenance ................................27 5. Troubleshooting ..............................32 6. Specifications .................................37... -
Page 4: Important Safety Instructions
1. Important Safety Instructions When using an electrical appliance, basic precautions should 7. Do not use without filters in place. 8. Do not operate the Appliance in an area where there are lit always be followed, including the following: candles or fragile objects. READ ALL INSTRUCTIONS BEFORE USING THIS 9. - Page 5 21. When not using the Charging Dock or AC Adapter for a long period of time, please unplug it. 22. The Appliance must be used in accordance with the directions in this Instruction Manual. ECOVACS ROBOTICS cannot be held liable or responsible for any damages or injuries caused by improper use.
-
Page 6: Package Contents
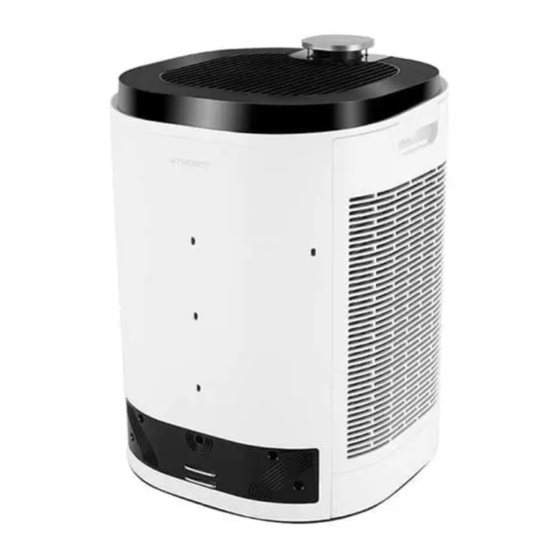
2. Package Contents 2.1 Package Contents Charging Dock and Remote Control and Robot Instruction Manual Quick Start Guide Charging Dock Bumper Battery*2 Note: Figures and illustrations are for reference only and may differ from actual product appearance. - Page 7 2. Package Contents 2.2 Product Diagram Robot Airflow Adjustment Button Purification Mode Button AUTO Wi-Fi Indicator BLUE: Excellent Filter Status Indicator GREEN: Good PM1.0 Indicator Control Panel AUTO ORANGE: Lightly polluted PM1.0 RED: Heavily polluted Air Quality Indicator Air Outlet Laser Distance Sensor (LDS)
- Page 8 2. Package Contents Front Back Infrared Distance Dust Sensor Sensors Charging Dock Ultrasonic Anti- Signal Sensors collision Sensors Power Switch Cover Charging Contacts Under the Cover RESET Button Power Switch (Connecting to the Wi-Fi network: Press (“I” = on, “O” = off.) the RESET Button .
- Page 9 2. Package Contents Side Side (Internal) Data Transmission Port (for customer care Handle use only) Air Inlet Grill Release Button Air Inlet Grill Fan Guard Foam Anti-collision Sensor...
- Page 10 2. Package Contents Bottom Charging Dock Universal Wheel Infrared Signal Emitter Charging Dock Pins Anti-drop Sensor Battery Cover Driving Wheel Charging Dock Bumper Port Anti-drop Sensor Power Plug Data Transmission Port Power Adapter Adapter Port (for customer care use only) Adapter Lock...
-
Page 11: Operating And Programming
3. Operating and Programming 3.1 Notes Before Use Before each use, tidy up the area by putting furniture in their proper ATMOBOT can pass a space of no less than 65 centimeters in width. place and remove loose items such as power cords and toys. Please do not stand in narrow spaces, such as hallways, to make sure Do not place items on top of or sit on ATMOBOT or use ATMOBOT ATMOBOT purification efficiency. - Page 12 3. Operating and Programming ATMOBOT is designed for use on hard floors only. Avoid carpet or area rugs in the air purification path. Do not allow ATMOBOT to enter wet areas such as the kitchen or bathroom. We recommend closing kitchen and bathroom doors before using ATMOBOT.
- Page 13 3. Operating and Programming Do not place the charging dock near stairs or a drop off to prevent Do not place the charging dock near reflective objects such as the robot from falling over the edge. mirrors. Do not place the charging dock in direct sunlight. The strong light Do not move the charging dock once the path is settled.
- Page 14 3. Operating and Programming 3.2 Quick Start Remove Protective Materials After opening the package, remove the following items: Protective film on top Fan guard (including foam) HEPA air bag on each side on each side of ATMOBOT Protective strip on Protective film on Protective film on bottom of ATMOBOT...
- Page 15 3. Operating and Programming Charging the Robot Step Step If there are baseboards along the bottom of the walls, install the Open the power switch cover at the bottom of ATMOBOT. Move the provided charging dock Bumpers on the Charging Dock. Bottom Power Switch to the ON position.
- Page 16 3. Operating and Programming Pairing the Remote Control With ATMOBOT Step Step Slide ATMOBOT’s power switch to “I” to turn the unit on. Take the batteries for the ATMOBOT remote control out of the package. Open the battery cover on the back of the remote control Pairing Step and insert the batteries.
- Page 17 3. Operating and Programming 3.3 Use ATMOBOT Note: ATMOBOT can be operated in three ways: from the main unit, using the App, and using the remote control. Choose whichever method that suits your needs. Control Panel Airflow Adjustment Quiet 0–15 Excellent Button Wi-Fi Indicator Normal...
- Page 18 3. Operating and Programming Starting purification Note: 1. You can run two purification modes from the main unit: spot purification and mobile purification. Choose the mode that fits your needs. 2. The first time you use mobile purification, ATMOBOT will first create a map and establish the spots to be purified before proceeding with purification.
- Page 19 3. Operating and Programming When it has finished scanning and mapping, ATMOBOT will Once ATMOBOT is completely charged, press and hold for 3 AUTO Step return to the charging dock. The means the spots to be purified Step seconds. ATMOBOT will leave the charging dock and move to have been established.
- Page 20 3. Operating and Programming Adjusting airflow volume Stopping purification ATMOBOT has four airflow levels: Stopping: Press while ATMOBOT is purifying. AUTO Stopping purification during mobile purification will terminate the Smart airflow, quiet airflow, normal airflow, and high current task. airflow. on the main unit’s control panel to switch among these levels.
- Page 21 3. Operating and Programming 3.4 ECOVACS App Download ECOVACS App to access more features. ECOVACS HOME iOS 9�0 or late r Android 4�0 or later...
- Page 22 3. Operating and Programming 3.5 Remote Control In standby mode, move AT- MOBOT forward, backward, Enter or exit purification spot-set- clockwise, or counter-clockwise. ting. Release to stop ATMOBOT. Direction Start/Stop In standby mode, press and Change airflow level. release to start spot purification. In standby mode, press and hold Set Airflow Volume for 3 seconds to start mobile...
- Page 23 3. Operating and Programming Starting purification Note: 1. You can use the remote control to start two kinds of purification: spot purification and mobile purification. Choose based on your needs. 2. The first time you use mobile purification, ATMOBOT will first create a map and establish the spots to be purified before proceeding with purification.
- Page 24 3. Operating and Programming Manually setting purification spots Note: 1. In mobile purification mode, ATMOBOT will automatically generate purification spots based on the map of your home that it created. You can also use the remote control to manually set spots. 2.
- Page 25 3. Operating and Programming ATMOBOT will turn 360° in place to confirm there are no Repeat Steps 2 and 3 to set other purification spots. When all Step Step obstructions around it. The spot has been set successfully when spots have been set, press and hold for 3 seconds.
- Page 26 3. Operating and Programming Adjusting airflow volume Charging ATMOBOT has four airflow levels: When ATMOBOT has a map, pressing and releasing will return Smart airflow, quiet airflow, normal airflow, and high ATMOBOT to the charging dock for charging. airflow. on the remote control to switch among these levels. Stopping Press and release while ATMOBOT is purifying to stop purification.
-
Page 27: Maintenance
4. Maintenance 4.1 Filter, Air Inlet Grill, and Fan Area Note: 1. Turn off the robot’s power switch before doing maintenance on the main unit's parts. Unplug the power cord when doing maintenance on the charging dock. 2. ECOVACS recommends maintaining and replacing the filter regularly to avoid secondary pollution and noise. Care and maintenance Turn off the main unit’s power switch. - Page 28 4. Maintenance Place the filter in sunlight and set out to dry completely for Put the filter and air inlet grill components back in their original Step Step 2–3 hours. positions. (Be sure the black side of the filter is facing outwards. Push the bottom of the filter down tightly when installing it.) Replacing the Air Filter The air filter life varies across different environments.
- Page 29 4. Maintenance 4.2 Air Outlet Regularly clean the air outlet at the top of the unit with a vacuum cleaner. This will ensure that the air outlet from ATMOBOT is clean. If you will not be using ATMOBOT for a certain time, it is suggested to cover the top with a soft, clean cloth. 4.3 Charging Contacts, Anti-drop Sensors, and Bumpers Note: The charger plates, down-viewing sensors, and bumpers all contain sensitive electronic components.
- Page 30 4. Maintenance Cleaning the charging dock pins Step Step 1. If you will not be using the product for some time, charge it fully and then turn off the power switch before placing it in storage. Be sure to recharge the product every three months to prevent the battery from over-discharging. 2.
- Page 31 4. Maintenance 4.4 Driving Wheels and Universal Wheels Cleaning the driving wheels Cleaning the universal wheels...
-
Page 32: Troubleshooting
5. Troubleshooting Troubleshooting Please use this chart to troubleshoot common problems using ATMOBOT. Problem Possible cause Solution ATMOBOT power switch is off. Turn the ATMOBOT power switch on. Be sure the main unit is fully charged before the first use. Turn on the power switch at the bottom of the main unit. - Page 33 5. Troubleshooting Problem Possible cause Solution It is the smell of new materials. Set the machine in a well-ventilated area and run it until ATMOBOT is near other objects that give off the smell goes away. smells, such as cigarettes, insecticides, and fragrances.
- Page 34 5. Troubleshooting Problem Possible cause Solution The batteries in the Remote Control need to be Replace with new batteries, ensuring they are installed replaced. correctly. See the section 3.2 Pairing the Remote Control With The remote control is not paired with ATMOBOT. ATMOBOT to pair the remote control with ATMOBOT and test the pairing.
- Page 35 5. Troubleshooting Problem Possible cause Solution Remove any debris or hair tangled around the universal The universal wheel is tangled with debris. wheel. Remove any debris or hair tangled around the driving The driving wheels are tangled with debris. wheels. ATMOBOT is not moving smoothly or is deviating LDS are blocked.
- Page 36 5. Troubleshooting Problem Possible cause Solution The home Wi-Fi username or password was Enter the correct home Wi-Fi username and password. entered incorrectly. ATMOBOT is not within the range of the home Make sure ATMOBOT is within the Wi-Fi signal range. Wi-Fi signal.
-
Page 37: Specifications
6. Product Specifications Model KJ500G-A30G Rated Input 24V DC, 3.75A Charging Dock CH1343B Rated Input 24V DC, 3.75A Rated Output 24V DC, 3.75A Remote Control RC1712 Rated Input 3V DC, 20mA Power Adapter EA10952K Rated Input 100-240V AC, 1.5A Rated Output 24V DC, 3.75A Laser Frequency... - Page 38 일상생활을 더욱 스마트하게 ! ECOVACS ROBOTICS ATMOBOT 을 구매해 주셔서 감사합니다 ! 오랜 시간 뛰어난 성능에 만족하시기를 바라며 , 새 로봇으로 집안을 깨끗하게 청소하고 소중한 시간을 더 중요한 일에 할애하실 수 있을 것입니다 . 이 사용 설명서에 제대로 설명되지 않은 상황이 발생한 경우 고객 서비스 센터로 문의해 주십시오 . 전문 기술자가...
- Page 39 목차 1. 주요 안전 지침 ................................40 2. 패키지 내용물 ................................42 3. 작동 및 프로그래밍..............................47 4. 유지보수 .................................63 5. 문제 해결 ................................68 6. 사양 ..................................73...
-
Page 40: 주요 안전 지침
1. 주요 안전 지침 전기 제품을 사용할 때는 항상 다음을 포함한 기본적인 주의 사항 10. 매우 덥거나 추운 환경 (-5 ˚ C/23 ˚ F 미만 또는 40 ˚ C/104 ˚ F 이상 ) 에서는 사용하지 마십시오 . 을 준수해야 합니다 . 11. - Page 41 1. 주요 안전 지침 한 후 폐기해야 합니다 . 22. 오랫동안 충전 도크 또는 AC 어댑터를 사용하지 않는 경우 전원 코드를 뽑아 놓으십시오 . 23. 사용 설명서의 지침에 따라 기기를 사용해야 합니다 . ECOVACS ROBOTICS 는 부적절한 사용으로 인한 파손이나 상해에 대해서 는...
-
Page 42: 패키지 내용물
2. 패키지 내용물 2.1 패키지 내용물 충전 도크 및 충전 도크 리모컨과 배터리 2 개 로봇 사용 설명서 빠른 시작 가이드 범퍼 참고: 그림과 설명은 참고용으로만 제시되었으며 실제 제품과 다를 수 있습니다. - Page 43 2. 패키지 내용물 2.2 제품 도면 로봇 바람 세기 조절 버튼 공기 정화 모드 버튼 AUTO Wi-Fi 표시등 파란색 : 좋음 필터 상태 표시등 녹색 : 보통 PM1.0 표시등 제어 패널 AUTO 주황색 : 약간 나쁨 PM1.0 빨간색 : 매우 나쁨 공기질...
- Page 44 2. 패키지 내용물 전면 뒤로 적외선 거리 센서 미세먼지 센서 충전 도크 신호 충돌 방지 초음파 센서 센서 전원 스위치 덮개 충전 접촉부 덮개 내부 재설정 버튼 전원 스위치 (Wi-Fi 네트워크에 연결 : 재설정 버튼 을 누르십시오 . 신호음이 한 번 울리면 ("I"...
- Page 45 2. 패키지 내용물 측면 측면 ( 내부 ) 데이터 전송 포트 ( 고객 지원 센터 손잡이 전용 ) 흡기구 그릴 분리 버튼 흡기구 그릴 팬 보호대 폼 충돌 방지 센서...
- Page 46 2. 패키지 내용물 하단 충전 도크 유니버설 휠 적외선 신호 송신기 충전 도크 핀 떨어짐 방지 센서 배터리 덮개 구동 바퀴 충전 도크 범퍼 포트 떨어짐 방지 센서 전원 플러그 데이터 전송 포트 전원 어댑터 어댑터 포트 ( 고객 지원 센터 전용 ) 어댑터...
-
Page 47: 작동 및 프로그래밍
3. 작동 및 프로그래밍 3.1 사용 전 참고 사항 사용 전에 가구를 적절한 위치에 두고 전원 코드와 장난감 같은 물건을 ATMOBOT 은 폭 65cm 정도의 공간을 통과할 수 있습니다 . 치워서 깔끔하게 정리하십시오 . ATMOBOT 의 공기 정화 효율을 위해 복도와 같이 좁은 공간에 서 있지 ATMOBOT 위에... - Page 48 3. 작동 및 프로그래밍 ATMOBOT 을 딱딱한 바닥에서만 사용하십시오 . 공기 정화 경로에 카펫이나 깔개를 두지 마십시오 . ATMOBOT 이 부엌이나 화장실과 같이 젖은 장소에 들어가지 않도록 하십시오 . ATMOBOT 을 사용하기 전에 부엌이나 화장실 문을 닫는 것이 좋습니다 .
- Page 49 3. 작동 및 프로그래밍 로봇이 떨어지지 않도록 충전 도크를 계단 근처나 경사면에 두지 충전 도크를 거울과 같은 반사체 근처에 두지 마십시오 . 마십시오 . 충 전 도 크 를 직 사 광 선 아 래 에 두 지 마 십 시 오 . 강 한 빛...
- Page 50 3. 작동 및 프로그래밍 3.2 빠른 시작 보호재 분리 패키지를 개봉한 후 다음을 제거합니다. ATMOBOT 상단의 보호 각 측면의 팬 보호대 ( 폼 각 측면의 HEPA 에어백 포함 ) 필름 ATMOBOT 하단의 보호 ATMOBOT 의 보호 필름 충전 도크의 보호 필름 스트립...
- Page 51 3. 작동 및 프로그래밍 로봇 충전 Step Step 벽 아래에 걸레받이가 있는 경우에는 제공된 충전 도크 범퍼를 충전 ATMOBOT 하단의 전원 스위치 덮개를 엽니다 . 하단 전원 스위치를 도크에 설치합니다 . ON 위치로 옮깁니다 . ( “ I ” = 전원 켜짐 , “ O ” = 전원 꺼짐 ) 음악이 나오면 ATMOBOT 이...
- Page 52 3. 작동 및 프로그래밍 ATMOBOT 과 리모컨 페어링 Step Step ATMOBOT 전원 스위치를 "I" 로 밀어 기기를 켭니다 . 패키지에서 ATMOBOT 리모컨의 배터리를 꺼냅니다 . 리모컨 후면의 배터리 덮개를 열고 배터리를 삽입합니다 . 페어링 Step 50cm 완료 Step 리모컨의 버튼을 길게 누릅니다 . "a voice report..( 음성 보고 ..)" 가 들리면...
- Page 53 3. 작동 및 프로그래밍 3.3 ATMOBOT 사용 참고: ATMOBOT은 주 기기에서 사용, 앱 사용, 리모컨 사용의 세 가지 방법으로 작동합니다. 필요에 맞는 방법을 선택하십시오. 제어 패널 바람 세기 조절 버튼 저소음 0 – 15 좋음 보통 16 – 35 보통 Wi-Fi 표시등...
- Page 54 3. 작동 및 프로그래밍 공기 정화 시작 참고 : 1. 주 기기에서 두 가지의 정화 모드인 지점 정화 및 이동 정화를 실행할 수 있습니다 . 필요에 맞는 모드를 선택하십시오 . 2. 이동 정화를 처음 사용하는 경우 ATMOBOT 이 먼저 지도를 생성하고 정화를 진행하기 전에 정화가 필요한 지점을 설정합니다 . 3.
- Page 55 3. 작동 및 프로그래밍 스 캔 및 지 도 생 성 이 완 료 되 면 ATMOBOT 이 충 전 도 크 로 ATMOBOT 이 충 전 을 완 료 하 면 버 튼 을 3 초 간 누 릅 니 다 . AUTO Step 돌아갑니다...
- Page 56 3. 작동 및 프로그래밍 바람 세기 조절 공기 정화 정지 ATMOBOT에는 다음과 같이 네 가지의 바람 세기가 있습니다. 정지 : ATMOBOT 이 정화를 하는 도중에 버튼을 누릅니다 . AUTO 이동 정화 도중에 정화를 정지하면 현재 작업이 종료됩니다 . 스마트, 저소음, 보통, 강력...
- Page 57 3. 작동 및 프로그래밍 3.4 ECOVACS 앱 더 많은 기능을 사용하려면 ECOVACS 앱을 다운로드하십시오 . ECOVACS HOME iOS 9�0 or late r Android 4�0 or later...
- Page 58 3. 작동 및 프로그래밍 3.5 리모컨 대기 모드에서 ATMOBOT 을 전 방 , 후방 , 시계 방향 또는 시계 반 정화 지점 설정을 시작하거나 종료 대 방향으로 움직입니다 . 손을 떼 합니다 . 면 ATMOBOT 이 정지합니다 . 방향 시작 / 정지 대기...
- Page 59 3. 작동 및 프로그래밍 공기 정화 시작 참고 : 1. 리모컨으로 지점 정화와 이동 정화의 두 가지 정화를 시작할 수 있습니다 . 필요에 따라 선택하십시오 . 2. 이동 정화를 처음 사용하는 경우 ATMOBOT 이 먼저 지도를 생성하고 정화를 진행하기 전에 정화가 필요한 지점을 설정합니다 . 3.
- Page 60 3. 작동 및 프로그래밍 수동으로 정화 지점 설정 참고 : 1. 이동 정화 모드에서는 사용자의 집안 지도를 기반으로 ATMOBOT 이 자동으로 정화 지점을 생성합니다 . 리모컨을 사용하여 수동으로 지점을 설정할 수도 있습니다 . 2. 리모컨을 사용하여 수동으로 정화 지점을 설정하는 경우 첫 지점을 설정하고 확인하는 즉시 ATMOBOT 이 이전에 생성한 모든 지점이 삭제됩니다 . 3.
- Page 61 3. 작동 및 프로그래밍 ATMOBOT 이 제자리에서 360° 회전하여 다른 정화 지점을 설정하려면 2-3 단계를 반복하십시오 . 모든 Step 주변에 장애물이 없는지 확인합니다 . 음성 보고가 들리면 지점이 Step 지점이 설정되면 버튼을 3 초간 누릅니다 . 음성 보고가 들리면 성공적으로 설정된 것입니다 . 장애물이 있는 경우 다른 지점을 지점...
- Page 62 3. 작동 및 프로그래밍 바람 세기 조절 충전 ATMOBOT 에 지도가 있는 경우 버튼을 눌렀다 떼면 ATMOBOT 이 ATMOBOT에는 다음과 같이 네 가지의 바람 세기가 있습니다. 충전을 위해 충전 도크로 돌아갑니다 . 스마트, 저소음, 보통, 강력 리모컨의 버튼을 사용하여 이 수준을 전환할 수 있습니다 . 정지...
-
Page 63: 유지보수
4. 유지보수 4.1 필터 , 흡기구 그릴 및 팬 구역 참고 : 1. 주 기기의 부품을 유지보수하기 전에 로봇의 전원 스위치를 끄십시오 . 충전 도크를 유지보수할 경우 전원 코드를 분리합니다 . 2. ECOVACS 에서는 2 차 오염 및 소음 방지를 위해 주기적으로 필터를 관리하고 교체할 것을 권장합니다 . 관리... - Page 64 4. 유지보수 필터를 직사광선 아래 두고 2-3시간 동안 완전히 말립니다. 필터와 흡기구 그릴 부품을 원래 위치에 다시 조립합니다. (필터 Step Step 의 검은 면이 바깥을 향하게 합니다. 조립 시 필터의 하단을 단 단히 누릅니다.) 공기 필터 교체 공기 필터의 수명은 환경에 따라 달라집니다 . ECOVACS 앱을...
- Page 65 4. 유지보수 4.2 배기구 기기 상단의 배기구를 진공 청소기를 사용하여 주기적으로 청소하십시오 . 이렇게 하면 ATMOBOT 의 배기구를 깨끗하게 유지할 수 있습니다 . ATMOBOT 을 일정 기간 동안 사용하지 않을 경우 부드럽고 깨끗한 천으로 상단을 덮어두는 것이 좋습니다 . 4.3 충전 접촉부 , 떨어짐 방지 센서 및 범퍼 참고...
- Page 66 4. 유지보수 충전 도크 핀 청소 Step Step 1. 기기를 일정 기간 동안 사용하지 않을 경우 보관하기 전에 완전히 충전하고 전원 스위치를 끄십시오 . 매 3 개월마다 제품을 다시 충전하여 배터리의 방전을 방지합니다 . 2. 배터리가 방전됐거나 오랫동안 사용하지 않은 경우 충전이 안 될 수도 있습니다 . 유지보수는 당사의 애프터서비스 부서에 문의하십시오 . 배터리를 절대...
- Page 67 4. 유지보수 4.4 구동 바퀴 및 유니버설 휠 구동 바퀴 청소 유니버설 휠 청소...
-
Page 68: 문제 해결
5. 문제 해결 문제 해결 다음 표를 참조하여 ATMOBOT 을 사용할 때 발생하는 일반적인 문제를 해결하십시오 . 번호 문제 가능한 원인 해결 방법 ATMOBOT 의 전원 스위치가 꺼져 있습니다 . ATMOBOT 전원 스위치를 켜십시오 . 처음 사용하기 전에 주 기기의 배터리가 완전 충전되어야 합니다... - Page 69 5. 문제 해결 번호 문제 가능한 원인 해결 방법 이는 새 제품에서 나는 냄새입니다 . 제품을 환기가 잘 되는 곳에 두고 냄새가 사라질 때까지 ATMOBOT 근처에 담배 , 살충제 및 향수와 같은 작동하십시오 . 냄새가 나는 물건이 있습니다 . 필터에서 이상한 냄새가 비가...
- Page 70 5. 문제 해결 번호 문제 가능한 원인 해결 방법 새 배터리로 교체하고 배터리를 올바르게 넣었는지 리모컨의 배터리를 교체해야 합니다 . 확인합니다 . 섹션 3.2 ATMOBOT 과 리모컨 페어링을 참조하여 리모컨이 ATMOBOT 과 페어링되지 않습니다 . ATMOBOT 과 리모컨을 페어링하고 페어링을 테스트하십시오...
- Page 71 5. 문제 해결 번호 문제 가능한 원인 해결 방법 유니버설 휠에 감긴 이물질이나 머리카락을 유니버설 휠에 이물질이 감겼습니다 . 제거하십시오 . 구동 바퀴에 이물질이 감겼습니다 . 구동 바퀴에 감긴 이물질이나 머리카락을 제거하십시오 . ATMOBOT 이 부드럽게 움직이지 않거나 LDS 가 막혔습니다 . LDS 의...
- Page 72 5. 문제 해결 번호 문제 가능한 원인 해결 방법 입력한 홈 Wi-Fi 사용자 이름 또는 암호가 올바르지 올바른 홈 Wi-Fi 사용자 이름과 암호를 입력합니다 . 않습니다 . ATMOBOT 이 홈 Wi-Fi 범위 밖에 ATMOBOT 이 Wi-Fi 범위 안에 있는지 확인합니다 . 있습니다...
- Page 73 6. 제품 사양 모델 KJ500G-A30G 정격 입력 24V DC, 3.75A 충전 도크 CH1343B 정격 입력 24V DC, 3.75A 정격 출력 24V DC, 3.75A 리모컨 RC1712 정격 입력 3V DC, 20mA 전원 어댑터 EA10952K 정격 입력 100-240V AC, 1.5A 정격 출력 24V DC, 3.75A 레이저...
- Page 74 Ecovacs Robotics Co., Ltd No. 18 You Xiang Road, Wuzhong District, Suzhou City, A30G-020-IM2019R02 Jiangsu Province, P.R.China...
Need help?
Do you have a question about the ATMOBOT PRO and is the answer not in the manual?
Questions and answers