Table of Contents
Advertisement
Quick Links
Advertisement
Table of Contents

Summary of Contents for Acoustic Signature TA-1000
- Page 1 Instruction Manual TA-1000 Pick-Up Arm 08.06.2017...
- Page 2 The TA-1000 Series embraces three models..........................TA-1000 9 Inch TA-1000 10 Inch TA-1000 12 Inch offering pivot to Stylus dimensions covering virtually all turntable requirements. These arms offer at reasonable cost outstanding built quality with all the most important features including...
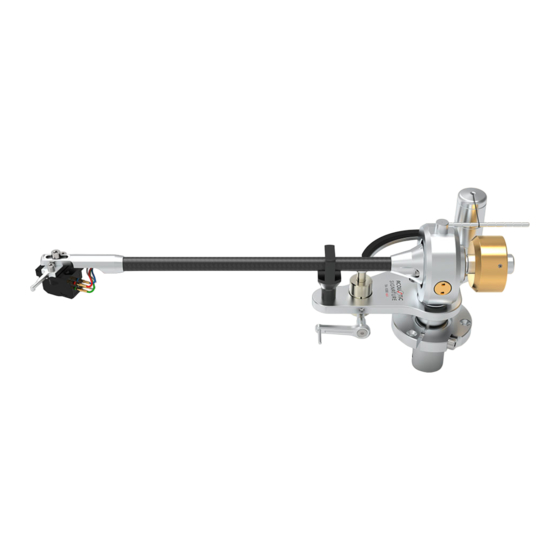
- Page 3 Parts identification...
- Page 4 1. Preparing the arm mounting board To mount the TA 1000 tonearm your turntable need´s to have a 23mm thru hole combined with 3 M3 thread´s around it at the Radius of 20.5mm (see drawing). Ensure that the thread´s are positioned as showed in the drawing. The distance of the center hole to the middle of the platter must be: 222mm for the 9 inch version 237,80mm for the 10 inch version...
- Page 5 3.1 Antiskating To ensure that depending on your needed Anti Skating force the string is moving straight the Antiskating Tower can be moved forward and backward. For low antiskating value up to 1gr. we suggest to have the Tower in a more front position. Higher values require a position in the midle or on the back end of the arm.
- Page 6 5.1 Prepare adjusting the cartridge Adjust the arm height with cartridge fitted, is either level or slightly low at the front end. You can do this by opening the red marked screw with the provided allen key. Open it carefully adjust the needed height and tighten the screw softly.
- Page 7 6.1 Adjusting the cartridge Use the plastic (showed pink in the left picture ) piece and place it below the anti skating stub and above the 2 metall pillar´s. This ensures your template is in the correct angle for adjusting the cartridge.
- Page 8 6.5 Adjusting the cartridge If you have to change the position of the diamond tip you can uns- crew the screw on the top of the tonearm`s headshell and move the cartridge into the corresponding position. Please make also sure that the leading edge of the cartridge is parallel to the marker lines of the cartridge alignment gauge and Not OK the needle is exactly in the reference point.
Need help?
Do you have a question about the TA-1000 and is the answer not in the manual?
Questions and answers