
Subscribe to Our Youtube Channel
Related Manuals for Qomo QPC80H2


Summary of Contents for Qomo QPC80H2
- Page 1 All manuals and user guides at all-guides.com QPC80H2 Portable Visualizer Quick Guide This document is subject to change without notice.
-
Page 2: Table Of Contents
All manuals and user guides at all-guides.com Contents Warnings ........................1 Parts Identification ......................2 Control Panel ......................... 3 Remote Control ......................4 Portable Visualizer ......................5 Recommended Working Environment ................6 Insert and Remove Micro SD Card (not supplied) ............7 USB Flash Drive (not supplied) .................. -
Page 3: Warnings
All manuals and user guides at all-guides.com Warnings Please prevent children from operating the device without supervision. Please unfold the device and adjust the camera head with one hand placing on the base and the other hand holding the case of camera head. ... -
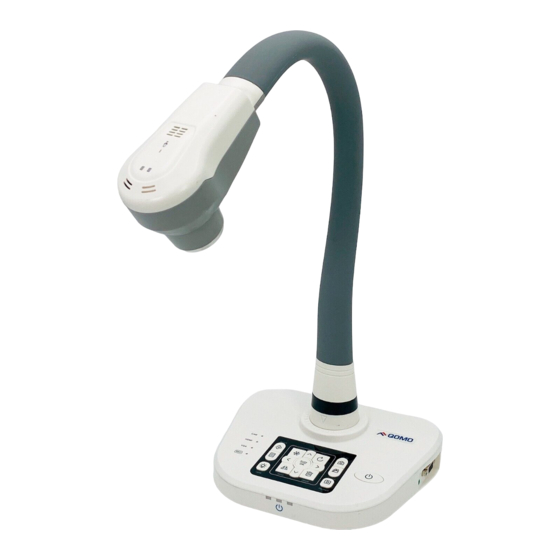
Page 4: Parts Identification
All manuals and user guides at all-guides.com Parts Identification VGA IN Anti-theft Slot Ventilation Hole Microphone Audio-OUT DC 12V Power Socket Remote Sensor VGA-OUT Micro SD Card Slot Signal Indicator HDMI-OUT Camera Head Control Panel LED Lamp Light VIDEO-OUT USB-A for flash drive & HDMI-IN Power Indicator mouse... -
Page 5: Control Panel
All manuals and user guides at all-guides.com Control Panel Button Function Button Function Power on/off *Press and hold for more than 2 seconds to turn off. *Short press to enter sleep mode (Note: Mirror the current image In sleep mode, camera and LED are off but HDMI pass-through function still works.) Up/Down,... -
Page 6: Remote Control
All manuals and user guides at all-guides.com Remote Control Button Function Button Function Power on/off *Press and hold for more than 2 seconds to turn off. *Short press to enter sleep mode Auto-focus or confirm Power (Note: In sleep mode, camera and LED are off but HDMI pass-through function still works.) Freeze/Unfreeze the current... -
Page 7: Portable Visualizer
All manuals and user guides at all-guides.com Portable Visualizer The section explains how to set up, adjust the device to meet your needs. Camera Head Please hold the camera head and adjust it to the position where you want to shoot the image. -
Page 8: Recommended Working Environment
All manuals and user guides at all-guides.com Recommended Working Environment Object distance in Telescope mode: 250 mm~∞; Object distance in Wide mode: 80 mm~ ∞; Suggested minimum height from Suggested minimum height from device in wide mode: 80 mm device in telescope mode: 250 mm Note: When the distance between object and camera is from 10 mm to 80 mm, please switch to Micro mode. -
Page 9: Insert And Remove Micro Sd Card (Not Supplied)
All manuals and user guides at all-guides.com Insert and Remove Micro SD Card (not supplied) SD Card 1. Insert the Micro SD card into the SD card slot on top of document camera. The images and files in internal memory can be copied to SD card or the capture image can be saved in the SD card. -
Page 10: Connect Portable Visualizer To External Equipment
All manuals and user guides at all-guides.com Connect Portable Visualizer to external equipment System connection diagram Connecting the power cord Plug in the power adapter to the device DC 12V IN power socket first and then connect the AC power cord to a 100V~240V AC power source. Note: The plug type of AC cord varies depending on the countries and regions where you are in. - Page 11 All manuals and user guides at all-guides.com Making the connection External Device Type Cable Equipment Interface Interface HDMI-OUT HDMI-IN HDMI HDMI-IN HDMI-OUT VGA-OUT VGA-IN VIDEO VIDEO-OUT VIDEO-IN AUDIO AUDIO-OUT AUDIO-IN TYPE-B Port TYPE-A Port TYPE-A Port TYPE-B Port RS232 control protocol RS232 Setting Baudrate 9600 bps...
- Page 12 All manuals and user guides at all-guides.com RS232 Packet 1 (Packet size: 4 bytes) HEADER LENGTH 0X48 0X02 0X14 0XXX 0X54 Command list FUNCTION HEADER LENGTH 0X14 0x48 0x02 0x04 0x54 0x48 0x02 0X14 0x05 0x54 DOWN 0x48 0x02 0X14 0x02 0x54 LEFT...
- Page 13 All manuals and user guides at all-guides.com 0x48 0x02 0X14 0x37 0x54 SCROLL_STOP 0x48 0x02 0X14 0x32 0x54 RECORD RECORD STOP 0x48 0x02 0X14 0x33 0x54 DELETE 0x48 0x02 0X14 0x35 0x54 Output Resolution and image ratios According to different resolution and image ratios, various display selections are listed below.
- Page 14 All manuals and user guides at all-guides.com Standard TV Connecting the VGA output port Use a VGA cable to connect the VGA OUT port of the device with the VGA input port of TV or projector. Note: Use Source Button to switch between modes. ...
-
Page 15: Basic Operation
All manuals and user guides at all-guides.com Basic Operation 1. Press MENU ( ) on the control panel or ( ) on the remote control. 2. Use ( ) to make a selection and adjust the setting. 3. Press OK button ( ) to make the new setting activated. - Page 16 All manuals and user guides at all-guides.com PC Camera USB to PC Mass Storage Copy to a SD card File Manager Delete all Format SD card Ensure System Reset Ignore Ensure Upgrade Ignore NTSC NTSC/PAL User 1 User Profile User 2 User 3 10%, 20%, 30%, 40%, 50%, 60%, 70% Mask Setting...
-
Page 17: Advanced Functions
All manuals and user guides at all-guides.com for 250 mm to ∞;wide mode: 80 mm to ∞; Micro mode for 10 mm to 80 mm. 2. Use the Left/Right buttons ( ) to adjust the image size. 3. Use the Auto Focus button to adjust the focus automatically. - Page 18 All manuals and user guides at all-guides.com menu. 2. Use the arrow buttons to select Mask: Menu>Function>Mask. Note: Use the Menu ( ) >Effect Setting>Mask setting to set the size of Mask. Highlight Line function You can use the Highlight Line function to mark those functions with a cross line. 1.
-
Page 19: Use The Device As A Camera
All manuals and user guides at all-guides.com Use the device as a camera Start the settings 1. Connect the device with the computer through USB Type-B: Turn on the power of your computer, and use the USB cable to connect the device with the USB port of your computer. -
Page 20: Storage
All manuals and user guides at all-guides.com Storage 1. Please turn off the power of the device. 2. Please unplug and remove the power cord and all other cables from the device. 3. Please refer to the diagram to the right to fold the gooseneck flexible tube for storage. -
Page 21: Problems And Solutions
All manuals and user guides at all-guides.com Problems and Solutions Problem Possible causes Solutions Make sure the power The device does not The power adapter is not adapter is connected turn on in normal connected correctly to the device correctly to the device and condition. -
Page 22: Specifications
Please shorten the distance The distance between the remote between the remote control control and the device is too far. and the device. Specifications Model QPC80H2 Image Sensor Omnivision 1/3" CMOS Lens 6 x optical zoom, 10 x digital zoom A3/A4 Shooting Area...
Need help?
Do you have a question about the QPC80H2 and is the answer not in the manual?
Questions and answers