Advertisement
Quick Links
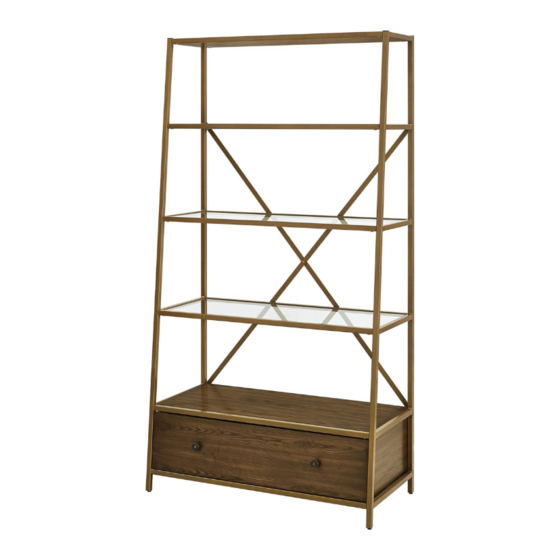
Metal Pyramid Etagere
Model Number:
UPC Code:
DA7836
0-65857-17972-9
Congratulations on your latest furniture purchase! Dorel Living furniture has been developed
with quality, convenience and style in mind. We trust it will provide you with many years of
exceptional comfort and service.
Before beginning assembly, we encourage you to familiarize yourself with your new furniture
piece by taking a few minutes to go through this booklet. It contains important information on our
warranty and care tips to keep your furniture looking as good as new.
Customer satisfaction is important to us at Dorel Asia. Our agents are available Monday to Friday
8am to 5pm (EST) to answer any question you may have. For faster service, always have the
model number ready when calling our toll free number 1-800-295-1980 or emailing us at
das@dorel.com .
For more great furniture ideas, check out our website at
www.dorelliving.com
You can also keep up to date on all the latest trends by liking our
Facebook
page.
Date of Purchase: _____ / _____ / _____
Lot Number:
(taken from carton)
DO NOT RETURN PRODUCT TO THE STORE. If a part is missing or damaged, contact
our customer service department. We will replace the part FREE of charge.
NOTE: THIS INSTRUCTION BOOKLET CONTAINS IMPORTANT SAFETY
INFORMATION. PLEASE READ AND KEEP FOR FUTURE REFERENCE.
Advertisement

Related Manuals for Dorel Living DA7836


Summary of Contents for Dorel Living DA7836
- Page 1 UPC Code: DA7836 0-65857-17972-9 Congratulations on your latest furniture purchase! Dorel Living furniture has been developed with quality, convenience and style in mind. We trust it will provide you with many years of exceptional comfort and service. Before beginning assembly, we encourage you to familiarize yourself with your new furniture piece by taking a few minutes to go through this booklet.
-
Page 2: Care And Cleaning
CUSTOMER SERVICE If you have any questions about this product, contact our customer service representative first! CALL 1-800-295-1980 You can also order parts by writing to the address listed below. Please include the product model number, color and a detailed description of the part. Customer Service Department No. -
Page 3: Hardware List
Metal Pyramid Etagere DA7836 HARDWARE LIST ∅1/4"*1/2" ∅5/32"*1/2" ∅8*2.5mm BOLT SCREW SUCTION CAP 30 PCS 12PCS 18 PCS ALLEN KEY CAM BOLT CAM LOCK 1 PC 8 PCS 8 PCS ∅32*20mm ∅5/32"*7/8" ∅1/8"*1/2" KNOB BOLT SCREW 2 PCS 2 PCS 6 PCS ∅1/4"*8mm... -
Page 4: Parts List
Metal Pyramid Etagere M U LTI FU N C TI O N C A R T DA7836 PARTS LIST LEFT SIDE PANEL RIGHT SIDE PANEL TOP PANEL 1 PC 1 PC 1 PC STRETCHER STRETCHER TOP WOOD PANEL 5PCS 4 PCS... - Page 5 Metal Pyramid Etagere M U LTI FU N C TI O N C A R T DA7836 PARTS LIST UPPER GLASS SHELF MIDDLE GLASS SHELF BOTTOM GLASS SHELF 1 PC 1 PC 1 PC DRAWER BACK DRAWER LEFT SIDE PANEL...
- Page 6 Metal Pyramid Etagere DA7836 STEP 1: Insert cam bolts (5) into drawer left side and right side panel (N & O). Insert cam locks (6) into drawer back (M) as shown. Attach drawer left and right side panel (N & O) to the drawer back (M) and secure by rotating cam locks (6) 1/2-turn clockwise using a Phillips head screwdriver (not included).
- Page 7 Metal Pyramid Etagere DA7836 STEP 2: Attach knobs (7) to drawer front (P) with bolts (8) using a Phillips head screwdriver. Insert cam bolts (5) into drawer front (P), and cam locks (6) into drawer side panels (N & O) as shown.
- Page 8 Metal Pyramid Etagere DA7836 STEP 3: Attach slide connector (S) to drawer slides (R). Insert drawer slides (R) into drawer back (M) as shown below until they rest in the grooves of drawer front (P). Secure slide connectors (S) to drawer back (M) with screws (9) using a Phillips head...
- Page 9 Metal Pyramid Etagere DA7836 STEP 4: Attach drawer stoppers (10) to the bottom wood panel (G) with screws (9) using a Phillips head screwdriver (not included) as shown.
- Page 10 Metal Pyramid Etagere DA7836 STEP 5: Attach top panel (C) to left side panel (A) with bolts (1) and Allen key (4) as shown. NOTE: Do not fully tighten the bolts. Loose bolts will facilitate assembly in the following steps.
- Page 11 Metal Pyramid Etagere DA7836 STEP 6: Attach stretchers (D) to left side panel (A) with bolts (1) and Allen key (4) as shown. NOTE: Do not fully tighten the bolts. Loose bolts will facilitate assembly in the following steps.
- Page 12 Metal Pyramid Etagere DA7836 STEP 7: Attach stretcher (T) to left side panel (A) with bolts (1) and Allen key (4) as shown. NOTE: Do not fully tighten the bolts. Loose bolts will facilitate assembly in the following steps.
- Page 13 Metal Pyramid Etagere DA7836 STEP 8: Attach stretchers (E) to left side panel (A) with bolts (1) and Allen key (4) as shown. NOTE: Do not fully tighten the bolts. Loose bolts will facilitate assembly in the following steps.
- Page 14 Metal Pyramid Etagere DA7836 STEP 9 Attach right side panel (B) to the assembled unit with bolts (1) and Allen key (4) as shown. NOTE: Do not fully tighten the bolts. Loose bolts will facilitate assembly in the following steps.
- Page 15 Metal Pyramid Etagere DA7836 STEP 10 Attach top wood panel (F) to stretchers (E) with screws (2) using a Phillips head screwdriver (not included) as shown. Make sure the top wood panel (F) is properly placed before securing it to...
- Page 16 Metal Pyramid Etagere DA7836 STEP 11 Attach bottom wood panel (G) to stretchers (E) with screws (2) using a Phillips head screwdriver (not included) as shown. Make sure the bottom wood panel (G) is properly placed before securing it to the stretchers (E).
- Page 17 Metal Pyramid Etagere DA7836 STEP 12 Attach the X-back post (H) to left and right side panel (A & B) and stretcher (T) as shown below with bolts (1) and Allen key (4) . NOTE: Do not fully tighten the bolts. Loose bolts will facilitate assembly in...
- Page 18 Metal Pyramid Etagere DA7836 STEP 13 Attach the X-back post (I) to left and right side panel (A & B) and stretcher (T) as shown below with bolts (1) and Allen key (4). NOTE: Do not fully tighten the bolts. Loose bolts will facilitate assembly in...
- Page 19 Metal Pyramid Etagere DA7836 STEP 14 Secure the X-back posts (H & I) with bolts (1) and Allen Key (4) as shown. Tighten all bolts previously installed.
- Page 20 Metal Pyramid Etagere DA7836 STEP 15 Slide the assembled drawer unit into the grooves of the drawer slides as shown.
- Page 21 Metal Pyramid Etagere DA7836 STEP 16 Place suction caps (3) on the metal supports on the frame as shown. Gently place the upper (J), middle (K), and bottom (L) glass shelves onto the shelf frames as shown.
- Page 22 Metal Pyramid Etagere DA7836 NOTE: The holes on the corners of top panel are to be used when securing the unit to the wall with the safety straps. The bottom posts are equipped with adjustable levelers. Rotate the adjustable levelers to make sure the...
- Page 23 Metal Pyramid Etagere DA7836 CAUTION: This unit is intended for use only with the products and/or maximum weights indicated. Use with other products and/or products heavier than the maximum weights indicated may result in instability or cause possible injury. Product...
- Page 24 MODEL #: DA7836 Customer Service PLEASE DO NOT RETURN THIS PRODUCT TO THE STORE PLEASE CONTACT CUSTOMER SERVICE REPRESENTATIVES AT THE FOLLOWING NUMBERS SHOULD THERE BE ANY MISSING OR DEFECTIVE PART(S). Customer Service Phone Number 1-800-295-1980 Email: das@dorel.com Customer Service Fax Number 514-353-7819...
- Page 25 Furniture Wall Safety Strap MOUNTING BRACKET SAFETY WALL STRAP LONG SCREW SHORT SCREW 4 PCS 2 PCS 2 PCS 2 PCS TOOLS NECESSARY: RUBBER MALLET AND PHILLIPS SCREW DRIVER ARE NOT INCLUDED. NOTE: 3/8" DRILL BIT AND ELECTRIC DRILL ARE NOT PROVIDED. WARNING: WHEN UPRIGHT, IT IS POSSIBLE THAT THE FURNITURE MAY TIP OVER.
Need help?
Do you have a question about the DA7836 and is the answer not in the manual?
Questions and answers