Table of Contents
Advertisement
Quick Links
DATE
DATE
Kit remplacement poignée à dépression
01/02/02
Coloris / Colour
Référence / Reference
Jaune - Yellow
Rouge - Red
Bleu - Blue
Orange - Orange
1•
Déposer le guidon (1) et
les carters (2 et 3).
Remove the handlebars
(1) and fairings (2 and 3).
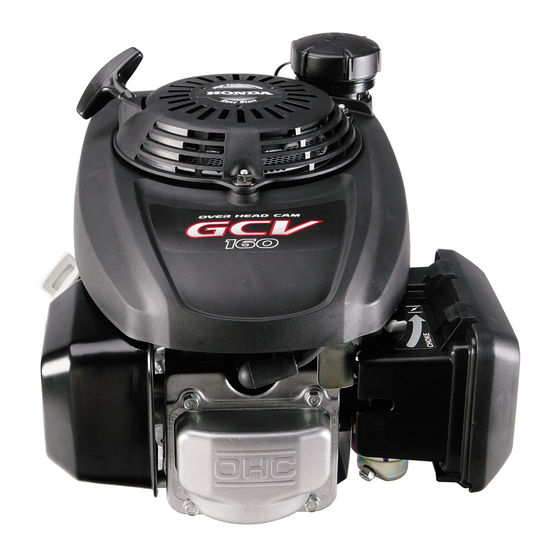
Version Honda GCV 160
2•
Remplacer le tuyau d'aspiration (4) par le nouveau en supprimant
le clapet anti-retour.
Replace the air inlet tube (4) with the new one; do not re-use the non-
return valve.
Vérifier l'étanchéité entre le tube
et la cale thermique.
Check that there is no leakage bet-
ween the tube and the thermal block.
Version Briggs & Sratton 5,5HP - OHV
A - Dévisser le carter et enlever le
filtre. Démonter le support filtre
(5).
A - Unbolt the fairing and remove the
filter. Dismantle the filter bracket
(5).
B - Démonter le carburateur (6).
B - Unbolt the carburettor (6).
C - Dégager la pièce du carbura-
teur (7), enlever le clapet anti-
retour (8) et remplacer le tuyau
d'aspiration (9). Remonter l'en-
semble filtre.
C - Release the carburettor piece (7),
remove the non-return valve (8)
and replace the air inlet tube (9)
with the new one. Reassemble the
carburettor and filter assembly.
3•
Déposer la courroie (10), câble (11) et le verin (12). Supprimer le
coude (13).
Take off the belt (10), cable (11) and cylinder (12). Discard the angle
bracket (13).
Note d'information technique
Technical information
OBJET
PURPOSE
Replacement kit for vacuum lever
Type de moteur / Type of engine
12101150
Honda GCV 160
Briggs & Stratton 3,5 - 5HP
Briggs & Stratton 5,5HP Intek OHV
Robin EY20
12102150
12103150
12104150
1
2
5
6
9
8
7
MACHINE CONCERNÉE
MACHINE CONCERNED
TOUTES LES MOTOBINEUSES DE PRODUC-
TION PUBERT A PARTIR DU 09 / 2000
ALL THE TILLERS OF PUBERT PRODUC-
3
4
4•
Repositionner le câble (11) sur la
tige du nouveau vérin (14).
Reposition the cable (11) on the stem
of the new cylinder (14).
5•
Mettre l'extrémité du câble dans le trou supérieur du levier, bien le
positionner dans la gorge du galet de renvoi. Si trou non existant,
le réaliser (Ø5,5) suivant le croquis ci-dessous.
Place the end of the cable in the upper hole of the lever, making sure it is
properly positioned in the groove of the return pulley. If there is no hole
in the lever, drill one (diameter 5.5 mm) as shown in the diagram below.
6•
Fixer le vérin à l'aide des 2 vis (15).
la vis la plus longue à l'arrière. Enlever la
peinture sous l'écrou (16).
Bolt the cylinder in place using the two screws (15)
The longer screw goes at the back. Scrape off
the paint from under the nut (16).
TION FROM 09 / 2000
Tube fournie / Tube supplied
14328 - Ø3,5x8,4 - lg 435
14320 - Ø4,7x9,5 - lg 200
Non fourni - Not supplied
12
13
10
11
Remonter la courroie - Replace the belt
FICHE N°
SHEET NO
2003/013
11
14
10
15
16
25241
Advertisement
Table of Contents

Summary of Contents for Pubert Honda GCV 160
- Page 1 SHEET NO Kit remplacement poignée à dépression TOUTES LES MOTOBINEUSES DE PRODUC- 2003/013 01/02/02 TION PUBERT A PARTIR DU 09 / 2000 Replacement kit for vacuum lever ALL THE TILLERS OF PUBERT PRODUC- TION FROM 09 / 2000 Coloris / Colour Référence / Reference...
- Page 2 7• 12• Démonter la vis (17) de la poignée Raccrocher l’extrémité du câble sur le inverseur, l’écrou (18) et les rondelles levier (20), visser l’écrou (18) d’un ou (19). Retirer le câble par le bas du gui- deux tours avec les deux rondelles don après l’avoir déconnecté...
Need help?
Do you have a question about the Honda GCV 160 and is the answer not in the manual?
Questions and answers