
Summary of Contents for Flyte ONE PRO 2
- Page 1 ONE PRO 2 Manuale d’uso e manutenzione Operations and maintenance manual 100% MADE IN ITALY...
- Page 2 INDICE DELLE LINGUE - LANGUAGE INDEX Italiano ................. pag 3 English ................pag 12...
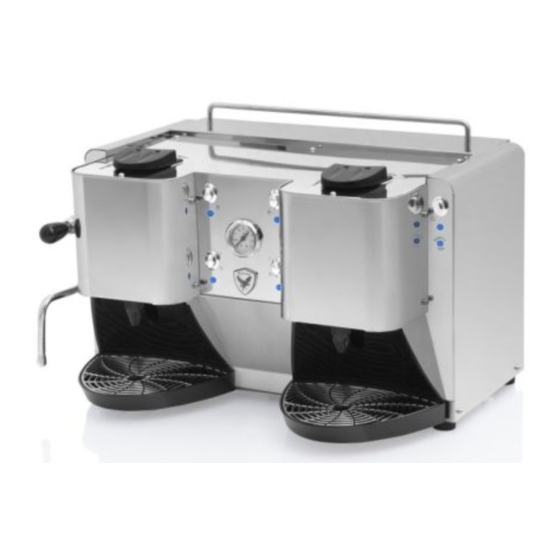
- Page 3 Tecno Meccanica S.r.l. Tutti i diritti sono riservati Nessuna parte di questo manuale può essere riprodotta, copiata o divulgata con qualsiasi mezzo senza l’autorizzazione scritta della Tecno Meccanica S.r.l. Pomello erogazione vapore; Accensione caldaia vapore; C. Spia di accensione gruppo caffè; D. Interruttore accensione gruppo caffè; Spia di temperatura gruppo caffè; Interruttore erogazione caffè;...
- Page 4 INDICAZIONI GENERALI DI SICUREZZA Di seguito sono riassunte alcune indicazioni generali di sicurezza: • Leggere attentamente le istruzioni d’uso prima di procedere alla messa in funzione della macchina; • Non effettuare mai alcuna operazione con le mani umide o bagnate; • Non coprire mai la macchina, neppure parzialmente, con strofinacci o con teli di protezione; • Non mettere le mani in prossimità dei beccucci erogazione caffè (rif. L), della lancia erogazione vapore (rif. P) e del ripiano superiore scalda-tazze (rif. R) durante il funzionamento; •...
- Page 5 INSTALLAZIONE Estrarre la macchina dall’imballo e collocarla su un piano stabile, adatto a sostenerne il peso, in prossimità di una presa di corrente idonea. Conservare l’imballo in tutte le sue parti per eventuali futuri trasporti. RIEMPIMENTO DEL SERBATOIO Togliere il coperchio di acciaio (rif. H) per accedere al serbatoio acqua. RACCOMANDIAMO L’UTILIZZO DI UN FILTRO ADDOLCITORE O DI UN SACCHETTO ANTICALCARE che deve essere periodicamente sostituito.
- Page 6 ACCENSIONE Accendere la macchina premendo l’interruttore generale (rif. M) posto sul fianco destro della stessa; la spia sottostante (rif. Q) si illuminerà. Per poter utilizzare i gruppi è necessario premere, sul pannello frontale dei comandi, i relativi interruttori d’accensione (rif. D); si illumineranno istantaneamente le corrispondenti spie blu (rif. C). I due gruppi sono indipendenti l’uno dall’altro: pertanto è possibile utilizzarli simultaneamente, oppure tenerne acceso soltanto uno (quando ad esempio il carico di lavoro è inferiore) per ottenere così un apprezzabile risparmio energetico. Appena accesi i gruppi, inizia il rapido processo di riscaldamento dei relativi corpi termici. Attendere l’accensione delle corrispondenti spie (rif. E): quando ciò si verifica vuol dire che l’acqua è in temperatura ottimale di esercizio e che i gruppi sono pronti all’uso.
- Page 7 APPARATO VAPORE La Vostra One Pro 2 è dotata dell’apparato per la produzione di vapore, pertanto Vi preghiamo di leggere attentamente quanto segue. Per poter utilizzare tale apparato è necessario premere, sul fianco sinistro della macchina, l’interruttore d’accensione (rif. B) della caldaia specifica; la spia sottostante si illuminerà. Attendere circa 6 minuti, durante i quali la caldaia andrà in pressione ideale di esercizio. Verificare da manometro (rif. I) che la pressione arrivi a circa 1,8 bar: quando ciò si verifica vuol dire che la caldaia è pronta ad erogare vapore. Per erogare vapore: inserire la lancia vapore (rif. P) all’interno di una tazza o altro recipiente contenente il liquido da scaldare o emulsionare (es. latte). Premere e tenere premuto il pomello (rif. A) in qualsiasi direzione: il vapore fuoriuscirà dal terminale della lancia (rif. P). Una volta ottenuto il risultato desiderato, potete rilasciare lo stesso pomello (rif.
- Page 8 PULIZIA DELLA LANCIA VAPORE (RIF. P) La lancia vapore deve essere pulita giornalmente, se utilizzata. A tale riguardo, inserire la lancia vapore (rif. P) all’interno di una tazza o altro recipiente contenente esclusivamente acqua pulita e premere e tenere premuto il pomello (rif. A) in qualsiasi direzione. Dopo 1 minuto potete rilasciare lo stesso pomello (rif. A).per arrestare il vapore. Attendere che la lancia (rif. P) si sia sufficientemente raffreddata, dopodichè...
- Page 9 PROBLEMA POSSIBILE CAUSA SOLUZIONE Erogazione del caffè Serbatoio dell’acqua vuoto Riempire il serbatoio (pag. 4). insufficiente o impossibile Spostamento sonda livello Verificare che la sonda, inserita acqua nel foro destro del serbatoio, non tocchi le pareti interne del serbatoio o altri oggetti (ad es. il sacchetto anticalcare) Macinatura troppo fine Utilizzare una cialda nuova.
- Page 10 La Società costruttrice Tecno Meccanica S.r.l. con sede amministrativa sita in Via Marlianese 43, 51034 Serravalle Pistoiese (PT) ITALY Dichiara sotto la propria responsabilità che la macchina per il caffè espresso descritta in questo manuale: Modello: One Pro 2 Alimentazione: 220v 50/60hz Anno di costruzione: vedi targa CE È conforme alle Direttive: 2006/42/CE relativa al ravvicinamento delle legislazioni degli Stati membri relative alle macchine, che sostituisce la Direttiva 98/37/CE;...
-
Page 12: Table Of Contents
Tecno Meccanica S.r.l. All rights reserved No part of this manual can be reproduced, copied or disclosed by any means without written authorisation by Tecno Meccanica S.r.l. Steam delivery knob; Steam boiler switching-on; C. Coffee group ON light; D. Coffee group ON switch; Coffee group temperature light; Coffee pouring switch; Sliding door; Water tank cover;... -
Page 13: General Safety Indications
GENERAL SAFETY INDICATIONS Some general safety indications are summarised below: • Carefully read the use instructions before operating the machine; • Do not carry out any operation with humid or wet hands; • Never cover the machine, not even partially, with cloths or protection cloths; •... -
Page 14: Installation
INSTALLATION Remove the machine from the packaging and place it on a stable and horizontal surface, suitable to support its weight, near a suitable socket. Keep the packaging and all its parts for possible future transport. FILLING OF THE TANK Remove the steel cover (ref. -
Page 15: Turning-On
TURNING-ON Turn on the machine pressing the general switch (ref. M) located on the right side of the same; the underlying light (ref. Q) turns on. To use the groups, it is necessary to press, on the front command panel, the relative turning-on switches (ref. -
Page 16: Steam And Hot Water Device (Optional)
STEAM DEVICE One Pro 2 is equipped with a device for the production of steam; therefore, we kindly ask you to carefully read what follows. To use such device, it is necessary to press, on the left side of the machine, the ON switch (ref. B) of the specific boiler; the underlying light will turn on. Wait about 6 minutes, during which the boiler will reach the ideal operating pressure. Check through the pressure gauge (ref. I) that the pressure reaches about 1.8 bars: when this occurs, the boiler is ready to deliver steam. To deliver steam: insert the steam wand (ref. P) inside a cup or other container containing the liquid to be heated or emulsified (i.e. milk) Press the knob (ref. A) and keep it pressed in any direction: the steam will come out from the end of the wand (ref. P). Once obtained the desired result, release the same knob (ref. A). -
Page 17: Cleaning Of The Steam Wand
CLEANING OF THE STEAM WAND (REF. P) The steam wand must be cleaned daily, if used. In this regard, insert the steam wand (ref. P) inside a cup or other container containing exclusively clean water and press and keep pressed the knob (ref. A) in any direction. - Page 18 ANOMALY POSSIBLE CAUSE SOLUTION Insufficient or impossible Water tank empty Fill the tank (page 4). pouring of the coffee Water level probe has moved Check that the probe, inserted in the right hole of the tank, does not touch the internal walls of the tank or other objects (for example the anti-scale bag) Grinding too fine Use a new pod.
- Page 19 The manufacturing Company Tecno Meccanica S.r.l. with registered office located in Via Marlianese 43, 51034 Serravalle Pistoiese (PT), ITALY. Declares under its own responsibility that the espresso coffee machine described in this manual Model: One Pro 2 Power supply: 220v 50/60hz Year of construction: see CE marking Complies with the following Directives: 2006/42/CE on the approximation of the laws of the Member States relating to machinery, repeals Directive 98/37/EC;...
-
Page 20: Warranty Conditions
WARRANTY The warranty is limited to the manufacturing or material defects, it is not valid for parts subject to wear or damages to delicate parts (switches, power supply cable, etc.…), and it is NOT extended to the damages deriving from negligence or incorrect use of the same machine (for example, use of water of hardness exceeding 8°F, and/or non-use or replacement of the suitable water softening filter that can cause scale). In case of failure covered under warranty, bring the machine back to the same Dealer where the machine was bought, together with the receipt or invoice, on which the serial number, corresponding to the one present on the machine, is reported. Only this way the free of charge restore of the machine’s functions...
Need help?
Do you have a question about the ONE PRO 2 and is the answer not in the manual?
Questions and answers