
Summary of Contents for Dahua Technology TiOC
- Page 1 How To Guides TiOC Solution Quick Start Guide Leading video surveillance product and solution provider...
- Page 2 QUICK START GUIDE TiOC Solution...
-
Page 3: Table Of Contents
QUICK START GUIDE | TiOC Solution Page 1 CONTENTS 1. What’s Required? 2. Installation Guide 2.1 Installing the camera 2.1.1 What’s in the box? 2.1.2 Installation requirements 2.1.3 How to install the camera 2.2 Installation of the recorder 2.2.1 Ports on the recorder 2.2.2 How to install the recorder... -
Page 4: What's Required
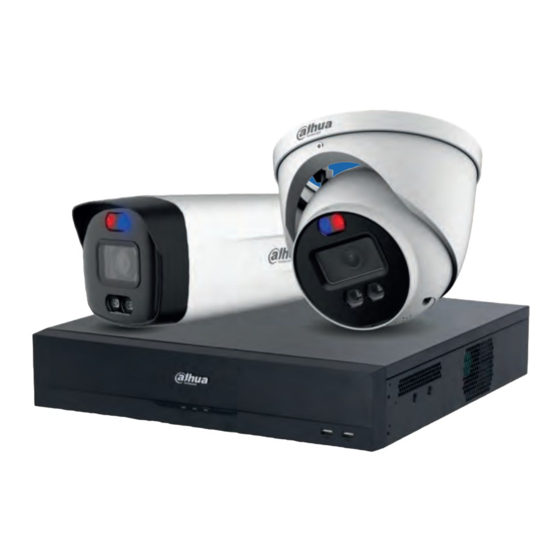
QUICK START GUIDE | TiOC Solution Page 2 1. What’s required? Equipment Specification Type Appearance Remarks IPC-HFW3249T1-AS-PV IPC-HFW3549T1-AS-PV IPC-HFW3849T1-AS-PV System Version: V2.800.00AD00.0.R Cameras Build Date: 29/07/2020 IPC-HDW3249T1-AS-PV IPC-HDW3549T1-AS-PV IPC-HDW3849T1-AS-PV System Version: V4.000.10BE002.4 Recorders NVR5000-I Series Build Date: 10/09/2020 Monitor DHL22-F600-S The firmware version is based on the latest version when this document was created and may slightly differ from future versions, however this will not affect any of the functions. -
Page 5: Installation Requirements
QUICK START GUIDE | TiOC Solution Page 3 2.1.2 Installation requirements We recommend an installation height and distance from the camera of approx. 3 meters, with the depression angle between 20° and 40°. 2.1.3 How to install the camera... -
Page 6: Installation Of The Recorder
QUICK START GUIDE | TiOC Solution Page 4 2.2 Installation of the recorder 2.2.1 Ports on the recorder Front Panel Rear Panel Port Name Port Name Port Name USB Ports Power Button MIC IN IR Indicator eSATA Port MIC OUT... -
Page 7: Connection And Initialisation
QUICK START GUIDE | TiOC Solution Page 5 3. Connection and Initialisation The next steps depend on what system is being installed; camera-only system or the NVR system. 3.1 Deployment of camera-only system If the camera has already been connected to the power and LAN it can be searched using... - Page 8 QUICK START GUIDE | TiOC Solution Page 6 After a while the status will change to initialised and then it is possible to get the IP address. Step 3: Login to the camera using a web browser by entering the IP address.
-
Page 9: Deployment Using Nvr-System
QUICK START GUIDE | TiOC Solution Page 7 3.2 Deployment using NVR-system If you are using an NVR-system, the following instruction will show how to initialise it. Once you have entered all of the basic information, there are several ways of initialising cameras. - Page 10 QUICK START GUIDE | TiOC Solution Page 8 7. Enter your IP Address. Step 3: Add the camera during the initialisation stage. Click Search Device and click Add after you select the camera you want to add to the device. Cameras can be added at this stage or later.
- Page 11 QUICK START GUIDE | TiOC Solution Page 9 Click Initialise and use the original information of the NVR for the new camera. You can change the new camera’s IP address on this screen. Please make sure the IP of camera is within the same range of the NVR’s IP address.
-
Page 12: Key Function Configuration
QUICK START GUIDE | TiOC Solution Page 10 You can also manually add the camera by typing the target IP address, user name and password. If the camera has been added successfully the new camera will be shown as the last of the added devices. -
Page 13: Face Mask Detection
QUICK START GUIDE | TiOC Solution Page 11 Click Draw Rule on the left hand side and use the mouse to draw a line for the target on the scene and set the parameter. Click Save in the bottom right hand corner to complete. -
Page 14: For The System Using An Nvr
QUICK START GUIDE | TiOC Solution Page 12 Step 3: To check the face detection alarm record details click Alarm on the top right hand corner and IVS under the Alarm Type. tick 4.2 For the system using an NVR 4.2.1 IVS... -
Page 15: Face Mask Detection
www.indigodistribution.co.uk Dunlop Commercial Park 3 Balloo Link, Bangor BT19 7HJ...
Need help?
Do you have a question about the TiOC and is the answer not in the manual?
Questions and answers