
Summary of Contents for OSS OSS-CPCIE3-3U-CR-4-M.2
- Page 1 CPCIe M.2 Flash Storage Module Model: OSS-CPCIe3-3U-CR-4-M.2 / OSS-CPCIe3-3U-CR-8-M.2 CPCIe M.2 Flash Storage Module SKU: OSS-CPCIe3-3U-CR-4-M.2 OSS-CPCIe3-3U-CR-8-M.2 www.onestopsystems.com...
-
Page 2: Table Of Contents
OSS-478 (OSS-CPCIe-3U-M.2) 1.4.2 OSS-481 (OSS-MEZZ-M.2) 478 and 481 Combined PCIe link LEDs General Features PLX 8748 (48-lane) PCIe Switch Parts of OSS-478 board Hardware & Software Requirements Hardware Software Tools Required for Installation Installation Procedures Installation on CPCIe Host unit Prepare the 0SS-478 board Mount the M.2 CARD... - Page 3 One Stop Systems 7.1 Contacting Technical Support 7.2 Returning Merchandise 7.3 Online Support Resources OSS-CPCIe3-3U-CR-X | 3...
-
Page 4: Preface
Disclaimer: We have attempted to identify most situations that may pose a danger, warning, or caution condition in this manual. However, the company does not claim to have covered all situations that might require the use of a Caution, Warning, or Danger indicator. OSS-CPCIe3-3U-CR-X | 4... -
Page 5: Safety Instructions
Also, before connecting a cable, make sure both connectors are correctly oriented and aligned. CAUTION Do not attempt to service the system yourself except as explained in this manual. Follow installation instructions closely. OSS-CPCIe3-3U-CR-X | 5... - Page 6 Handle all sensitive components at an ESD workstation. If possible, use anti-static floor pads and workbench pads. Handle components and boards with care. Do not touch the components or contacts on a board. Hold a board by its edges or by its metal mounting bracket. OSS-CPCIe3-3U-CR-X | 6...
-
Page 7: Introduction
Dimensions 3.94 x 6.3” (100 x 160 mm) (H x L) Single Slot 4HP, 0.8" width (OSS-478) Single Slot 8HP, 0.8" width (OSS-478 + OSS-481 mezzanine) Weight: 3 lb Bandwidth / Backplane PCIe x8 Gen3 (64Gb/s) Interface M.2 Interface Four or Eight x4 Gen3 (32Gb/s) to each M.2... -
Page 8: 478 Block Diagram
One Stop Systems 478 Block Diagram OSS-478 (OSS-CPCIe-3U-M.2) OSS-CPCIe3-3U-CR-X | 8... -
Page 9: M.2 Interface
Since M.2 allows for direct communication over PCIe at up to 4 lanes without a controller chip, a PCIe switch chip is used on the M.2 mezzanine board to provide maximum lanes to each M.2 module Optional Mezzanine board OSS-481 (OSS-MEZZ-M.2) OSS-CPCIe3-3U-CR-X | 9... -
Page 10: Board Dimensions
One Stop Systems Board Dimensions 1.4.1 OSS-478 (OSS-CPCIe-3U-M.2) 1.4.2 OSS-481 (OSS-MEZZ-M.2) OSS-CPCIe3-3U-CR-X | 10... -
Page 11: 478 And 481 Combined
One Stop Systems 478 and 481 Combined OSS-478 with M.2 DRIVES OSS-478 and OSS-481 attached together PCIe link LEDs PCIe Link Status LED Pattern No Link Link is up, 2.5 GT/s, Any negotiated link width Blinking 1Hz Link is up, 5 GT/s, Any negotiated link width... -
Page 12: Plx 8748 (48-Lane) Pcie Switch
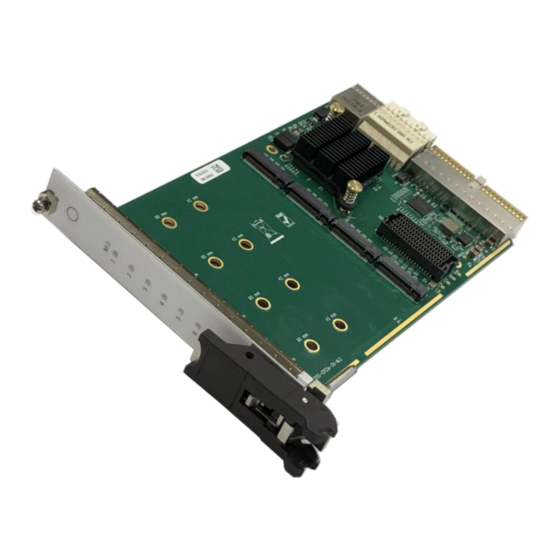
PCIe Switch : On board PLX 8748 PCIe Switch M.2 Key slot: Slot for mounting the M.2 module Mezzanine board connector: For attaching the optional OSS-481 board PXI XP4 Connector>> Power and PXI Trigger and Local Bus ... -
Page 13: Hardware & Software Requirements
M.2 driver / software. This is provided by the M.2 vendor. You can download the software / driver from the vendor’s website. Windows 7, 10 and Server Tools Required for Installation To complete the installation of the OSS product you will need a Phillips-head screwdriver and ESD wrist strap to prevent electrostatic discharge. OSS-CPCIe3-3U-CR-X | 13... -
Page 14: Installation Procedures
One Stop Systems Installation Procedures The following steps will guide you through the installation of your OSS-478 board, OSS-481 and M.2 modules. Installation on CPCIe Host unit Below is an example of a CPCIe host running Windows OS (i.e Windows 10) - Page 15 SKIP the instructions below if you do not have the mezzanine board (OSS-481). The OSS-481 is used to mount four more M.2 cards, Place the OSS-481 mezzanine board on to a sturdy surface. Plug in each M.2 card to the slot (JP1, JP2, JP3 and JP4 socket). Secure the M.2 cards with screws.
- Page 16 Place the OSS-48I on top of the OSS-478 and carefully align the two mezzanine board connectors. Lightly press the OSS-481 board down to the OSS-481 board until both boards are firmly mated together. Turn the board and place the four screws to secure the OSS-481 board.
-
Page 17: Install The Cpcie M.2 Flash Storage Module
Slowly push the card carrier until it is correctly seated in the slot and secure it. Connect Power and Power UP Plug in the power to the CPCIe enclosure and power it UP. Upon powering UP the system, the OSS-478 bracket LEDs should come ON. Verify Bracket LEDs There are nine LEDs on the PXI bracket for 478. -
Page 18: Software Installation
One Stop Systems Software Installation Install the appropriate software / driver for the M.2 device. OSS does not provide the driver / software for the M.2 device. This can be obtained or downloaded from the manufacturer’s website. When done installing the driver, reboot the host computer. -
Page 19: Identify / Verify The M.2 Device
Several ways to open Disk Management in Windows 10 Way 1: Open it from the Quick Access Menu. Right-click on Start at the bottom left of the screen From the list, click on Disk Management Disk Management will then launch on the Desktop OSS-CPCIe3-3U-CR-X | 19... - Page 20 Use Windows+R to open Run, type diskmgmt.msc in the empty box and tap OK. Way 3: Open Disk Management in Computer Management. Step 1: Right-click This PC and choose Manage in the context menu to enter Computer Management. Step 2: Select Disk Management on the left. OSS-CPCIe3-3U-CR-X | 20...
-
Page 21: Windows 8
To access Disk Management in Windows 8, please follow the instructions below: Right-click on Start at the bottom left of the screen From the list, click on Disk Management Disk Management will then launch on the Desktop OSS-CPCIe3-3U-CR-X | 21... -
Page 22: Windows Vista And
From the Start Menu, right-click on the Computer icon and choose Manage from the menu. This will bring up the Computer Management window Click on Disk Management, which appears in the left-hand side under the heading Storage. The list of the hard drives available is now be visible in the center of the window OSS-CPCIe3-3U-CR-X | 22... -
Page 23: Disk Management In Windows Server 2012
2. You can also right-click the Start menu, select Computer Management program here directly and click it. The Disk Management tool will be opened immediately. 3. Or you can open the Windows File Explorer, in the following window, right-click Computer, select Manage. OSS-CPCIe3-3U-CR-X | 23... - Page 24 After opening the Disk Management, you can start to use it to partition hard drive for Server 2012. You can right-click on a disk or partition, and then, it will display a menu listing all options for different operations. OSS-CPCIe3-3U-CR-X | 24...
-
Page 25: Managing The M.2 Devices
Disk4, Disk5, Disk6, Disk6, Disk7 and Disk8 (see screenshot below). These disk are new and it will come up as “unallocated”. For more detailed information on “Disk Management” tool go to Microsoft website, see link below. https://docs.microsoft.com/en-us/windows-server/storage/disk-management/overview-of-disk-management OSS-CPCIe3-3U-CR-X | 25... -
Page 26: Read & Write Performance
One Stop Systems Read & Write Performance Below are the performance read and write test results of the M.2 modules mounted on the OSS card carrier. System: Using PXie 1095 NI Model with 25 GB DDR4, running Windows 10 64-bit Pro. -
Page 27: How To Get More Help
If you need technical support, product assistance or have a technical inquiry we encourage you to submit it on-line using our Technical Support Form. If you need to send a unit for repair or diagnostic evaluation, fill out our RMA (Return Material Authorization) online request form. https://www.onestopsystems.com/support OSS-CPCIe3-3U-CR-X | 27... - Page 28 One Stop Systems OSS-CPCIe3-3U-CR-X | 28...
Need help?
Do you have a question about the OSS-CPCIE3-3U-CR-4-M.2 and is the answer not in the manual?
Questions and answers