Advertisement
Quick Links
Advertisement

Summary of Contents for CZEM Drill One Evo
- Page 1 DI S PL AYS - MA NUAL...
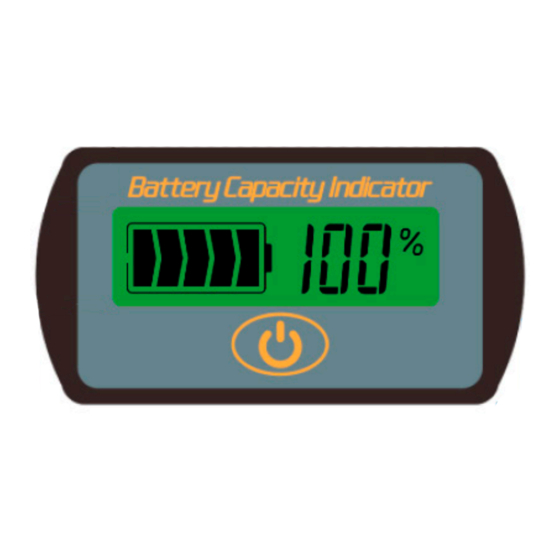
- Page 2 LCD and OLED displays for DRILL ONE EVO motorcycles The DRILL ONE EVO motorcycle comes in standard with an LCD display providing information on battery capacity and voltage. LCD display 7S Settings When turn o hold on the K key on the back and power on. 7S displays the present speci cation. Use K+ and K keys to adjust speci cations, select desired speci cation you need, then press the OK key on the front, 7S will work normally (correspond with code as below).
- Page 3 Press the "K+" button on the back of the device to set the mode function. The 7S has two functions: F0 and F2. Use the "K+" button to select the F0 or F2 function. To con rm the selection, press the "OK" button on the front to start the selected function.
-
Page 4: Warning And Warranty
V&% Volt and Percentage Display - The 7S displays the current volt and percentage capacity status. Press the "OK" button to change the display. Volts Display - The 7S displays only the current volt level. Percentage Display - 7S displays only the current percentage status. Warning and warranty During use or storage, the 7S must not be exposed to direct sunlight or be in an environment with strong ultraviolet radiation, such as winter (<... - Page 5 Diagram RE255003 RE255002 RE255060 100% THROTTLE KILL SW DIODE AC230V/110V CON5-M CON5-F RM500000 CHARGER TYPE KP600A-60L 53,9V/10A ONLY!!! CON7-M ENGINE CON10-F CON10-M CON7-F RE600051 BATTERY DC 53,9V XT150-M XT150-F F3 30A XT150-F XT150-M XT150-F CON1-M CON1-F F3 500mA F2 1A XT150-M 13S/16P 48Ah F1 250A...
- Page 6 OLED extended display OLED display can be selected as an optional extra with a resolution of 128 x 64 pixels. The display does not have a backlight as each dot is active. The advantage of this display is the ability to display additional data, especially the driving speed or engine speed.
- Page 7 Switch on the display To turn on the display, switch the ON/OFF switch to the ON position. After switching on, the CZEM logo appears on the display and the CAN data on the motorcycle is initialised. If proper initialization is not achieved, the display will automatically restart within a few seconds and attempt to re-establish communication.
- Page 8 Description of OLED display functions Display of the selected map The currently selected map is shown in the upper left part of the display with three indicator bars. One (smallest) bar indicates map 1 with the lowest power, two bars the medium power and three bars the highest power of the motorcycle.
-
Page 9: Remaining Battery Capacity
1.4.3. When the display rmware update is released, the new rmware can be downloaded from www.czem.pro and uploaded as a user to the controller. For a description of the update, see the section Updating rmware. - Page 10 Display con guration The display allows the user to change the following data: - speed units (kmh/mph) - gear ratio - the default value displayed when the display is switched on Entering con guration mode. - make sure the motorcycle is switched o (ON/OFF switch is in OFF position) - press and hold the button on the display - switch the motorcycle on with the ON/OFF button - wait until the entire display is white, release the button...
- Page 11 If a di erent wheel or sprocket size is used, the recalculation of the values sent by the controller can be adjusted to match reality. For this purpose, a table with individual motorcycle con gurations that can be supplied by CZEM is prepared. Example: the motorcycle uses a larger wheel than the standard wheel, the speed therefore does not match reality and the conversion "times 1.1"...
- Page 12 WIFI connection. For the update, the display must nd a Hotspod SSID WIFI access point (ACCESSS POINT) named CZEM in its vicinity. The access point can be created very easily, for example using a mobile phone with ANDROID.
- Page 13 If the page does not open, try entering the IP address assigned to the display instead of the text czem.local. The IP address shown in this picture is only illustrative, you need to enter the value that your display shows.
- Page 15 Click on the "Select File" button, locate the folder where you saved the downloaded rmware and con rm the upload of the rmware with the UPDATE button. The process of uploading new rmware is indicated by the text UPDATE STARTED, the correct upload is: If rmware has an incorrect format, the message BAD FILE FORMAT is displayed.
- Page 16 Diagram RE255013 RE255012 RE255001 RE255052 RE255021 RE255070 KILL SWITCH DISPLAY THROTTLE DIODE AC230V/110V RE680001 CHARGER TYPE KP600A-60L RM500000 53,9V/10A CON6-F CON7-M CON5-M CON4-M CON9-M CON8-M CON6-M AP-PF900CH05880150 CON5-F CON4-F 53,9V/15A CON7-F CON9-F CON8-F ONLY!!! RE255170 RE255920 30cm ENGINE CON10-F CON10-M DISPLAY CONTROLLER BATTERY...
Need help?
Do you have a question about the Drill One Evo and is the answer not in the manual?
Questions and answers