Table of Contents
Advertisement
Quick Links
Advertisement
Table of Contents

Related Manuals for CocktailAudio X14


Summary of Contents for CocktailAudio X14
- Page 1 Rev2.0 English...
-
Page 2: Gracenote End User License Agreement
® Gracenote End User License Agreement This application or device contains software from Gracenote, Inc. of Emeryville, California (“Gracenote”). The software from Gracenote (the “Gracenote Software”) enables this application to perform disc and/or file identification and obtain music-related information, including name, artist, track, and title information (“Gracenote Data”) from online servers or embedded databases (collectively, “Gracenote Servers”) and to perform other functions. -
Page 3: Notification Of Gnu General Public License
NOTIFICATION of GNU General Public License This product contains a software which, as a free software, is fully or partly subject to the terms of a license of the GNU General Public License Version 2/Version 3 or GNU Lesser General Public License ("LGPL"). Upon request (nwkoh@novatron.co.kr), you will also receive the software's source code on a customary data storage device. - Page 4 portion of it, either verbatim or with modifications and/or translated into another language. (Hereinafter, translation is included without limitation in the term "modification".) Each licensee is addressed as "you". Activities other than copying, distribution and modification are not covered by this License; they are outside its scope. The act of running the Program is not restricted, and the output from the Program is covered only if its contents constitute a work based on the...
- Page 5 of Sections 1 and 2 above on a medium customarily used for software interchange; or, b) Accompany it with a written offer, valid for at least three years, to give any third party, for a charge no more than your cost of physically performing source distribution, a complete machine-readable copy of the corresponding source code, to distributed under the terms of Sections 1 and 2 above on a medium customarily used for software interchange;...
- Page 6 the only way you could satisfy both it and this License would be to refrain entirely from distribution of the Program. If any portion of this section is held invalid or unenforceable under any particular circumstance, the balance of the section is intended to apply and the section as a whole is intended to apply in other circumstances.
- Page 7 possible use to the public, the best way to achieve this is to make it free software which everyone can redistribute and change under these terms. To do so, attach the following notices to the program. It is safest to attach them to the start of each source file to most effectively convey the exclusion of warranty;...
- Page 8 them these terms so they know their rights. Developers that use the GNU GPL protect your rights with two steps: (1) assert copyright on the software, and (2) offer you this License giving you legal permission to copy, distribute and/or modify it. For the developers' and authors' protection, the GPL clearly explains that there is no warranty for this free software.
- Page 9 of the specific operating system (if any) on which the executable work runs, or a compiler used to produce the work, or an object code interpreter used to run it. The “Corresponding Source” for a work in object code form means all the source code needed to generate, install, and (for an executable work) run the object code and to modify the work, including scripts to control those activities.
- Page 10 packaged. This License gives no permission to license the work in any other way, but it does not invalidate such permission if you have separately received it. • d) If the work has interactive user interfaces, each must display Appropriate Legal Notices; however, if the Program has interactive interfaces that do not display Appropriate Legal Notices, your work need not make them do so.
- Page 11 is in no case prevented or interfered with solely because modification has been made. If you convey an object code work under this section in, or with, or specifically for use in, a User Product, and the conveying occurs as part of a transaction in which the right of possession and use of the User Product is transferred to the recipient in perpetuity or for a fixed term (regardless of how the transaction is characterized), the Corresponding Source conveyed under this section must be accompanied by the Installation Information.
- Page 12 to propagate or modify it is void, and will automatically terminate your rights under this License (including any patent licenses granted under the third paragraph of section 11). However, if you cease all violation of this License, then your license from a particular copyright holder is reinstated (a) provisionally, unless and until the copyright holder explicitly and finally terminates your license, and (b) permanently, if the copyright holder fails to notify you of the violation by some reasonable means prior to 60 days after the cessation.
- Page 13 cause the Corresponding Source to be so available, or (2) arrange to deprive yourself of the benefit of the patent license for this particular work, or (3) arrange, in a manner consistent with the requirements of this License, to extend the patent license to downstream recipients.
- Page 14 STATED IN WRITING THE COPYRIGHT HOLDERS AND/OR OTHER PARTIES PROVIDE THE PROGRAM “AS IS” WITHOUT WARRANTY OF ANY KIND, EITHER EXPRESSED OR IMPLIED, INCLUDING, BUT NOT LIMITED TO, THE IMPLIED WARRANTIES OF MERCHANTABILITY AND FITNESS FOR A PARTICULAR PURPOSE. THE ENTIRE RISK AS TO THE QUALITY AND PERFORMANCE OF THE PROGRAM IS WITH YOU.
- Page 15 copy of the modified version: • a) under this License, provided that you make a good faith effort to ensure that, in the event an Application does not supply the function or data, the facility still operates, and performs whatever part of its purpose remains meaningful, or •...
-
Page 16: Table Of Contents
2-5. X14 purchased without storage …….……………………………………………..……….……..……………. 29 2-5-1. HDD installation ……………………………………………………………….…….…..………..…………… 29 2-5-2. HDD Format ……………………………………………………………….………….…..…………..…………. 29 2-6. X14 purchased with an internal storage installed …………………..….………..……………..……. 29 3. Turn ON and Start ……………………………………………………………………..…………….…..…………….……. 30 3-1. Wizard Setup (Setup Assistant) …………………………………………….…….….……..…..……………..30 3-2. - Page 17 4-1-5. Append Artist in Album Track View ………..……………………………..…………………………. 32 4-1-6. Thumbnails in Text List ………………………………..…………………………..……………………. 32 4-1-7. Storage for Music DB ………………………………………………..……..……..……….………….…….33 4-1-8. Music DB Scan Status ………………………………………..…………………….…..………………………33 4-1-9. Rescan Resources …………………………………………………….……………..…………………………. 33 4-1-10. Music DB Initialization ………………………………………………..…………..……………………….. 33 4-1-11. Backup Music DB …………………………………………………………..…….…….…..………..… 34 4-1-12.
- Page 18 4-4. Network …………………………………………………………………….……………….………...…...….……………... 48 4-4-1. Wired Setup …………………………………………………….…..….…………..……..…..…...………..…….. 48 4-4-1-1. DHCP (Auto IP) ………………………………………..….…………..………...…..……………….. 48 4-4-1-2. Static IP ……………………………………………….…..….…………….……….….….………..…… 49 4-4-2. Wireless Setup …………………………………………………..…..…………….……..….……………………49 4-4-2-1. Open SSID ……………………………………………..…………………...……….…………………. 49 4-4-2-2. Hidden SSID ……………………………………………..…….………….………..…………………. 50 4-4-2-3. WiFi Repeater Roaming function ................50 4-4-3.
- Page 19 6-4-5. How to merge all tracks of Multi-Album into one folder(one album) after already ripped multi-album CDs to separate folders(albums) ........75 6-4-6. Automatic Ripping(Auto Rip) function ..................77 6-5. In the case that X14 is NOT connected to network (Internet) ……..…..….………..….…..…… 77...
- Page 20 6-5-1. Ripping All ………………………………………………………………………………….……….………..…….. 78 6-5-2. Ripping Track ………………………………………………………………………….…..………..….……..…… 79 6-6. If the FreeDB is installed onto the hard disk of the X14…………………………..…..……..….. 79 6-7. To check the status of CD ripping and converting………………….……….…..…….…..…...…..….. 79 7. How to use the Music DB(database)………………………………………………..…..……..…..…..…..…….… 80 7-1.
- Page 21 13-1. Internet Radio …………………………….………………………………………..…………..……………….…….… 95 13-1-1. How to play the Internet radio………………………………………..……..….……..…….……… 95 13-1-2. How to add your favorite stations into My Favorites …….…..…..…..….………. 96 13-1-3. How to run a search function on the Internet Radio …….………..…..…..….…... 96 13-1-4. Recording from the Internet Radio ……………………………….….………...…..…...………… 96 13-1-4-1.
- Page 22 17-10. Sleep mode ..…………………………………………………………………………………..…………..….….….. 111 17-11. Auto Play ………..…………………………………………………………………………….…..…………..…..… 111 17-12. Shortcut to find file in all list modes …………….…………………..…………..………..…..….. 111 17-13. Seek function on the Playing Screen ……………..…………………..……..…..…..………..….. 112 17-14. Function of Multi-Cutting(Auto-Cutting) for recorded file ..........112 17-14-1. How to set ‘cutting point’ by auto ………………………………………..……….……112 17-14-2.
-
Page 23: Important Safety Instructions
Important safety instructions For your own safety, please read the following important safety instructions carefully before attempting to connect this unit to the main power supply. They will enable you to get the best performance from the unit. 1.Read the instructions. 2.Keep the instructions. - Page 24 RF Exposure To comply with FCC RF exposure compliance requirements, a separation distance of at least 20 cm must be maintained between the antenna of this device and all persons. This device must not be co-located or operation in conjunction with any other antenna or transmitter.
-
Page 25: Product Overview
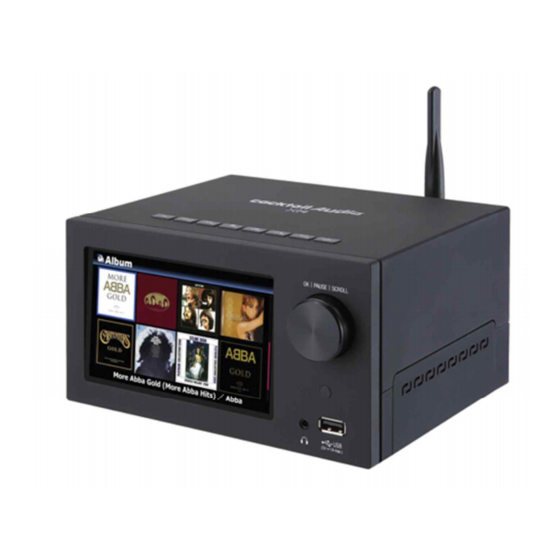
1. Product overview 1-1. Front View ① 5inch LCD Screen ④ Headphone Out ② Control knob for OK, Pause, Scroll ⑤ USB Host Port ③ Remote Control receiver ⑥ Storage Door 1-2. Top View ① Fn: Function key to combine with F1 ~F6 keys. -
Page 26: How To Define Fn(F1 ~ F6) Key For A Function
1-3. How to define Fn(F1 ~ F6) key for a function You can define function for each function key(F1 ~ F6) by yourself for Playlist or a station listed in the iRadio Favorite folder For example; ① Place the cursor on the Playlist#1\ ②... -
Page 27: View Of Remote Control And Key Function
1-4. View of Remote Controller and each key’s function POWER: Power ON/OFF HOME: Go to home screen SEARCH: Pop up search menu Alphanumeric: Enter number & alphabet/Seek at Playing Screen mode NOW PLAYING: Go to Playing Screen STOP: Stop playing MENU: Popup menu ARROW: Move cursor to upper side ARROW: Move cursor to left side... -
Page 28: Prepare
2. Prepare 2-1. Check the contents of X14 package ① X14 unit ② Remote controller + AAA batteries x 2EA ③ Power cord ④ Manual ⑤ FreeDB Data CD ⑥ 2.5inch HDD or SSD adapter ⑦ Screw to install storage ⑧... -
Page 29: Optional Items, External Optical Disk Drive
2-5. X14 purchased without storage. You need a 3.5” or 2.5” SATA hard disk or SSD, and install it into the X14 like below picture and format it. For formatting of the installed storage into X14, please refer to the 4-7-7. Format Storage (Page 58) 2-5-1. -
Page 30: Turn On And Start
Switch the unit on at the rear of the X14. Power it on using the remote control or the power button on the top of the X14. The X14 should take about 30~40 seconds to boot up as it is looking to see if a network is connected. -
Page 31: Setup
4. SETUP Go into SETUP menu with remote controller. You can select each item with the arrow key and confirm it with the OK button. 4-1. Music DB Select the Display Mode and confirm with the OK button. 4-1-1. Display Mode You may set one of fourteen(14) options, see below. -
Page 32: Track Numbering
※Artist view, Genre view, Composer view, Mood view, Folder view, Track view and Playlist view are also available. 4-1-3. Track Numbering With the Track Numbering option at SETUP, you may decide whether you allow the track number to be added at the front of title for each track when you rip CD. -
Page 33: Storage For Music Db
4-1-7. Storage for Music DB You can select a HDD(SSD)1, USB or NAS (Network attached storage) for Music DB storage. If one of them is selected as Music DB storage (Main storage), its color on the Browser mode will be green. -
Page 34: Backup Music Db
① Go to SETUP > Music DB > Music DB Initialization ② Select 'Music DB Initialization' and confirm it with OK key to open the below screen ③ Select OK icon and confirm it with OK key to start clearing the Music DB ※... -
Page 35: Restore Music Db
2) While backup in progress, device response will be delayed slightly when try using other function. 4-1-12. Restore Music DB You can restore the backup data in the Music DB. Connect the backup storage to the X14... - Page 36 ① Go to SETUP > Music DB > Restore Music DB and click it ② Select one of Full or Partial Restoration ※ Full restoration: -. All backup sub-folders in the selected storage (folder) will be restored to main storage (green colored storage) -.
-
Page 37: Converting Old Music Db To New Music Db
※ Partial Restoration : -. Selected folder in the backup storage will be restored to selected folder in the target storage. -. No device re-boot after partial restoration 2) In case of selecting Partial Restoration ① Select the folder you want to restore from the backup storage ②... -
Page 38: Cd Ripping
NOTE: For CD Ripping, you need to buy an external USB Optical Disk Drive separately because X14 manufacturer doesn’t provide the ODD. You can buy it easily from local store or from online store like Amazon. And, many laptop users already have it. -
Page 39: Bit Rate And Quality
4-2-1. Bit Rate and Quality You can select bit rate and the quality level for ripping to MP3 files. There are two (2) items.(This is for ripping a CD to an MP3 file) □ Compressed Rate : 128K / 192K / 320K [default] 192K □... -
Page 40: Freedb Textcode
To install the FreeDB data to the X14 hard disk, insert the FreeDB data DVD into the CD slot of the X14 and go to SETUP and select FreeDB to install. You will see the CD, select and confirm with the OK button. -
Page 41: Freedb Delete
4-2-7. Auto Rip When ripping many CDs at one time, this function will be useful. If Auto Rip is set as ON, X14 will rip CD by itself if you insert CD, and eject CD by itself after finishing ripping without pressing any key ※... -
Page 42: Equalizer
4-3-4. Analog Out Volume You can set Analog Out Volume as Variable or Fixed ※ Default: Variable ※ Fixed: X14 volume will be set as 0dB (Max). You can’t control volume with X14 4-3-5. Analog Out Analog Out can be set as OFF or ON ※... -
Page 43: Recording Sample Rate
※ Default: 48Khz 4-3-7. Digital Out Volume ※ Variable: You can control volume for Digital Out with X14 ※ Fixed: X14 volume will be set as 0dB (Max). You can’t control volume for Digital Out with X14 ※ Default: Variable 4-3-8. -
Page 44: Spdif
You can set as ON or OFF for Speaker Out ※ Default: ON 4-3-11. Gapless Play The X14 supports gapless playback function for MP3 files, WAV, FLAC and DSD files only. ※ Default: ON 【 TIP 】 ※LAME-encoded MP3 files only supported ※The Gapless play function works properly on ‘Repeat All’... -
Page 45: Slide Show Effect
4-3-14. Replaygain 4-3-14-1. What’s the Replaygain function It allows X14 to equalize and normalize loudness for individual track or album. This avoids the common problem of having to manually adjust volume levels between tracks when playing audio files from albums that have been mastered at different loudness levels. ※ Default: OFF 4-3-14-2. -
Page 46: File(Track)
4-3-14-3. How to write(add) ‘Replaygain info’ into metadata of each music file(track) ① Place the cursor on the target album or track list. You may select multiple list by RIGHT ARROW key ② Press MENU key and click 'File Operations > to get Replaygain started ③... -
Page 47: How To Clear 'Replaygain Info' From Metadata Of Each Music
4-3-14-4. How to clear ‘Replaygain info’ from metadata of each music file(track) ① Place the cursor on the target album or track list. You may select multiple list by RIGHT ARROW key ② Press MENU key and click 'File Operations > to get Clear Replaygain started ③... -
Page 48: Power On Volume
4-3-16. Power On Volume This is option to set volume level after booting up. Default is ‘Last played volume’. If you select ‘Volume Selection’ option, you can set volume level from 0dB to 100dB. 4-4. Network ※ Make sure your Ethernet cable or a USB WiFi dongle is connected. Select Network and press the OK button. -
Page 49: Static Ip
④ The screen to the left will be shown if the network is connected successfully. 4-4-2. Wireless Setup. The X14 offers two kinds of method for wireless network connection 4-4-2-1 Open SSID ① Select ‘Wireless Setup’ and confirm with OK key. -
Page 50: Hidden Ssid
The follow procedure is same as ‘Open SSID’ 4-4-2-3 WiFi Repeater Roaming function In case that signal strength of the connected AP goes down -45db, the X14 will be connected to the AP which has same SSID and better signal strength if it is detected 4-4-3. -
Page 51: Wake On Lan
※ Default: OFF <NOTICE> In case that Wake ON LAN is set as ON, LED of X14 Ethernet LAN on the rear will be blinking even though you power it off by remote control or front power button. 4-5. Network Service Select Network Service and confirm with the OK key. -
Page 52: Network Sharing (Samba Client)
※ How to see the folders of the X14 hard disk on your PC screen (based on Window 7 ) ① Click the ‘START’ icon on the left/bottom on your monitor. ② Select ‘Computer’ and click it. ③ You may see ‘Network’... - Page 53 ⑥ Then, IP address will be shown up in the path ※ In case that IP address doesn’t show up, please insert it by keyboard. You can connect USB Keyboard into the X35 ⑦ Place the cursor on the IP address, and click it ⑧...
-
Page 54: Upnp Server
※What you can do with FTP Server function? After installing FTP software like ‘File Zilla’ onto your PC, you can copy, delete or move files or folders between X14 hard disk and your PC hard disk. 4-5-5 Shareplay(Airplay) You can set Airplay function as OFF if needed ※Default: ON... -
Page 55: Internet Service
4-6. Internet Service X14 integrated Online Music Services into its software. So, you can play Qobuz, TIDAL, Deezer, Napster, Amazon Music and HighResAudio with X14 directly if you subscribe for those services and put their user name and password here properly. -
Page 56: System
【 TIP 】 For detailed explanation of Auto Play function, refer to 17-11 Auto Play (Page 109) 4-7-3. Resume Play When you boot up the X14, it will automatically resume playing the music in the Music DB, Browser or i-Radio from where it was last stopped. -
Page 57: Play In Browser
4-7-6. HDD Sleep You can make X14 HDD go to sleep mode by this setting. There are five (5) options like OFF, 10 Min, 20 Min, 30 Min and 1 Hour. During the selected time, if no access to HDD, the HDD goes into sleep mode. -
Page 58: Format Storage
USB storage, you can try this function to remove some error in file system of storages. Select File System Fix and confirm with the OK key. 【 Caution 】 We recommend you NOT to run this function if the file system of the X14 hard disk has no problems. -
Page 59: Alarm
Alarm is set as ‘after 2 days from now’. 4-7-11. Auto Shutdown The X14 will be powered off automatically at the assigned time and date. ① Go to SETUP and select System. ② Select Auto Shutdown and confirm with the OK key... -
Page 60: Scroll Speed
④ You can set the time on the X14 ⑤ Once the time is set move cursor onto the OK icon and confirm with the OK key. ※ NOTE: Use the arrow key (UP/Down) to change the values. Use the arrow key (left/right) to move the cursor. -
Page 61: User Front
② go to SETUP > System > User Font: Confirm it with OK key to open menu window like above ③ Select 'Get User Font' to look for the fonts files and load it. ※ To return to 'X14 original system font, select 'User System font' and confirm it with OK key. 4-7-15. Browser View... -
Page 62: R1 And R2 Keys Of 2 Nd Remote Control
① Select Time Set (Internet) and confirm it with the OK button. All the time options will be displayed as below. 【 TIP 】 Make sure that the X14 is connected to network (internet) before you try time setting by Time Set (Internet). -
Page 63: Time Set (Manually)
② Input your time manually and select OK to confirm it with OK button. 4-9. Firmware You can check the current firmware version of your X14 and install the updated new firmware. Select Firmware and confirm with the OK key. 4-9-1. Current Version You can check the current firmware version as shown below. -
Page 64: Update Automatically (Automatic Firmware Update By Network)
4-9-4. What is Automatic Firmware Update by network? This function is available only when X14 is connected to a network (internet). In the instance that a higher version of the firmware exists at our server system, your X14 will check it automatically when the X14 boots up. -
Page 65: Check Now For New Firmware
4-9-5. Check now for new firmware When you want to check if your X14 has the latest firmware installed, please use this function. If there is higher version of firmware in our server, the dialog window will show up when you click this option. -
Page 66: License For Gracenote
4-11. License for Gracenote 4-11-1. Limited Gracenote service X14 provides Gracenote service to retrieve CD metadata and Album cover art for CD Ripping. ※ NOTICE But, Gracenote service is free for two (2) years. After two (2) years, if you want to keep using Gracenote service, you need to pay five (5) EURO per service for one year. -
Page 67: What Is The Cd Database(Musicdb) Of X14
Users can easily register(scan) music files to the Music DB by folder unit, and remove it from the Music DB easily. If you do CD ripping with X14, ripped files will be stored in the ‘My Music’ folder of main storage (green colored storage in the Browser mode), and index data of the ripped files will be registered(scanned) to the Music DB automatically. -
Page 68: How To Add Music To The Music Db
5-3. How to add music to the Music DB ① Go to Browser and place the cursor on the folder containing the music you want to add to the Music DB ② Press MENU key to open menu window like below ③... -
Page 69: Automatic Indexing (Registration To Music Db)
5-6. Automatic Indexing (Registration to Music DB) If you add (copy) music files into the scanned folder (Blue colored), the added(copied) music files will be automatically indexed to the Music DB. If you edit music file in the folder, the edited contents will be automatically reflected to the Music DB. -
Page 70: Rescan Resources(Folders) Function
-. Auto Cursor: If you set ‘Auto Cursor’ as ‘On’, the cursor is automatically positioned as the path you are currently scanning. The path you are currently scanning for will be displayed in blue color like below screen. 5-8. Rescan Resource (folder) function To synchronize contents in Music DB and in folders of storages already scanned to Music DB, please go to SETUP>Music DB>Rescan Resource. -
Page 71: How To Delete Album/Songs And Others In The Music Db
No matter which format is selected during ripping procedure, once the X14 will rip the CD to WAV format first, and then as background job, It will be converted to the selected format. Converting lead-time will be almost same as actual playing time. Files that have not been converted are not visible when you click the folder or album. -
Page 72: How To Register (Scan) Ripped Files Into The Music Db
6-3. How to register (scan) ripped files into the Music DB Index of the ripped files will be registered (scanned) into the Music DB of the X14 automatically. 【 TIP 】 It is recommended that you should connect to the internet to make use of the CD metadata server when loading (ripping) CDs. -
Page 73: Ripping Track
From here, next procedures are same as the ‘Ripping All’ 【 TIP ③ 】 When a CD is inserted into the optical drive, the X14 loads (rips) the CD to a WAV format first, even if the MP3 option was chosen. The X14 then converts the WAV file into MP3 format afterwards in the background. -
Page 74: Structure Of Id3 Tag Edit Dialog Screen In Cd Ripping
【 TIP ④ 】 Explanation of each item on the ripping screen. ① Title of track being ripped ② Number of tracks to be ripped/ total no of tracks in CD. ③ Title of playing time ④ Total time for playing ⑤... -
Page 75: How To Merge All Tracks Of Multi-Album Into One Folder(One Album) After Already Ripped Multi-Album Cds To Separate Folders(Albums)
② Then, you will see 'Album Help' screen like left, and the cursor will be placed on the album which has same 1st alphabet as CD2's album name. This will help you to look for the CD1 easily. ③ Place the cursor on the CD1 album and press OK. ④... - Page 76 ② Place cursor on the CD2(2nd Album) and press MENU key ③ Confirm 'Album Edit' to open Tag Edit screen like below picture. ④ Cursor will be on Album name like left picture. Press OK key to open 'Album Help' screen like below. ⑤...
-
Page 77: Automatic Ripping(Auto Rip) Function
'Album Edit' and 'Cover Art' functions 6-5. In the case that the X14 is NOT connected to a network (Internet). ① Insert CD into X14. -
Page 78: Ripping All
⑩ After entering the info, select OK and confirm it by pressing the OK button. ※ NOTE: You can edit tag information for loaded CDs in Music DB of the X14 easily through MusicX NEO app for Desktop PC(Windows or Mac) -
Page 79: Ripping Track
※ NOTE: If you wish to check the information and the status of the conversion process for the whole of the Music DB of the X14, go to the home screen. Place the cursor on the Music DB icon and Press the INFO key. -
Page 80: How To Use The Music Db(Database)
7. How to use the Music DB (database) 7-1. Play music loaded (ripped) onto the X14. The Music DB contains loaded (ripped) music. ① Select Music DB icon, confirm with the OK button. The album list is displayed as shown below. -
Page 81: Search Function
【 TIP ④ 】 Playing screen ------- press INFO button ------- Detailed info of current music ①Title / Album of current music ①Title / Album of current music. ②Title of previous music ②Artist ③Title of current music ③Album ④Title of next music ④Composer ⑤Play mode ⑤Genre... -
Page 82: How To Manage Music Db
7-3. How to manage Music DB The X14 allows you to manage the Music DB. You can delete or rename albums, artists and genre. You can export music from other storage devices (USB memory sticks or other hard disks) to Music DB folder. -
Page 83: Cover Art
7-3-2. Cover Art You can add album cover art for an album in MusicDB ① Place the cursor on the album list to which you want to add album cover art. ② Press MENU key to open menu window like left. Then, you can follow up as the window guides you. -
Page 84: How To Export Music From The Music Db To Other Storage Devices
7-3-4. How to export music from the Music DB to other storage devices (HDD or USB). You can export music from the Music DB to other storage devices such as; an external HDD or USB by following the steps below: ①... -
Page 85: Creating .M3U And .Pls Files When Exporting
7-3-5. Creating .M3U and .PLS files when exporting When you run 'Export Song' function, X14 will create .M3U file and .PLS file also in the target folder. For playlist icon on the home screen, you can export it to outside like USB 7-3-6. -
Page 86: Editing The Tag Information Of The Music In The Music Db
③ Using the remote control or USB keyboard you can edit the information. ④ Select OK and confirm with the OK button. 【 TIP 】 You can edit contents in the Music DB of the X14 easily using the MusicX NEO app for Desktop PC (Windows and Mac) -
Page 87: Audio Cd Direct Play
① Insert a CD into the X14. ② Then, all tracks will be displayed automatically 【 TIP ② 】If the X14 is connected to CD database server through the network, the below screen will be displayed. ③ Select the music you would like to play and press the OK button. -
Page 88: In Case That You Have Installed The Freedb Data Onto The Hard Disk Of The X14
X14 If you installed the FreeDB data onto the storage of the X14, it will work just like the X14 is connected to a network (Internet). The X14 displays the CD information from the FreeDB data installed on the storage. - Page 89 ② Press the MENU button to show a popup menu, see screen shot below. ③ Select New PLS and confirm with the OK button. The screen below is then displayed. ④ Enter a playlist name and select OK. Confirm the selection with the OK button.
-
Page 90: How To Make A Playlist With Whole Tracks In Album, Genre, Or Artist
11-1-2. How to make a Playlist with whole tracks in album, Genre, or Artist ① For example, go to Album list and place the cursor on the target album ② Press PLAYLIST key of remote control ③ Edit Playlist name as you want, and press OK. Go to Playlist and there will be the playlist like below picture. -
Page 91: How To Play A Playlist
11-1-5. How to play a Playlist ① Select the Playlist icon on the remote control or press the PLAY LIST hotkey on the remote control. The following screen is then displayed. ② Select the Playlist you would like to play and confirm with the OK button. -
Page 92: My Playlist (Virtual Playlist)
① Select playlist you want to export ② Press MENU key to open menu window ③ Select ‘Export Songs’ ④ Select target storage and folder ⑤ Click ‘Export Start’ to go next step ⑥ Select ‘Overwrite’ or ‘Skip’ to start exporting 11-2. -
Page 93: Advanced My Playlist (Virtual Playlist)
③ The selected song will start playing, and will be stored as My Playlist. 12. The Music Streaming function As the X14 supports various network protocols such as; UPnP Server/Client/Renderer and Samba Server/Client, you can enjoy various Music Streaming functions with the X14. -
Page 94: Upnp Server/Client And Samba Server/Client Function
Place the X14 with the storage (music server) in your living room. A second X14 (without storage) is placed in room #1 or room #2. You can then play files from the X14 (music server) on the X14’s without storage, see schematic below. -
Page 95: Shareplay (Airplay)
13-1. Internet Radio 13-1-1. How to play the Internet Radio. You can enjoy many internet radio stations. The X14 Internet radio is based on the Airable server. It provides many stations by genre, by country, etc. 【 TIP 】 When the i-Service icon is highlighted the X14 is successfully connected to the network. -
Page 96: How To Add Your Favorite Stations Into My Favorites
※ NOTE 1: We recommend NOT to record continuously for over three (3) hours. ※ NOTE 2: Space required for recording in MP3 format: 1 hour(54MB)/2 hours(108MB)/3 hours(162MB) ※ NOTE 3: X14 will record i-Radio by the formats like MP3, AAC or ASF according to the station’s streaming format. 13-1-4-1. How to record ①... -
Page 97: Where Is The Recorded File Stored
13-1-4-2. Where is the recorded file stored? The X14 creates a [IRadio Recording] folder on the hard disk automatically when recording has started. All recorded files are stored in the IRadio Recording folder, see below. 13-1-4-3. The recorded file name structure The station will show the music title, see below, the recorded file name will be the music title. -
Page 98: Reservation Recording
[ Import to DB ] [ Copy File ] [ Move file ] 13-1-5. Reservation Recording This function works for the stations stored in Favorites folder. 13-1-5-1. How to set reservation recording ① Open ‘Favorites’ folder of Radios. ② Place the cursor on the station you want to set ③... -
Page 99: How Does The Reservation Recording Start
14-1. How to play an external device via Analog Input As the X14 has an Analog Input, you can connect external devices like TV, Player or Mobile phone, etc to the X14, and can play it or record the audio (signal) coming from outside device. -
Page 100: How To Record
Recording Sample Rate of SETUP 14-3. Where is the recorded file stored ? If you start recording, the X14 creates the folders automatically where the recorded files are stored. ① Select Browser icon on the home screen, and confirm it with OK key. -
Page 101: Usb Host Port For Usb Devices
If you go to the Browser icon, you can run the following functions. 16-1. Play audio file data CDs NOTE: For playing audio file data CDs directly with X14, you need to buy an external USB Optical Disk Drive separately because X14 manufacturer doesn’t provide the ODD. -
Page 102: File Management
Ogg Vorbis, PCM, PLS, M3U, etc. ① Insert the data CD into the X14. ② Select the Browser icon and confirm with the OK button. You will see the data CD. Select the music you would like and play using the OK button. -
Page 103: Tag Edit
16-2-2. TAG Edit This function is only valid for files not for folders or disks. Place the cursor on the file you would like to edit and press the MENU key. Select Edit Tag and the edit screen is displayed, see below. 16-2-3. -
Page 104: Move Files
If you wish to play an individual internet radio station using the X14, you will need to create a PLS or M3U file and put the file(PLS or M3U) onto the storage or USB host of the X14. Once you have created the file you can play the station through the X14 Browser, see example below. - Page 105 ① If you want to convert the format of tracks in the Music DB, export them into a certain place of hard disk on the Browser with the 'Export Songs' function. ② Place the cursor on the file or folder, and press MENU key. (※ With RIGHT ARROW key, you may select multiple song files) ③...
-
Page 106: Cut The Recorded File (Cut 'Playing Section')
16-2-8. Cut the recorded file (Cut ‘Playing Section’) ※ NOTE: This cutting function works on Browser mode only. For example, you recorded iRadio like left screen. ① If you go into 'IRadio Recording' folder of HDD1 via Browser, there will be the recorded file (FM - Start It Up.mp3 ) ②... -
Page 107: Extra Function
17-2. Listing by Text or Album cover art You can list up all information (like album, title, genre, artist, etc) on the screen of X14 by text or album cover art. You can select one of text mode and album cover art mode easily using TEXT/ART button of remote control. -
Page 108: Bookmark
※ NOTE: Preset EQ works for X14’s Speaker Out (internal amplifier) 17-5. Resume Play When you boot up the X14, it will automatically resume playing the music in the Music DB, Browser or i-Radio from where it was last stopped. -
Page 109: Clock And Display (Lcd) Off
Select Resume Play and confirm with the OK key. Set it as ON as shown left. ※ Default is OFF 【 TIP 】 ※This function does NOT work in the case that the ‘Alarm’ function or ‘Auto Play’ function is enabled. ※Function priority : Alarm function ----à... -
Page 110: Alarm Set
17-8. Alarm set You can set six (6) alarm settings on the X14. ① Go to Alarm at SETUP, and confirm it with the OK key. The following screen will appear. ② Select the line you require and press the OK button. -
Page 111: Sleep Mode
Sleep mode (power off). 17-11. Auto Play When the power is ON, Auto Play function allows the X14 to boot up and start playing automatically the song in the Auto Play folder in the Playlist on the home screen. ① Navigate to the Playlist to Auto Play. -
Page 112: Seek Function On The Playing Screen
17-14. Function of Multi-Cutting(Auto-Cutting) for recorded file You can record iRadio of X14. Otherwise, you may have a file recorded by other devices like X40. With this new function, you can cut the file into each track by auto or by manual. To understand this function, you need to understand each key's function well by reading this manual very carefully. -
Page 113: How To Set 'Cutting Point' By Manual
There are four(4) spins to set 'cutting point'. ※ Press MENU key to toggle Enable/Disable for these spins ※ Role of each spin -. -35 dB: to set max dB value for auto cutting. Scope settable: -30dB~-40dB -. 4.0 Sec: to set duration for the above max dB value. Scope settable: 0.1 ~ 5 Sec ※... -
Page 114: Role Of Each Key On 'Multi-Cut Screen
2) MENU key: to toggle Enable/Disable for four(4) spins 2-1) When Spin is enabled <Buttons on the front of X14 unit> -. OK: to go to next spin -. JOG spinning: to up/down spin value -. MENU: to disable Spin <Keys of remote control>... -
Page 115: Audio Cd Burning Function
NOTE: For Audio CD burning, you need to buy an external USB Optical Disk Drive separately because X14 manufacturer doesn’t provide the ODD. You can buy it easily from local store or from online store like Amazon. And, many laptop users already have You can burn Audio CD with X14 like below ①... -
Page 116: Function Of Jump To A Song On Playing Screen
⑤ Selected files will start copying to 'My Audio CD' folder in the storage set as MusicDB storage ⑥ Go to Browser and look for 'My Audio CD' foler.(There will be WAV files in the folder) ⑦ Place the cursor on the 'My Audio CD' folder, and press MENU key to select and confirm 'Burn My Audio CD' to start... -
Page 117: Multi-Room (Group Play)
17-17. Multi-room (Group Play) Multi-room (Group play) function lets you play hi-res music including DSD, MQA and 192Khz/24Bit HD FLAC, WAV seamlessly in any room of the home wirelessly. You can play the same song in every room or play the same song with two devices as Left/Right channel in perfect sync. ※... -
Page 118: File Formats And Sample Rate With Which Multi-Room (Group Play)
17-17-1. File formats and sample rate with which Multi-room (Group Play) function work File Format Wireless Wired LAN Remarks PCM(WAV, FLAC) 44.1Khz(48Khz) 88.2Khz(96Khz) 176.4Khz(192Khz) 352.8Khz(384Khz) 768Khz Not supported Not supported 44.1Khz(48Khz) 88.2Khz(96Khz) 176.4Khz(192Khz) 352.8Khz(384Khz) High-resolution files are reduced to 44.1Khz(48Khz)/16bit for multi-room (group play) 17-17-2. -
Page 119: Basic Setup By Device
17-17-4. Basic Setup by device 17-17-4-1. How to set a device as server device You can set a device as Server device ① Go to home screen and click the Group Play icon ② Place the cursor on the 'Group Play Enabled' or 'Group Play Disabled' ③... -
Page 120: Playing Screen
17-17-4-4. Playing screen If you play the songs over the Group Play, you can find the playback screen of Server and Client like below. Server device screen Client device screen 17-17-5. Advanced setup by MusicX NEO app You are recommended to use MusicX NEO app for advanced setup and easy use of Group Play. 17-17-5-1. -
Page 121: Start Playing Songs To Set As Server Device
17-17-5-2. Start playing songs to set as server device Once you play music on the Living room device, the three (3) devices will be like below -. Living Room device: This will be server device -. Bed Room device: This will be a client device and automatically joined to the Group Play, because this device is set as 'Auto Join' -. -
Page 122: Control Devices
17-17-5-4. Control devices For server device (Living Room) ① Tap the area marked with a square to pop up control window ② You can control volume of all devices including client devices at the same time, and can set channel of the server device as you want like Stereo, Left channel or Right channel. -
Page 123: Specification
18.Specification Model name cocktailAudio X14 Host CPU & CPU: Dual Core ARM Cortex A9 running at 1.0GHz Memory Main Memory: DDR-1066 1GByte EMMC 8GByte CD Drive Type External USB Optical Disk Drive (Optional) If needed, user should buy a external USB optical disk drive for CD-... -
Page 124: Mqa(Master Quality Authenticated)
The LED light next to MQA logo on the X14 screen glows green or blue to indicate that the unit is decoding and playing an MQA stream or file, and denotes provenance to ensure that the sound is identical to that of the source material. - Page 125 6. The disc is skipping 6-1. Check for scratches or dirt. 6-2. Make sure that the X14 is on a firm surface and not subject to vibrations. 7. There is a hum coming from the speaker. Make sure that all cable connections are secure.
Need help?
Do you have a question about the X14 and is the answer not in the manual?
Questions and answers