Advertisement
Advertisement

Related Manuals for VTUVIA SN100


Summary of Contents for VTUVIA SN100
- Page 1 SN100...
-
Page 3: Table Of Contents
Table of Contents About Manual ................................1 Basic information ................................2 Assembly Instructions ..............................5 Battery Charging ...............................26 Maintenance................................30 Troubleshooting.................................34 Warnings and Safety..............................36 Limited Warranty ...............................40... -
Page 5: About Manual
This manual contains details of the product and information on its operation and maintenance. Read it carefully and familiarize yourself with the VTUVIA bike before using it to ensure safe use and prevent tragic accidents. Be sure to retain this manual as your convenient VTUVIA bike information source. -
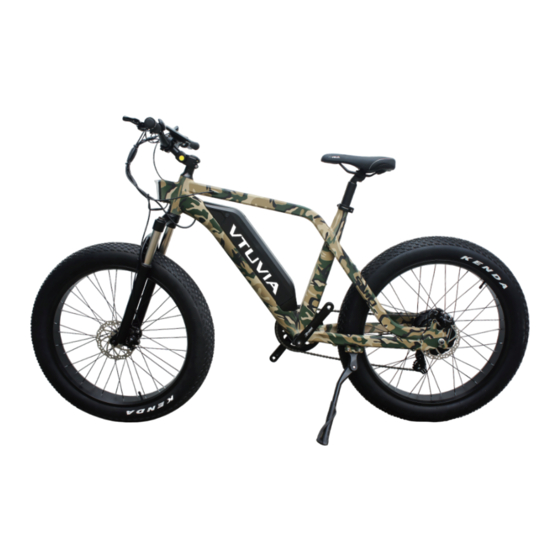
Page 6: Basic Information
Product Specification Motor: 48V/750W rear geared brushless Battery: 48V/13AH Li-ion batter Controller: 48V 25A Intelligent brushless PAS: 1:1 Intelligent pedal assistant system Range: 22 miles(electric only),35 miles(pedal assistant) Charging Time: 4-6 hours Rear Derailleur: Shimano front 1 and rear 7 outer Bike Frame: 6061 Aluminum alloy Front Fork:... - Page 7 Chain: Chain Wheel: Aluminium alloy crank 44T Foot: Aluminium alloy foot Seat Post: Aluminium alloy Seat Cushion: VELO Shelves: Rear rack (optional) Colour: Black/Camouflage/Green/Grey Max Load: 300 lbs Net Weight: 66 lbs Gross Weight: 87 lbs Max Speed: 20mph - 3 -...
- Page 8 Basic Structure Brake Lever Frame Saddle Fork Spoke Valve Motor Battery Pedal Rear Derailleur - 4 -...
-
Page 9: Assembly Instructions
Ensure the following pieces are included in the package. If there are any missing parts please contact VTUVIA Bikes for help replacing missing pieces. Please also ensure you have received the correct frame size before assembling the bike. - Page 10 Step 2 : Open the tool box ii the package twist off the nut get out a little spring insert the centre axle adjust the wheel lock off the quick release finish installation - 6 -...
- Page 11 Step 3: Amount handlebar - 7 -...
- Page 12 Step 4: Pedal and Saddle Turn the right pedal marked into The pedal marked has left-hand The pedal marked has right- the right side of the crank arm,and threads.Tighten it in a counter- hand threads.Tighten it in a the left pedal marked into the left clockwise direction(anti-clockwise).
- Page 13 Display Features 1.Size parameters 80.0mm 55.3mm 61.2mm - 9 -...
- Page 14 2.Press Brake Indicator Faulty Indicator Power Indicator Front Light USB Indicator Speed Mode Value Indicator Speed Mode Speed Circle Mileage Mode Gear Indicator Value Indicator - 10 -...
- Page 15 2.1 Brake Indicator Display when brake power off. 2.2 Gear indicator Display the current power-assisted gears 0-9, where 0 is neutral and no power, and 1-9 corresponds to power-assisted gears. Display P when in walk assist mode. 2.3 Faulty Indicator Display when a fault is detected.
- Page 16 3.1 Power On/Off Long press(1 second) Power Button when the display is off, display, the display is fully displayed and starts to work, the power of the controller is turned on; Long press(1 second) Power Button when the display is on, display power off, the power of the controller is turned off. If you ride for 5 minutes (time can be set by the user) without operating the meter, the meter will automatically turn off the power.
- Page 17 3.3 Mileage Mode Switch When power on, short-press Power Button to switch the mileage display mode, and the following information is displayed cyclically: riding time (Time) → accumulated mileage (ODO) → power information (Pow) → single mileage (Trip). * If there is no key operation for 5 seconds, the meter will automatically return to the single mileage display state.
- Page 18 3.4 Speed Mode Switch When power on, short press the Mode Button to switch the speed display mode, and the following information is displayed cyclically: real time speed (RT SPEED) → average speed (AVG SPEED) → maximum speed (MAX SPEED). 0 Gear3 Gear9 Gear 0 Gear3 Gear9 Gear 0 Gear3 Gear9 Gear...
- Page 19 3.5 Headlight / Backlight Switch Press and hold Plus Button (1 second), the brightness of the meter's backlight decreases, and the lights are turned on (requires controller support). Press and hold Plus Button again (1 second), the display backlight will return to its original bright ness, and the lights will be turned off at the same time. * If there is no key operation for 5 seconds, the meter will automatically return to the real-time speed display state.
- Page 20 3.6 Walking Mode(6km walk assist) Press and hold Minus Button (1 second), the electric bike enters the boosting state, the speed displays the real-time speed, and the gear position displays “P”. Release Minus Button to exit the walking mode. Walking Mode Off Walking Mode On * Some controllers may not support this function - 16 -...
- Page 21 3.7 USB Function Long press Mode Button (1 second), the USB function is turned on, the user can use the USB function, and long press Mode Button for more than 1 second, the display will close the USB function, and the charging parameter is DC 5V 500mA.
- Page 22 4.MENU Parameter Setting When power on, press Mode Button twice (<0.3 seconds between presses), the system enters the parameter setting state. In this state, the meter parameters can be set. Press Mode Button twice again to exit the setting state. (<0.3 seconds between presses). When in setting state, press Mode Button to select the desired adjustment item, when the parameter flashes, press Plus Button and Minus Button to adjust the parameter setting, press Power Button to save and switch, and press Mode Button twice to exit the setting...
- Page 23 Backlight Brightness: For item P1, press Plus Button and Minus Button to select the display 1 ~ 5, “1” is the darkest backlight and “5” is the brightest. Backlight Brightness Adjust Interface Automatic shutdown time: For item P2, press Plus Button and Minus Button to adjust the position, 1 ~ 9 minutes represents the automatic shutdown time, OFF means cancel the automatic shutdown function.
- Page 24 Universal/ England: For item P3, press Plus Button and Minus Button to switch km / h or MPH display, set Universal/ England: 0 stands for universal system and 1 stands for England system. Universal/ England Switch Interface - 20 -...
- Page 25 You may also use the throttle to accelerate and maintain your desired speed. Driving Range The range of your VTUVIA Bike is the distance the bike will travel on a single full charge of the onboard battery pack.The range values in this manual are estimates based on expected usage characteristics.
- Page 26 We suggest that you select a lower assistance level when you first get your VTUVIA Bike to get to know your bike and travel routes. Once you become familiar with the range requirements of your travel routes, and the capabilities of your VTUVIA Bike you can then adjust you riding characteristics if you so desire.
- Page 27 Do not park, store, or transport your VTUVIA Bike on a rack that is not designed for the size and weight of the bike.
- Page 28 MAXIMUM PAYLOAD FOR WTVA BIKE The total maximum weight limit of the VTUVIA Bike(150 Kilograms) includes the weight of the rider as well as clothing, riding gear, cargo, etc. The kickstand is not designed to be used for loading cargo. You MUST hold onto the bike whenever loading cargo.
- Page 29 • Cargo should be loaded as low as possible to lower the center of gravity and improve stability, but ensure that cargo does not interfere with any moving components or the ground. • Ensure your loads are properly secured and periodically check that nothing loosens. •...
-
Page 30: Battery Charging
Always charge your battery in temperatures between 10 and 26 degrees Celsius and ensure the battery and charger are not damaged before initiating charge. If you notice anything unusual while charging, please discontinue chargingand use of the bike and contact VTUVIA Bike for help. Basic Battery Charging Tips The battery should be recharged after each use. - Page 31 o The charger will automatically stop when the battery pack is full o Always charge in dry locations and indoors away from direct sunlight, dirt or debris. o Do not cover up the charger when plugged in or charging, it air cools and needs to be left in a clear space.
- Page 32 Do not charge the battery with any other chargers then what was originally supplied with your VTUVIA Bike or a charger purchased directly from VTUVIA Bikes for use with your specific bike serial number, as approved by VTUVIA Bikes.
- Page 33 !!Please take special care in charging of your VTUVIA Bike in accordance with the above procedures and safety information. Failure to follow proper charging procedures can result in damage to your VTUVIA Bike, charger, personal property and/or serious injury or death.
-
Page 34: Maintenance
Maintenance Bicycle Care To ensure safe riding conditions you must ensure your bike is properly maintained. You should follow these basic guidelines and see your certified bicycle mechanic at regular intervals to ensure your bike is safe for use. 1. Properly maintain batteries by keeping them fully charged when not in use. 2. - Page 35 Therefore, always have a certified bicycle mechanic perform a tune-up on your VTUVIA Bike after your initial break-in period of 80- 160 km (depending on total weight, riding characteristics and terrain). Regular inspections and tune-ups are particularly important for ensuring that your bicycle remains safe and problem-free.
- Page 36 Wheels and Tires o Ensure tires are inflated to within the recommended limits displayed on the tire sidewalls. o Ensure tires have tread and have no BULGES OR EXCESSIVE WEAR. o Ensure rims run true and have no obvious wobbles or kinks. o Ensure all wheel spokes are tight and not broken.
- Page 37 Motor Drive o Ensure hub motor is spinning smoothly and the motor bearings are in good Assembly working order. and Throttle o Ensure all power cables running to hub motor are secured and undamaged. o Make sure the hub motor axle bolts are secured and all torque arms and torque washers are in place.
-
Page 38: Troubleshooting
Basic Troubleshooting Symptoms Possible Causes Most Common Solutions It doesn’t work 1. Insufficient battery power 1. Charge the battery pack 2. Faulty connections 2. Clean and repair connectors 3. Battery not fully seated in tray 3. Install battery correctly 4. Improper turn on sequence 4. - Page 39 Reduced range 1. Low tire pressure 1. Adjust tire pressure 2. Low or faulty battery 2. Check connections or charge 3. Driving with too many hills, battery headwind, braking, and/or 3. Assist with pedals or adjust route excessive load 4. Replace the battery 4.
-
Page 40: Warnings And Safety
Warnings and Safety General Warnings Like any sport bicycling involves risk of injury and damage. By choosing to ride a bicycle, you assume the responsibility for that risk, so you need to know, and practice the rules of safe and responsible riding and the proper use and maintenance of this bicycle. - Page 41 Ensure handle bar grips are not damaged and properly installed. Loose or damaged grips can cause you to lose control and fall. o Do not use this product with standard bicycle trailers, stands or bicycle racks. Contact VTUVIA Bikes to check if your equipment will work with the bicycle.
- Page 42 o Engaging in extreme riding is extremely dangerous and should be avoided. Although many articles/ advertisements/catalogues depict extreme riding this is not recommended nor permitted and you can be seriously injured or killed if you perform extreme riding. o Bicycles and bicycle parts have strength and integrity limitations and extreme riding should not be performed or you risk damaging the components or becoming seriously injured or killed.
- Page 43 Any aftermarket changes to your VTUVIA Bike not expressly approved by VTUVIA Bikes could void the warranty and create an unsafe riding experience. o Because electric bicycles are heavier and faster than normal bicycles, they require extra caution and care while riding.
-
Page 44: Limited Warranty
Warranty Info Every bike is covered under a manufacturer's one-year all-inclusive warranty for the original owner against all manufacturing defects. VTUVIA Bike warrants this product, including all individual components against defects in material or workmanship as follows: VTUVIA Bike LIMITED 1 YEAR WARRANTY VTUVIA Bike’s bicycle components including frame, forks, stem, handlebar, headset, seat post, saddle,... - Page 45 This warranty does not include consumables or normal wear and tear parts (tires, tubes, brake pads, cables and housing, grips). VTUVIA Bike will not be liable and/or responsible for any damage, failure or loss caused by any unauthorized service or use of unauthorized parts. In no event shall VTUVIA Bike be responsible for...
- Page 46 Components of the VTUVIA bike are subject to higher wear when compared to bicycles without power assistance. This is because the VTUVIA bike can travel at higher average speeds than regular cycles and has a greater weight. Higher wear is not a defect in the product and is not subject to warranty. Typical components affected are the tires, brake pads, suspension forks, spokes/wheels and battery pack.
Need help?
Do you have a question about the SN100 and is the answer not in the manual?
Questions and answers