Table of Contents
Advertisement
Quick Links
DIGITAL CONTROL CENTER
Second Shooter & Second Shooter Plus
TABL E OF C O N T E N T S
Updates 11/18/16 Firmware V1.1.0.12
........................................................................ 2
........................................................................ 3
........................................................................ 3
........................................................................ 3
........................................................................ 3
.........................................................................3
........................................................................ 4
.........................................................................4
......................................................................4-6
.........................................................................6
.........................................................................7
......................................................................7-8
........................................................................ 8
.........................................................................8
Advertisement
Table of Contents

Related Manuals for Kessler Second Shooter


Summary of Contents for Kessler Second Shooter
-
Page 1: Table Of Contents
DIGITAL CONTROL CENTER Second Shooter & Second Shooter Plus Updates 11/18/16 Firmware V1.1.0.12 TABL E OF C O N T E N T S Digital Controll Center (DCC) ................ 2 Getting Started: Hardware Set-Up ................ 3 - Connecting the Motors ................ -
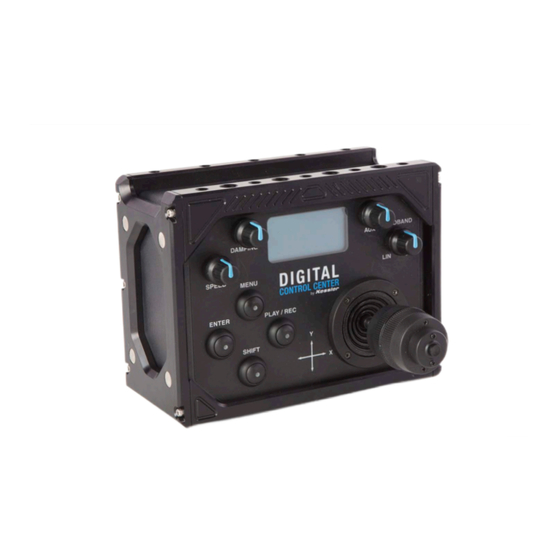
Page 2: Digital Controll Center (Dcc)
(cruise control). K) USB For firmware updates - connect to a computer. L) Expansion For integration with Second Shooter/Second Shooter Plus controller. M) Out Connect the controller to CineDrive MCB or Pan/Tilt to run motors manually N) In Connect the controller to a CineDrive Brain. -
Page 3: Getting Started: Hardware Set-Up
GET T I NG STA R T E D: HA R DWARE S ET- UP • CONNECTING SECOND SHOOTER/SECOND SHOOTER PLUS (SS/SS+) • Put SS/SS+ into slave mode. • Connect SS/SS+ to power souce and turn on. Select MASTER/SLAVE and then selecet SLAVE. -
Page 4: Main Menu
MAIN MENU RUN: Select to exit the menu and return to the Run screen for motor control. • Currently a maximum of 3 motors are available to the joystick. • Double tapping SHIFT makes the next three addressed motors available to the joystick •... - Page 5 • Select RUN with JTK BUTTON/ENTER * Press MENU to stop • Scrubbing – Move LEFT or RIGHT on the joystick while Looping to enter SCRUB mode and press JTK BUTTON/ENTER to return to Looping Mode. This feature will allow you to manually advance the position of the motors within the programmed move.
-
Page 6: Play/Rec Move
• Select START to begin the time lapse. The motors will move into the start position (1st key frame) and the back- • light will turn off. Press the SHIFT button to toggle the backlight on/off. Press the JTK BUTTON/ENTER button to Pause/Resume the time lapse move. * Press MENU to stop •... -
Page 7: Calibration
4. CALIBRATION: This menu will allow you to calibrate each axis (ie. mark begin and end points) • CAL ALL AXIS: Calibrate all connected axis • CAL SINGLE AXIS: Calibrate an individual axis • AXIS: the corresponding motor axis • CALIBRATE: shows N (no) or Y (yes) to indicate if the axis is calibrated HOW TO CALIBRATE •... -
Page 8: Name Axis
• SETUP: Set which joystick motion (up/down, left/right, twist, or AUX) controls a specific axis 1. Press MENU 2. Select JTK CONFIGURATION 3. Only the axes that are connected to the DCC will show up in this list. The list can be navigated with the joystick.
Need help?
Do you have a question about the Second Shooter and is the answer not in the manual?
Questions and answers