
Related Manuals for EFIX CM3


Summary of Contents for EFIX CM3
- Page 1 C M 3 G N S S R e c e i v e r U s e r G u i d e 2021-11-10 Release Shanghai EFIX Geomatics Co., Ltd...
-
Page 2: Preface
Experience requirements In order to make better use of the CM3 series, EFIX suggests that you read this user guide carefully before using this product. If you do not know much about the principles of the CM3 series, please contact us for technical advice and training. -
Page 3: Technology And Services
Relevant information You can find the manual in the following ways: 1, EFIX GNSS products, the instrument box will be accompanied by a product instruction manual, convenient for you to operate the instrument. 2, the official website of the login http://www.efix-geo.com, in the "action video" column can download to watch the video operation instructions. -
Page 4: Table Of Contents
Relevant information ........................3 Your suggestion ..........................3 Safety Directions ..........................5 Get started with the CM3 series (quick start)................... 6 1.1 Connecting the instrument ......................6 1.2 Set the base - the external base ....................6 1.3Set up the rover ........................... 6 1.4 Create a new project ........................ -
Page 5: Safety Directions
This device complies with part 15 of the FCC Rules. Operation is subject to the following two conditions: (1) This device may not cause harmful interference, and (2) this device FCC ID:2A3MU-CM3 must accept any interference received, including interference that may cause undesired operation. -
Page 6: Get Started With The Cm3 Series (Quick Start)
The CM3 series uses WiFi or Bluetooth to connect instruments. Connect CM3 Series receivers When the CM-Survey software is turned on after the host is turned on, click Connect Instrument to enter the Connect instrument interface and connect the SN number of the CM3 Series receiver using Bluetooth/WiFi (Bluetooth password:1234) , click Connection, CM-Survey will prompt "Connection succeeded"... - Page 7 Its physical operation can be found in the CM-Survey software operation video, which is available next Path: http://www.efix-geo.com download in the Action Videos column.
-
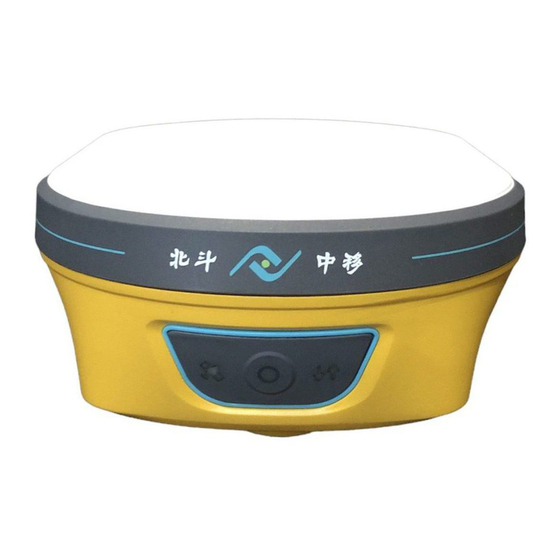
Page 8: Product Introduction
1 Product introduction 1.1 The appearance of the receiver CM3 Figure: ① ② Detailed description of the indicator The CM3 indicators above are: differential data indicator, power indicator. Indicator Color Meaning Yellow In base mode, the color is yellow ①Differential... -
Page 9: The Instrument Is Taken In High Quantities
1.3 The instrument is taken in high quantities measurement Using the auxiliary height gauge, the bottom of the antenna is selected by means of Auxiliary Height Gauge 2 Receiver field work requirements Precautions: The distance between the station mode, the base station scaffold and the station whip antenna scaffold is recommended to >... -
Page 10: Fl3 Radio Settings
① ② ⑨ ⑩ ⑩ ③ 错误 ④ ① ⑤ ⑥ ⑦ ⑧ ⑨ (1) Whip antenna(2)Radio antenna connection base(3)Extend rod(4)aluminum disc Radio Power (5) Scaffolding(6)FL3Radio(7) Cord(8)Battery Auxiliary (9) Host(10) Gauge(11)Base 2.1 FL3 radio settings In external station job mode, use the radio panel to turn on the key to open the station, and use the left and right switch keys and up and down keys to configure the station. - Page 11 419.050 445.063 438.125 410.050 445.075 440.125 453.550 445.088 441.125 455.550 445.100 442.125 457.550 445.113 443.125 459.550 445.000 444.125 461.550 441.000 446.125 463.550 442.000 447.125 TT450s Arbitrarily writable 411.050 465.550 443.000 412.050 467.550 444.000 413.050 469.550 445.000 414.050 451.550 446.000 415.050 445.013 447.000 416.050...
-
Page 12: Pc-Side Web Page Set Up Receiver Instructions
3 PC-side web page Set up receiver instructions The process Detailed description Note of operation First step:turn on receiver WiFi,Search for receivers on your Default name: Receiver SNnumber computer or other 1.Login WiFi-enabled device; web page Second step:open google chrome browser, Enter Default user name: admin the website 192.168.1.1 Default password: password... - Page 13 configuration configuration" on the left reference station information. side of the page. You can [Antenna parameter settings]Antenna parameter check: settings can be set antenna quantity, antenna [Summary] manufacturer, antenna type, antenna number, [Antenna antenna height, height cut-off angle, PDOPlimits. parameter [Reference station settings] You can set the settings]...
- Page 14 data found by the receiver, restoring the factory settings refers to clearing the receiver and reverting to the factory configuration, and turning off the receiver means to turn off the receiver. [Account management]Interface language switching is supported。 [Account management] Accounts can be added, saved, deleted, and passwords modified;...
- Page 15 [TCP/serve/Ntrip caster] The Ntrip protocol and the TCP protocol are supported in the connection protocol, and the Ntrip protocol allows the user to log directly into the CM3 series to obtain data. [Serial Port] Data output Baud Rate, Differential Data,RawData,HCPPPData,HRCData,GPGGA,GPGS...
- Page 16 the machine support output data types, can be set whether the output and output frequency. If differential data needs to be output, it needs to be set to self-starting base station mode, with an external radio station typically with a Baud rate of 9600.
-
Page 17: Smart Phone-Side Web Page Set Up Receiver Instructions
[Firmware and so on. upgrade] [Firmware upgrade] Web firmware upgrade, [Board upgrade] please refer to the details [CM3 Series firmware [Receiver upgrade method]. registration] [Board upgrade] Select the board firmware to upgrade the board. [Receiver registration]Implements the function of registering the receiver. - Page 18 phone search and connect to the receiver; Second step: open the smart phone browser, enter the remote address Default username: admin 192.168.1.1 in the address Default password: password bar, enter login interface; [The receiver position]The interface shows the longitude and latitude of the receiver's current phase Click the "Receiver Status"...
- Page 19 [TCP/serve/Ntrip caster] The Ntrip protocol and the TCP protocol are supported in the connection protocol, and the Ntrip protocol allows the user to log directly into the CM3 series to obtain data. [Serial Ports] Data output Baud Rate, Differential Data,RawData,HCPPPData,HRCData,GPGGA,GPGSV,G...
-
Page 20: Operation And Accuracy Of Static Operating Mode
You release date. can check: [Firmware upgrade] Web firmware upgrade, please [Firmware refer to the details [CM3 series firmware upgrade 9.Firmware information] method]. [Firmware upgrade] [Hardware... -
Page 21: Static Web Page Parameter Settings
Slope Height Vertical Height Control Points Step3Record Record the name call, instrument SNnumber, instrument height, start observation time. Step4Collect static data Turn on the receiver, set the receiver to static mode, the receiver will automatically start recording static after searching for enough satellites; Receiver records static process do not touch scaffolding or instruments, try to avoid human interference, arrange for special guards. -
Page 22: Data Download
After the whole point storage --- select the whole point, the recording duration needs to be set to a value that can be divisive by 1440 minutes The loop storage --- automatically overwrites the thread's early data after the set storage space has been exceeded After a single acquisition --- select Yes, that is, after recording a file with a set duration, stop, or not as a continuous record... -
Page 23: Static Accuracy Test
Note: Web mode focuses on settings, you can set how many sets of data are logged on and off, and ftpmode focuses on data export, so data export is recommended using ftp mode or Type-C data line export. 5.4 Static accuracy test Static measurement accuracy refers to the degree to which the static measurement baseline vector results of the device under test conform to the known baseline vector (horizontal and vertical components). -
Page 24: Rtk Setup Method And Tilt Measurement
Base External Radio - Bluetooth Settings: 1) Receiver power on; 2) FL3 radio power on, Bluetooth search receiver Bluetooth, so that FL3 and CM3 to establish a connection, CM3 will automatically switch to base station mode; 3) Configure FL3 radio protocol, channel, Baud rate lamp information, configuration can be completed, view FL3 radio Bluetooth light (BT) has been long on, differential light (RX/TX) one second flash configuration success. - Page 25 2)At this point, you will go to the initialization interface and follow the interface prompt steps to initialize. The tilt measurement icon is green after successful initialization , you can use tilt measurements. 2) Enter the name and instrument height before the measurement and click on the measurement icon The measuring point is automatically saved to point management after acquisition is complete.
-
Page 26: Firmware Upgrade Method
7 Firmware upgrade method 7.1 Upgrade via web page Web firmware upgrade, select Browse to add the corresponding .binfile, click OK to upgrade, note: less of the battery than50% will remind you that the upgrade is not possible. The receiver firmware upgrade is complete after the update is complete (approximately3minutes). 7.2 Upgrade via USB stick 1、Turn off the receiver. -
Page 27: The Data Line (Mnt Directory) Upgrade
7.3 The data line (mnt directory) upgrade The receiver is turned on, the receiver is connected to the computer using the Type-Ccable, and the upgrade the receiver file(e.g.update_cm3_v2.1.7.2_b20210706 .bin) iscopied to mntdirectory and the receiver is restarted. After both lights are on and flashing at the same time, press the power key to enter the upgrade and cancel the upgrade twice in a row. -
Page 28: Appendix 1 Use And Precautions
When using CM3 Series receivers: Do not remove the instrument yourself, contact the supplier in the event of a failure;... -
Page 29: Appendix 2 Of The Main Technical Indicators
Appendix 2 of the main technical indicators Satellite Beidou All-Constellation tracking LINUX Waterproof breathable Support film Receiver ③ initializa characteristics tion time The data output rate Initializa tion >99.99% reliabilit Appearance A streamlined cylinder Button A power button The appearance 1 correction data indicator of the receiver Indicator... - Page 30 technology supplying system RTK mode for12hours, with external Battery direct current and automatic (4). life switching of built-in battery power External power 5V DC supply Size 12.4cm×13.5cm ≤1Kg Weight Material AZ91D magnesium alloy Operating temperatur -20℃~+60℃ e(discharg e) Operating temperatur 0℃~+45℃...
-
Page 31: Get Technical Support
400-602-8152 Customer Service Toll Free: www.efix-geo.com Website: The website of Shanghai EFIX Geomatics Co., Ltd provides the latest information on the CM3series of products. This product strictly implements Shanghai enterprise standard Q/201100ZYDH001-2021GeodesicGNSSreceiver, and has obtained the metering instrument type approval...
Need help?
Do you have a question about the CM3 and is the answer not in the manual?
Questions and answers