Advertisement
Quick Links
Advertisement

Related Manuals for Sonexis ConferenceManager

Summary of Contents for Sonexis ConferenceManager
- Page 1 Quick Start Guide...
- Page 2 Installation Instructions Site Preparation • Choose a site with proper temperature control and • If you are installing multiple systems in a rack, make sure adequate floor loading capacity for the current installation the overall loading for each branch circuit does not exceed and for future growth. Install near appropriate AC outlets the rated capacity. and Ethernet switches (10/1000 Base-T cables cannot be • Install servers in the lower part of the rack because of their longer than 100 meters). weight and to allow easier access to server components. • All racks must be mounted securely. The installer must • Do not slide more than one server out from the rack at a provide the rack-specific installation hardware (rack nuts, time — doing so may destabilize the rack. machine screws, etc.). • Close doors and panels on the rack and server to maintain • Leave sufficient clearance around the rack to allow for proper cooling when not being serviced. free airflow and for server access. Installing the Rails Unpack the server and locate the mounting hardware. Step 1. Find the vertical position in the rack where the rails will be installed. Step 2. Align the back of the left slide rail with the mounting holes on the left rear post of the rack. Step 3. Squeeze the mounting pins together and insert the rail into the rack. Step 4. Identify the corresponding mounting holes on the left front post of the rack.
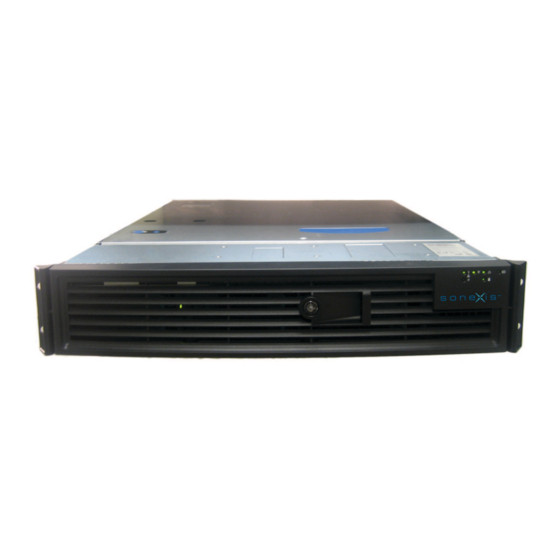
- Page 3 Cabling the System After installing the conferencing system in a rack, connect the appropriate power, network, and T1 cables. Power Supply Fans Power Good Indicators T1 Connectors (1, 2, or 3 Boards) Power Supply Locks Power Cords (Redundant Power Supply Optional) Video Connector USB Connectors Network Interface Connector (LAN1) Span 4 Span 4 Step 1. Connect the power cord(s) to the conferencing system and lock them in place. Span 3 Span 3 Step 2. Connect the Ethernet cable to the network interface connector (LAN 1).
- Page 4 Additional Conferencing Configuration To use SSL, you must open TCP port 443 and install a server certificate. You have multiple options for See the Installation and Administration Guide for details on: configuring audio and web firewall ports. See the • PSTN, H.323, SIP, and VoIP telephony settings Installation and Administration Guide for more information about SSL and firewall configuration details. • Configuring an SMTP server to send conference invitations • Configuring multi-server conferencing systems Disclaimer: This Quick Start Guide is meant as a general guide The Installation and Administration Guide and other to installing and configuring the conferencing system. Not every documentation is available from the Help button on any configuration or problem can be anticipated given the variations conferencing system screen. in all hardware and software products. Sonexis Technology, Inc. accepts no responsibility for errors or omissions contained in this Guide. 400 Network Center Drive Tewksbury, MA 01876 (978) 640-2000 www.sonexis.com © 2011 Sonexis Technology, Inc. customercare@sonexis.com SPN11853 rev A 021411...
Need help?
Do you have a question about the ConferenceManager and is the answer not in the manual?
Questions and answers