Advertisement
Quick Links
READ THIS MANUAL CAREFULLY BEFORE USE – FAILURE TO DO SO MAY RESULT IN INJURY, PROPERTY
DAMAGE AND MAY VOID WARRANTY. • KEEP THIS MANUAL FOR FUTURE REFERENCE. • Products covered by
this manual may vary in appearance, assembly, inclusions, specifications, description and packaging.
Safety
Any injury, damage or equipment failure due to incorrect installation and /or usage is not covered by
warranty.
Hose
Type B (1)
Hose
Type A (11)
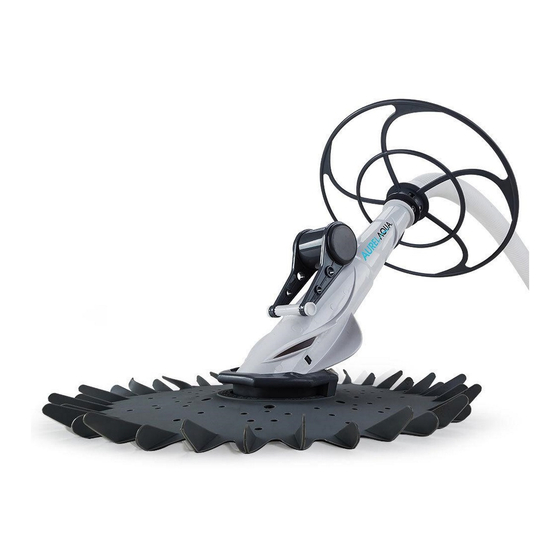
Pool Cleaner Assembly
Before assembly, check that all parts are included and are in good condition.
Attach the foot (B) to the cleaner body (A). The foot must be installed so the "fingers" (C) around the edge
are facing up. Pull the foot over the ring (D) at the bottom of the cleaner body so it sits evenly and firmly.
A
E&OE
Cleaner Body
Dive Float
Hose
Adaptor A
Hose
Adaptor B
Hose
Weight
Suction
Relief Valve
C
B
©2018 Aurelaqua
45°
Elbow (2)
Flow
Deflector
D
Foot
Deflector Ring
1
Advertisement

Summary of Contents for Aurelaqua SWPCLNAURB5WT
- Page 1 Attach the foot (B) to the cleaner body (A). The foot must be installed so the "fingers" (C) around the edge are facing up. Pull the foot over the ring (D) at the bottom of the cleaner body so it sits evenly and firmly. E&OE ©2018 Aurelaqua...
-
Page 2: Installation
Turn the pool pump ON. To adjust the speed of the pool cleaner, rotate the ring on top of the suction relief valve - rotate right (clockwise) to increase speed, rotate left (anti-clockwise) to reduce speed. Hose Length Pump Outlet Speed Flow Deflector Adjustment E&OE ©2018 Aurelaqua... -
Page 3: Troubleshooting And Maintenance
- ensure it is fully seated on the end of the shaft. To complete assembly, reverse the disassembly procedure from step e back to a. E&OE ©2018 Aurelaqua... - Page 4 For example, if the hose was not properly wrapped while hanging on a storage rack, the plastic will stay in that position. To remedy the situation, lay the vacuum hose outside during hot weather and try to manipulate the hose to make it as straight as possible. E&OE ©2018 Aurelaqua...
- Page 5 ©2018 Aurelaqua. All rights reserved. No part of this document, including descriptive content, concepts, ideas, diagrams or images may be reproduced or transmitted in any form or by any means, electronic or mechanical, including photocopying, scanning or recording, or any information storage and retrieval system, without express permission or consent from the publisher.
Need help?
Do you have a question about the SWPCLNAURB5WT and is the answer not in the manual?
Questions and answers