
Summary of Contents for Seriallink SLK-S502
- Page 1 SLK-S502 Serial server instruction manual SLK-S502 Serial Server Instruction manual WEB:www.seriallink.cn e-Mail:info@seriallink.net...
-
Page 2: Table Of Contents
SLK-S502 Serial server instruction manual catalog Chapter 1 Product Introduction..........................1 1.1 Product Brief..............................1 1.2 Detailed parameters............................2 1.3 Appearance Design............................3 1.3.1 Product Size............................3 1.3.2 Appearance instructions........................4 Chapter 2 Parameters configuration......................... 6 2.1 Preparation before serial port server configuration..................6 2.1.1 Set a static IP address.......................... -
Page 3: Chapter 1 Product Introduction
Ethernet for centralized management. After installing the virtual serial port, it can realize remote reading of serial data. SLK-S502 serial server supports multiple working modes, including TCP server mode, TCP client mode, UDP mode, TCP/UDP Socket, Modbus RTU to Modbus TCP Server and other working modes, allowing user software to access the serial port through TCP plus port number Line equipment. -
Page 4: Detailed Parameters
SLK-S502 Serial server instruction manual 1.2 Detailed parameters item description Dual-Core 880MHZ 1Gb DDR3 RAM default, can be customized to support 4Gb DDR3 RAM maximum NAND Flash 128Mbytes default Ethernet Number of interfaces:2 interface speed:10/100 /1000Mbps, auto MDI/MDIX Connector:8-pin RJ45 protect:... -
Page 5: Appearance Design
SLK-S502 Serial server instruction manual 1.3 Appearance Design 1.3.1 Product Size WEB:www.seriallink.cn e-Mail:info@seriallink.net... -
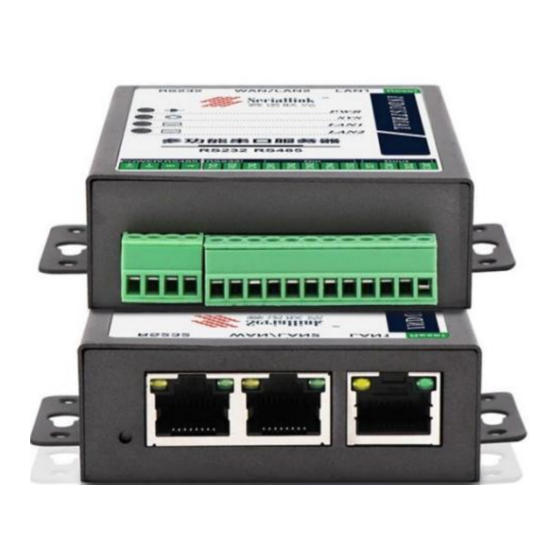
Page 6: Appearance Instructions
SLK-S502 Serial server instruction manual 1.3.2 Appearance instructions Figure 1 Figure 2 Figure 3 Figure 1 RS232 WAN/LAN2 LAN1 Reset Serial port Network port Network port Restore factory settings button Figure 2 Always bright:Equipment power supply is normal Power indicator light Not bright:The device is not powered, please check whether the voltage... - Page 7 SLK-S502 Serial server instruction manual Figure 3 category parameter Description POWER Power input 9-28V RS458 RS458 Negative end RS458 Positive end RS232 RS232 Signal sending end RS232 Signal receiving end Ground terminal end DIN1 DIN2 Switching value input end DIN3...
-
Page 8: Chapter 2 Parameters Configuration
SLK-S502 Serial server instruction manual Chapter 2 Parameters configuration 2.1 Preparation before serial port server configuration Connect one of the LAN ports of the serial server directly to a computer or to a switch. Before logging in to the Web setting page of the serial server, you need to make sure that the management computer has an Ethernet card installed. -
Page 9: Get Ip
Seriallinkv1.2.exe to get the device IP information, as shown in the figure (LAN has been set to DHCP), search The IP address of the device model SLK-S502 is 192.168.20.182, and then the network bit in the IP address of the PC is changed to 192.168.20, see 2.1.1 for details. -
Page 10: Login Configuration Page
SLK-S502 Serial server instruction manual 2.2 Login configuration page Open IE or other browsers, enter the LAN port IP address in the address bar (default is 192.168.0.233), after the connection is established, in the pop-up login interface, log in as the system administrator (admin), that is, in the login interface Enter the password (the factory default setting of the password is admin). -
Page 11: Network Setting
SLK-S502 Serial server instruction manual 2.3 Network Setting 2.3.1 Modify the static login page address The default static address of the serial server is 192.168.0.233. You can see the network information in the navigation bar "Network Setting" >>> "LAN Setting". You can also modify the static IP address, and after the modification, the new IP address will be used to log in to the page. -
Page 12: Serial Port Configuration
SLK-S502 Serial server instruction manual 2.4 Serial port configuration 2.4.1 Use tools and preparation Select Serisl Utility>>>PROT 2 in turn to configure a port according to your needs. Here is an example of PORT 2. Connect the computer serial port, check the serial port as shown in the figure below, right click on the desktop This PC>>>Manage>>>System Tools>>>Device Manage>>>Ports(COM &LPT). -
Page 13: Tcp Server
SLK-S502 Serial server instruction manual 2.4.2 TCP Server Select Serisl Utility>>>PORT2 in turn,select TCP Server as the network protocol, and choose the data type according to your needs. Generally, the choice is "Raw date". You need to remember the local port after setting. - Page 14 SLK-S502 Serial server instruction manual Open the software, select TCP Client, IP is the server address, the port is the same as the server port, and click Connect. TCP Server and TCP Client send and receive data diagram. WEB:www.seriallink.cn e-Mail:info@seriallink.net...
-
Page 15: Tcp Client
SLK-S502 Serial server instruction manual 2.4.3 TCP Client Protocol select TCP Server, Local host addr select the IP address set by the computer, which is in the same network segment as the device's LAN port IP. The Local host port is the default, and the client settings need to use Local host addr and Local host port,click Open. - Page 16 SLK-S502 Serial server instruction manual After saving and applying, the software will print "[2021-12-02 17:36:44.743]# Client 192.168.0. 233:44380 gets online.", indicating that the connection is successful. TCP Client and TCP Server send and receive data diagram. WEB:www.seriallink.cn e-Mail:info@seriallink.net...
-
Page 17: Udp Server
SLK-S502 Serial server instruction manual 2.4.4 UDP Server Select Serisl Utility>>>PORT2 in turn,select UDP Server as the network protocol, choose the data type according to your needs. Generally, the choice is Raw date. You need to remember the local port after setting. - Page 18 SLK-S502 Serial server instruction manual The software settings are as follows, Protocol selects UDP, Local host addr selects the same network segment IP set by the computer and the device, and the Local host port defaults to it. Click Open after setting.
- Page 19 SLK-S502 Serial server instruction manual UDP Server and UDP Client send and receive data diagram. WEB:www.seriallink.cn e-Mail:info@seriallink.net...
-
Page 20: Udp Client
SLK-S502 Serial server instruction manual 2.4.5 UDP Client Protocol select UDP, Local host addr select the IP address set by the computer, which is in the same network segment as the device's LAN port IP. The Local host port is the default, and the client settings need to use Local host addr and Local host port,click Open. - Page 21 SLK-S502 Serial server instruction manual UDP Client and UDP Server send and receive data diagram, If the data is not sent from the server IP and port, it will be rejected. WEB:www.seriallink.cn e-Mail:info@seriallink.net...
-
Page 22: Modbus Tcp
SLK-S502 Serial server instruction manual 2.4.5 Modbus TCP Select Serisl Utility>>>PORT2 in turn,Select Modbus TCP as the network protocol. After setting the local port, remember to configure the baud rate, data bit, stop bit and parity bit of the serial port through the serial port configuration bar according to your needs. - Page 23 SLK-S502 Serial server instruction manual The pop-up dialog box is as follows, the baud rate, data bit, stop bit and parity bit are changed according to the values set on the web page. Open the software ModScan32, Connection>>>Connect. WEB:www.seriallink.cn e-Mail:info@seriallink.net...
- Page 24 SLK-S502 Serial server instruction manual The pop-up dialog box is as follows, select Remote modbusTCP Server, fill in the IP Address and Service Port, and then click OK. ModSim32 和 ModScan32 软件中选中部分设置需要一致。 WEB:www.seriallink.cn e-Mail:info@seriallink.net...
- Page 25 SLK-S502 Serial server instruction manual Double-click 00001: <0> area, a dialog box pops up, select On, and then click Update. The effect is as follows WEB:www.seriallink.cn e-Mail:info@seriallink.net...
-
Page 26: Transport Proto
SLK-S502 Serial server instruction manual 2.4.6 Transport Proto When selecting TCP Server, the data type also has the option of Telnet (RFC2217), and a software putty.exe is used here.Select Serisl Utility>>>PORT2 in turn,Select TCP Server or UDP Server as the Network Proto, and Telnet (RFC2217) as the Transport Proto. - Page 27 SLK-S502 Serial server instruction manual Open the putty.exe software, fill in the server IP address and port number, select Telent for Connection type, set as follows, click Open after the configuration is complete. If no error is prompted after opening, a pure black dialog box will be displayed, as shown below.
-
Page 28: Poe Power
SLK-S502 Serial server instruction manual Click the putty dialog box, enter any character, and the result is as follows. 2.4.7 POE Power The serial port power supply function switch is closed by default. Log in to the serial server page when you need to use it, click Serial Utility>>>POE Power, select ON, and then click SAVE&APPLY. -
Page 29: Chapter 3 Routing Setting
SLK-S502 Serial server instruction manual Chapter 3 Routing Setting 3.1 Firewall The firewall is turned on by default. When doing DMZ and Port Mapping, you need to disable the firewall. To disable the firewall, click Routing Setting>>>Firewall, select Disable for the firewall, and then click "SAVE&APPLY". - Page 30 SLK-S502 Serial server instruction manual Click Routing Setting>>>Port Mapping and enter the "Port Forwards" interface to configure. Name: Specify the name of this rule, you can give a meaningful name. Protocol: Specify the protocol to be forwarded, which can be TCP, UDP, or TCP/UDP.
- Page 31 SLK-S502 Serial server instruction manual After the addition is successful, there will be an extra port forwarding rule, click "SAVE&APPLY" to make this rule effective. You can add multiple rules. Check the wan port ip, through the wan port ip and the external port number, you can access the internal port of the downstream device or the local device.
-
Page 32: Dmz
SLK-S502 Serial server instruction manual 3.3 DMZ The DMZ function can map the WAN port address to a host on the LAN side; all packets to the WAN address will be transferred to the designated LAN host to achieve two-way communication. In fact, a host in the intranet is completely exposed to the Internet and all ports are opened. - Page 33 SLK-S502 Serial server instruction manual Check the wan port ip, you can directly access the downstream device through the wan port ip. If you can't access it, the possible cause is that the firewall of the downstream device is turned on, and the firewall of the downstream device needs to be turned off.
-
Page 34: Chapter 4 Switch Control
SLK-S502 Serial server instruction manual Chapter 4 Switch Control 4.1 Switch DI/DO Click Switch Control>>>Switch DI/DO, select Transport Protocol, Local Port, and Power Input as needed. Here, follow the instructions of Passive Input and Active Input of Power Input. Passive Input:... - Page 35 SLK-S502 Serial server instruction manual As shown in the figure below, the area Address setting value in the red box: 0001, the Length setting value: 4, and the MODBUS Point Type select 02: INPUT STATUS. This is mainly for demonstration. The short connection method is used. A is connected to CND and B is connected to DIN1.
- Page 36 SLK-S502 Serial server instruction manual AcTive Input: After changing the power input to Active Input, click SAVE&APPLY. Open ModScan32.exe software, click Connection>>>Connect on the menu bar, fill in the pop-up window IP Address as the IP address of the LAN port, Service Port as the local port in the Switch Control, and then click OK, the settings are as follows: WEB:www.seriallink.cn...
- Page 37 SLK-S502 Serial server instruction manual As shown in the figure below, the area Address setting value in the red box: 0001, the Length setting value: 4, and the MODBUS Point Type select 02: INPUT STATUS. This is mainly for demonstration. The short connection method is adopted. A is connected to 12VDD and B is connected to DIN1.
-
Page 38: Chapter 5 Equipment Manage
SLK-S502 Serial server instruction manual Chapter 5 Equipment Manage 5.1 Diagnosis This function is used to test whether it is connected to the Internet, the PING address can be selected, or you can fill in a well-known domain name (a website that can be accessed normally), and then click PING, wait for the result, if”ping: bad address '********'”... -
Page 39: Date Time
SLK-S502 Serial server instruction manual 5.2 Date Time You can choose to synchronize the local time, or you can synchronize the time of the NTP server. 5.3 Language Setting Modify the language of the serial server, and you need to save it before you can use it after modification. -
Page 40: Modify Password
SLK-S502 Serial server instruction manual 5.4 Modify Password Change the login password of the serial server page Password:new password Confirmation:Enter again to confirm the password If the password does not match the confirmed password, the password modification will fail. If they are the same, the modification is successful. After the password is modified, the password will take effect the next time you log in to the page. -
Page 41: Update Firmware
SLK-S502 Serial server instruction manual 5.5 Update Firmware Image:Click "Choose File" to select your firmware file. Click "FLASH IMAGE...". Checksum:MD5 of the firmware Size:The size of the firmware file Click "PROCEED" to start the firmware upgrade WEB:www.seriallink.cn e-Mail:info@seriallink.net... -
Page 42: Factory Reset
SLK-S502 Serial server instruction manual 5.6 Factory Reset Restoring the factory settings can effectively solve some errors caused by improper configuration. 5.7 Reboot Device Reboot:Click PERFORM REBOOT, the device restarts. Time Reboot:Tick enable, set the time, click SAVA & APPLY, after it is turned on, it will restart at a fixed time every day (the device time needs to be correct). -
Page 43: Chapter 6 Check
SLK-S502 Serial server instruction manual Chapter 6 Check 6.1 Status Display information related to the system. WEB:www.seriallink.cn e-Mail:info@seriallink.net... -
Page 44: System Log
SLK-S502 Serial server instruction manual 6.2 System Log Display system log. WEB:www.seriallink.cn e-Mail:info@seriallink.net... -
Page 45: Chapter 7 Logout
SLK-S502 Serial server instruction manual Chapter 7 Logout 7.1 Logout Exit and enter the login page. Thank you for your support of SERIALLINK products. If you have any questions, please email: info@seriallink.net or www.seriallink.net WEB:www.seriallink.cn e-Mail:info@seriallink.net...
Need help?
Do you have a question about the SLK-S502 and is the answer not in the manual?
Questions and answers