Advertisement
www.retromanufacturing.com
7470 Commercial Way
Henderson, NV 89011
Warranty
IMPORTANT: RetroPod™ products are designed to be modified to fit your particular
mounting requirement, however, once modified, they are not covered by this warranty.
Therefore, thoroughly check to make certain of speaker/vehicle fit prior to modification or
installation.
This warranty does not cover normal wear and tear or cosmetic damage or lost speaker
grilles. If your unmodified product does not work properly because of defects in materials or
workmanship, Retro Manufacturing, LLC (collectively referred to as the "warranter") will repair
or replace (at our option) for a period of One Year from date of original purchase as
determined by the date on the sales receipt or other proof of purchase.
ITEM
RetroPod™
You may return your product prepaid during the warranty period. This warranty only applies
to products purchased and serviced in the continental United States. This warranty is
extended only to the original purchaser of a new product which was not sold "as is."
To handle warranty issues, contact us at tech@retromanufacturing.com or call 888.325.1555.
All returns and warranty issues must be accompanied by a Return Authorization (RA) number
along with a copy of your original purchase receipt. Any items sent to us without a RA
number and copy of the receipt will be refused. Once an RA number is issued, send the
product along with the original sales receipt to the address shown above.
Copyright 2017 © Retro Manufacturing, LLC. Unauthorized reproduction prohibited. All rights reserved.
Before You Begin
Always disconnect the battery before beginning. Avoid drilling through fuel lines, brake lines,
hydraulic lines or electrical wiring. You will need the following mounting hardware (not
included) and tools to install your RetroPod™ speaker pods. Always wear eye protection
when using power tools.
Hole Saw
Sheet Metal Screws and
Rotary Cutting Tool
*Due to continuing product improvement, hardware, specifications and features are subject to change without notice.
Finding a Mounting Location for Your RetroPod™ Speaker Pods
RetroPod™ allows you to mount speakers onto most surfaces in your vehicle where speakers
normally cannot be installed. Below are some examples of common RetroPod™ installations.
These illustrations are examples only. Your vehicle may have different mounting requirements.
Kick-Panel
IMPORTANT: Once modified, RetroPod™ products are not eligible for return.
Check thoroughly prior to modification or installation.
702.483.2222
WARRANTY
1 Year
Air Saw
Washers
File
Package Tray
Door Panel
BASIC INSTALLATION GUIDELINES
The information enclosed in this installation guide is to be used as merely a general outline to
assist you during the process of installation. This guide does not cover every installation
possibility, vehicle or every aspect of the installation process.
Retro Manufacturing, LLC, or its subsidiaries assume no responsibility for proper or improper
installation. Every attempt as been made to make this installation guide as informative as
possible. This guide may be updated from time to time, and specifications are subject to
change without notice. Please check our website for the latest updates.
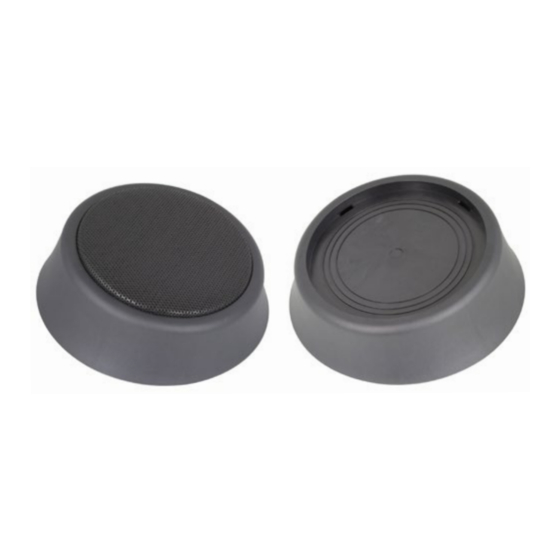
Modifying Your RetroPod™ Speaker Pods
Once you've chosen your mounting location, you will need to modify your pods to fit
your speakers. All RetroPod™ speaker pods have etched cutting grooves at various
speaker sizes that help accommodate cutting out the speaker openings.
Use extreme caution before modifying your speaker pods. Once they have been
modified, they will no longer be warrantied and cannot be returned.
RPOD4
Precut guides for 4" and 4" x 6"
Precut guides for 5.25",
speakers
6" and 6.5" speakers
Use a hole saw, air saw or rotary cutting tool to cut your speaker hole. Do not cut directly
along the channel line. Instead, allow some extra material to ensure a tight fit. Test fit the
speaker, and use a file to trim and smooth the excess plastic and ensure the best fit.
Mounting Your RetroPod™ Speaker Pods
Before mounting your speaker pods, make sure the area behind the mounting points are
free of any electrical wires, fuel lines, brake lines, exhaust components or hoses.
Fold Tabs
Start by folding all 4
Use sheet metal screws and
mounting tabs to
washers (not included) to
prepare your RetroPod™
mount your RetroPod™
for mounting
to the desired location
RPOD6
RPOD9
Precut guides for 6.5" component kit, 4" x 8"
and 6" x 9" speakers
Drill holes in the mounting surface
Finished installation
for the speaker wiring. Run the
(kick-panel shown)
wires through the hole, connect
them to your speaker, and mount
the speaker to the pod using
sheet metal screws and washers.
Version 2
Advertisement
Table of Contents

Summary of Contents for RETRO RetroPod RPOD4
- Page 1 You may return your product prepaid during the warranty period. This warranty only applies Retro Manufacturing, LLC, or its subsidiaries assume no responsibility for proper or improper to products purchased and serviced in the continental United States. This warranty is installation.
- Page 2 RPOD9 Footprint RPOD6 Footprint RPOD4 Footprint...
Need help?
Do you have a question about the RetroPod RPOD4 and is the answer not in the manual?
Questions and answers