Table of Contents
Advertisement
Available languages
Available languages
Quick Links
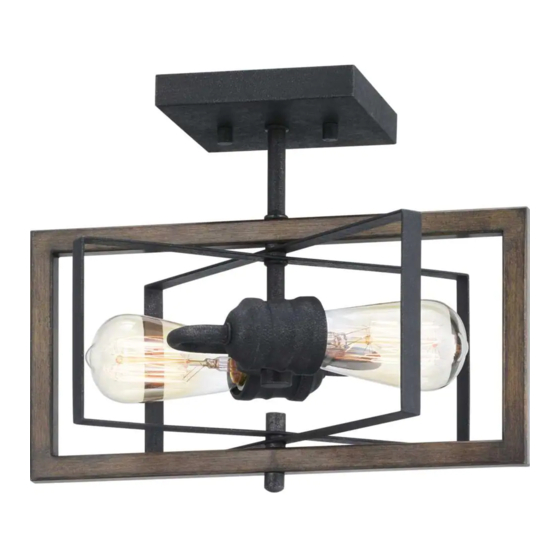
PALERMO GROVE: 2-LIGHT SEMI FLUSH
We appreciate the trust and confidence you have placed in Home Decorators Collection through the purchase of this light fixture. We strive
to continually create quality products designed to enhance your home. Visit us online to see our full line of products available for your home
USE AND CARE GUIDE
Questions, problems, missing parts? Before returning to the store,
call Home Decorators Collection Customer Service
8 a.m. - 7 p.m., EST, Monday - Friday, 9 a.m.- 6 p.m., EST, Saturday
HOMEDEPOT.COM/HOMEDECORATORS
improvement needs. Thank you for choosing Home Decorators Collection!
1-800-986-3460
THANK YOU
Model #
Item #
1033HDCGIDI
1006 325 863
1033HDCANDI
1006 326 187
1033HDCGRDI
1006 326 173
Advertisement
Chapters
Table of Contents

Subscribe to Our Youtube Channel
Related Manuals for Home Decorators Collection 1033HDCGIDI


Summary of Contents for Home Decorators Collection 1033HDCGIDI
- Page 1 THANK YOU We appreciate the trust and confidence you have placed in Home Decorators Collection through the purchase of this light fixture. We strive to continually create quality products designed to enhance your home. Visit us online to see our full line of products available for your home...
-
Page 2: Table Of Contents
Table of Contents Safety Information ........2 Pre-Installation . -
Page 3: Planning Installation
Pre-Installation PLANNING INSTALLATION Before beginning the installation, make sure all of the parts are included using the Hardware Included and Package Contents sections. If any part is missing or damaged, do not attempt to assemble, install, or operate the product. To avoid damaging this product, place it on a soft, non-abrasive surface, such as carpet or cardboard. -
Page 4: Package Contents
Pre-Installation (continued) PACKAGE CONTENTS Part Description Quantity Canopy Stem Fixture Washer Wingnut... -
Page 5: Installation
Installation Preparing the mounting plate Installing the mounting plate □ Loosely thread the screws (CC) and the hex nuts (DD) onto □ Attach this assembly to the outlet box using the mounting the round mounting plate (BB). screws supplied with the outlet box (not provided). Tighten securely. - Page 6 Installation (continued) Assembling the fixture Connecting the wires □ Pass the wires from the fixture (C) through the stem (B). □ Strip 3/8 in. of insulation from the electrical wire ends. Thread the stem (B) onto the fixture (C) and secure the Using wire nuts (AA), connect the WHITE fixture wire to the stem (B) tight to the fixture (C).
-
Page 7: Care And Maintenance
Care and Maintenance WARNING: Before you perform any cleaning or maintenance work, turn off the electricity at the main circuit breaker panel. □ Wipe the fixture clean with a damp, soft cloth. Do not use any abrasive cleaners or cleaners that contain alcohol. □... - Page 8 Questions, problems, missing parts? Before returning to the store, call Home Decorators Collection Customer Service 8 a.m. - 7 p.m., EST, Monday - Friday, 9 a.m.- 6 p.m., EST, Saturday 1-800-986-3460 HOMEDEPOT.COM/HOMEDECORATORS Retain this manual for future use.
- Page 9 MERCI Nous vous remercions d’avoir fait confiance à Home Decorators Collection en achetant ce luminaire. Nous nous efforçons en permanence de créer des produits de qualité conçus pour agrémenter votre maison. Vous pouvez visiter notre site en ligne pour consulter notre gamme...
- Page 10 Table des matières Consignes de sécurité ....... 2 Pré-installation ........3 Garantie .
-
Page 11: Préparation À L'installation
Pré-installation PRÉPARATION À L’INSTALLATION Avant de procéder à l’installation, assurez-vous qu’il ne manque aucune pièce à l’aide des sections relatives à la quincaillerie fournie et au contenu de l’emballage. Si l’une des pièces est manquante ou endommagée, n’essayez pas d’assembler, d’installer ou d’utiliser le produit. Pour éviter d’endommager ce produit, placez-le sur une surface molle et non abrasive telle qu’un tapis ou un carton. -
Page 12: Contenu De L'emballage
Pré-installation (suite) CONTENU DE L’EMBALLAGE Pièce Description Quantité Monture Tuyau Luminaire Rondelle Écrou papillon... -
Page 13: Installation
Installation Préparation de la traverse Installation de la traverse □ Vissez lâchement les vis (CC) et les écrous □ Fixez cet assemblage sur la boîte de sortie de courant à hexagonaux (DD) sur la traverse ronde (BB). l’aide des vis de montage fournies avec la boîte de sortie de courant (non fournie). - Page 14 Installation (suite) Fixation de la monture Raccordement des fils □ Faites passer les fils du luminaire (C) à travers le tuyau (B). □ Dénudez 9,52 mm de gaine isolante des extrémités des Vissez le tuyau (B) sur le luminaire (C) et fixez le tuyau (B) fils électriques.
-
Page 15: Soin Et Entretien
Soin et entretien AVERTISSEMENT : Coupez l’alimentation électrique au niveau du panneau à disjoncteurs principal avant d’effectuer tout entretien ou nettoyage. □ Essuyez le luminaire avec un linge doux et humide pour le nettoyer. N’utilisez pas de nettoyants abrasifs ou contenant de l’alcool. □... - Page 16 Questions, problèmes, pièces manquantes? Avant de retourner au magasin, appelez le service à la clientèle de Home Decorators Collection du lundi au vendredi de 8 h à 19 h HNE et le samedi de 9 h à 18 h HNE. 1 800 986-3460 HOMEDEPOT.COM/HOMEDECORATORS Conservez ce guide pour un usage ultérieur.
- Page 17 GRACIAS Apreciamos la confianza que has depositado en Home Decorators Collection al comprar esta lámpara. Nos esforzamos en crear continuamente productos de calidad diseñados para mejorar tu hogar. Visítanos por Internet para ver nuestra línea completa de productos disponibles a fin de...
- Page 18 Tabla de contenido Información de seguridad ......2 Preinstalación ........3 Garantía.
- Page 19 Preinstalación PLANIFICACIÓN DE LA INSTALACIÓN Antes de comenzar la instalación, asegúrate de tener todas las piezas cotejándolas con las secciones de Herrajes Incluidos y Contenido del Paquete. Si alguna pieza está dañada o falta, no intentes ensamblar, instalar u operar el producto. Para evitar dañar el producto, colócalo sobre una superficie suave, no abrasiva, como una alfombra o cartón.
- Page 20 Preinstalación (continuación) CONTENIDO DEL PAQUETE Pieza Descripción Cantidad Cubierta Vástago Lámpara Arandela Tuerca de mariposa...
- Page 21 Instalación Cómo preparar la placa de montaje Cómo instalar la placa de montaje □ Enrosca sin apretar los tornillos (CC) y las tuercas □ Fija este conjunto a la caja eléctrica usando los tornillos de hexagonales (DD) en la placa de montaje redonda (BB). montaje suministrados con la caja eléctrica (no incluida).
- Page 22 Instalación (continuación) Colocación del conjunto de la cubierta Cómo conectar los cables □ Pase los cables de la lámpara (C) a través del vástago (B). □ Quita 3/8 plg (9.5 mm) de aislante de los extremos de Enrosque el vástago (B) en la lámpara (C) y asegure el los cables eléctricos.
- Page 23 Cuidado y mantenimiento ADVERTENCIA: Antes de realizar cualquier trabajo de limpieza o mantenimiento, apaga la electricidad en el panel del cortacircuitos principal. □ Limpia la lámpara con un paño suave húmedo. No uses limpiadores abrasivos o que contengan alcohol. □ Al reemplazar, utiliza bombillas incandescentes MÁX de 60 vatios de base media o bombillas SBLED o SBCFL equivalentes a 60 vatios. Solución de problemas Problema Causas posibles...
- Page 24 ¿Preguntas, problemas, piezas faltantes? Antes de devolver a la tienda, llama al Servicio al Cliente de Home Decorators Collection, de lunes a viernes, entre 8 a.m. y 7 p.m., hora estándar del Este, y los sábados de 9 a.m. a 6 p.m., hora estándar del Este.
Need help?
Do you have a question about the 1033HDCGIDI and is the answer not in the manual?
Questions and answers