Table of Contents
Advertisement
Quick Links
Advertisement
Table of Contents

Summary of Contents for SPS ZOOM 300
- Page 1 User Manual Revision 03 January 2015...
-
Page 2: Table Of Contents
ISPOSAL CONSIDERATIONS 1.11.10 H ANDLING AND TORAGE 1.12 A BOUT 1.13 E XCEPTIONS FROM ESPONSIBILITY CHAPTER 2: SETTING UP THE ZOOM 300 2.1 S ETTING UP 2.2 I NSERT REMOVE THE BATTERY 2.2.1 P ZOOM 300 B LUG THE ATTERY 2.2.2 R... - Page 3 CHAPTER 3: OPERATING THE ZOOM 300 3.1 P OWER ON THE SCANNER 3.2 P OWER OFF THE SCANNER 3.2.1 S TANDARD POWER OFF 3.2.1.1 Up to firmware version 0.4.100 3.2.1.2 Firmware version later than 0.4.100 3.2.2 F ORCED POWER OFF 3.3 L...
-
Page 4: Chapter 1: Introduction
Chapter 1: Introduction 1.1 General MIDAREX is the manufacturer of the 3D Laser Scanning System ZOOM 300. Laser scanning is an automatic process during which real objects are surveyed and sampled almost completely to determine their location, size, orientation and form. The ZOOM 300 rapidly determines high‐resolution measurement results within very short... -
Page 5: Description Of The System
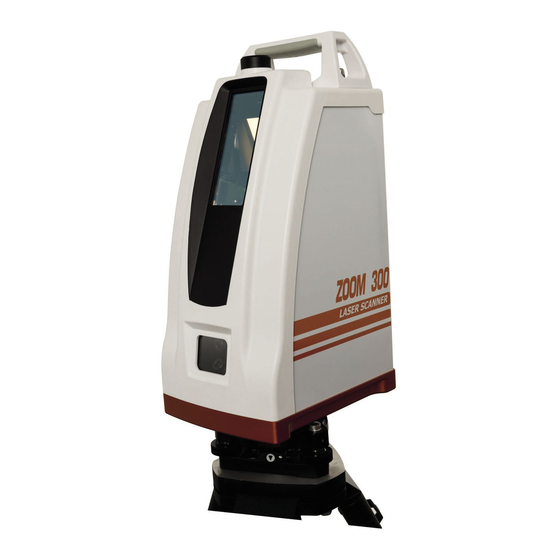
ZOOM 300 User manual Revision 03 January 2015 1.3 Description of the system Transport handle GPS mount Laser window Camera window (camera UP and camera DOWN) Figure 1: ZOOM 300 Front-Right side Figure 2: ZOOM 300 Rear side Power button... -
Page 6: Operational Specifications
ZOOM 300 User manual Revision 03 January 2015 1.4 Operational specifications ZOOM 300 supports four scan modes at different resolution (grid of points). Scan time varies according to the scan mode. Resolution H. res. (360°) V. res. (90°) Total points H. -
Page 7: Transport And Shipping
ZOOM 300 User manual Revision 03 January 2015 ◆ Taking out the battery It is not suggested to take out the battery when the instrument is on. Otherwise, stored data may be lost. So it is better to replace the battery after powering off the instrument. -
Page 8: Storage
ZOOM 300 User manual Revision 03 January 2015 ◆ Field adjustment After transport, inspect the field adjustment parameters given in this user manual before using the product. 1.7 Storage ◆ Product Respect the temperature limits when storing the equipment, particularly in summer if the equipment is inside a vehicle. - Page 9 ZOOM 300 User manual Revision 03 January 2015 ! WARNING Do not perform disassembly or rebuilding. Fire, electric shock or burn could result. Only MIDAREX authorized distributors can disassemble or rebuilt. Do not collimate the sun directly. ...
-
Page 10: Safety Standards For Laser
ZOOM 300 User manual Revision 03 January 2015 1.10 Safety Standards for Laser ZOOM 300 series adopt the class of Laser Product according to IEC Standard Publication 60825‐1 Amd. 2:2001. According this standard, EDM device is classified as Class 1M Laser Product. -
Page 11: Hazard Identification
ZOOM 300 User manual Revision 03 January 2015 1.11.2 Hazard identification Main Hazard: flammable under high temperature Effect of over exposure: irritation of skin, eyes and respiratory tract. Symptoms of (over) exposure: coughing, headache, dizziness, unconsciousness. Skin: as result of adsorbption throught the intact skin, the substance may cause dry skin redness. -
Page 12: Ecological Information
ZOOM 300 User manual Revision 03 January 2015 1.11.8 Ecological information When properly used or disposed, MIDAREX Lithium‐Ion rechargeable batteries can be recycled and do not present environmental hazard during their life time. 1.11.9 Disposal considerations Dispose in accordance with applicable regulations, which vary from country to country. -
Page 13: Chapter 2: Setting Up The Zoom 300
ZOOM 300 User manual Revision 03 January 2015 Chapter 2: Setting up the ZOOM 300 2.1 Setting up Extend the tripod legs to the same length to allow for a comfortable working posture. Tighten the screws at the bottom of the legs. -
Page 14: Insert/Remove The Battery
Figure 3 represents the ZOOM 300 battery pack: for proper mounting, the connectors must be facing up and the handle must be on the outer side. Figure 4 represents the ZOOM 300 battery housing, placed in the rear side of the scanner. Figure 3: ZOOM 300 battery pack Figure 4: ZOOM 300 battery housing 2.2.1 Plug the ZOOM 300 Battery... -
Page 15: Remove The Zoom 300 Battery
Figure 7: Unplug the battery pack Figure 8: Unplug the battery pack 2.3 Charging the battery The ZOOM 300 battery can be charged directly using the appropriate battery charger, included in the bundle (Figure 10). Power specifications: Figure 9: Battery power plug... -
Page 16: Features
ZOOM 300 User manual Revision 03 January 2015 2.3.1 Features Model: Li‐ion battery charger Input: AC 100 ~ 240 V 50/60 Hz Output: 12.6 V / 2 A 2.3.2 Battery Charging Connect the AC cable to the power pack as described in Figure 11. -
Page 17: Chapter 3: Operating The Zoom 300
The following workflow describes the operations performed during the power on process. To power on the ZOOM 300 simply press the power button on the top of the instrument. There’s no need to press and hold the button: just push and release it. -
Page 18: Power Off The Scanner
ZOOM 300 User manual Revision 03 January 2015 3.2 Power off the scanner There are two ways to power off the ZOOM 300. 3.2.1 Standard power off 3.2.1.1 Up to firmware version 0.4.100 Push and hold the power button After a while a beep will be emitted, continue to press the button A second beep will be emitted, continue to press the button After a while, a series of beeps will be emitted. -
Page 19: Led Indicators
ZOOM 300 User manual Revision 03 January 2015 3.3 Led indicators There are 14 LED indicators placed on the top of the instrument. Three LEDs on the left are dedicated to the ZOOM300 status. They are in different colors. Starting from the left: Red, Yellow, Green ... -
Page 20: Status Leds
ZOOM 300 User manual Revision 03 January 2015 3.3.1 Status LEDs LEDs status Description ZOOM300 is powered off The system is initializing. This state appears few seconds after power on The system is ready and waiting for user input System error. Use the controller to check the failure on Status section. -
Page 21: Battery Level Alert
ZOOM 300 User manual Revision 03 January 2015 3.3.3 Battery level alert The battery level is continuously monitored. The critical threshold is below 20% and the alarm is visible on the RED Status LED: At 20% : LED is on, with 1 second off every 8 seconds ... -
Page 22: Gps Offsets
ZOOM 300 User manual Revision 03 January 2015 3.3.5 GPS offsets The following diagram shows the position of the origin point of the measures and the relative offsets to the GPS mount. Figure 15: GPS offsets... -
Page 23: Zoom300 Framework Offsets (Optional Accessory)
ZOOM 300 User manual Revision 03 January 2015 3.3.6 ZOOM300 Framework offsets (optional accessory) Figure 16: ZOOM 300 Framework offsets... -
Page 24: Use Of The Onboard Software
ZOOM 300 User manual Revision 03 January 2015 3.4 Use of the onboard software To operate the ZOOM 300 Laser Scanner, all you need is a control device equipped with a Wi‐Fi hardware and a web browser, whether it is a pc, a tablet or a smartphone. - Page 25 ZOOM 300 User manual Revision 03 January 2015 Search for the ZOOM300 wireless network using the OS connection manager: the ZOOM300 is identified by its serial number (e.g: Z300PSXXXXXX) Connect to the ZOOM300 network. It is an open connection, no passkey is required.
- Page 26 ZOOM 300 User manual Revision 03 January 2015 Open the web browser: the ZOOM300 main page will appear. If not, refresh the page or enter the following IP address: 192.168.1.11 The access to the main page is protected by User ID and Password.
-
Page 27: Web Interface
ZOOM 300 User manual Revision 03 January 2015 3.5 Web interface 3.5.1 Home page The Homepage is the main menu of the ZOOM300 web interface. From here users can access to all the ZOOM300 functions and settings. Homepage Functions Simple scan... -
Page 28: Simple Scan
ZOOM 300 User manual Revision 03 January 2015 3.5.2 Simple scan The Simple scan menu provides access to the scan control panel. Here it is possible to define scanning parameters and options. Simple Scan Functions 1. Scan name Enter the name of the new scan that you want to start. - Page 29 ZOOM 300 User manual Revision 03 January 2015 Renaming the new scan, if the scan file already exist in the Files management archive or the file name is invalid, the scan name will be colored in red and a message with a suggested name will appear in a yellow box.
- Page 30 ZOOM 300 User manual Revision 03 January 2015 The scan process go through four or five sequential steps. 1. Initializing The scanner warms up and registers the scan center position. 2. Positioning The scanner turns until reaching the start position.
-
Page 31: Files Management
ZOOM 300 User manual Revision 03 January 2015 3.5.3 Files management Files management Functions From this menu it is possible to browse the files stored in the internal memory, manage them and find out scan information. Giving a quick look at the page, you can... - Page 32 ZOOM 300 User manual Revision 03 January 2015 2. Searching filter bar In the Searching filter bar, write the name or part of it to find out all the files corresponding to the filter. 3. Scan profile When you click on a specific scan file box, you will be led to its dedicated information page.
- Page 33 ZOOM 300 User manual Revision 03 January 2015 c. Download Download of the selected file through Wi‐Fi or Ethernet cable (optional). On the right there is the estimated file size. d. Manage - Delete Erase the selected file from ZOOM300 internal memory.
-
Page 34: Camera
ZOOM 300 User manual Revision 03 January 2015 3.5.4 Camera Camera Functions From this menu it is possible to check the light exposure of the digital cameras and take a shot to check it on camera up and down separately. -
Page 35: Preferences
ZOOM 300 User manual Revision 03 January 2015 3.5.5 Preferences Preferences Functions From this menu it is possible to manage the system and tools preferences. System Language: change the software language (see par. 3.5.5.1) Security: modify the protection settings of the Wi‐Fi/Lan cable connection (see par. -
Page 36: Language
ZOOM 300 User manual Revision 03 January 2015 3.5.5.1 Language Language Functions From this menu it is possible to change the default language of the ZOOM300 onboard software. Tap on a language to apply the change. NOTE Midarex will periodically release additional language packs, independently or upon request, at the discretion of Midarex. -
Page 37: Compensator
ZOOM 300 User manual Revision 03 January 2015 3.5.5.3 Compensator Calibration/Compensator Functions In this menu it is possible to check if the ZOOM300 Laser Scanner is leveled and if the internal compensator of the ZOOM300 is correctly set. It’s important to verify if the instrument is... -
Page 38: Upgrade Firmware
ZOOM 300 User manual Revision 03 January 2015 3.5.5.4 Upgrade firmware Midarex releases periodically new firmware versions for the ZOOM300 Laser Scanner. The need to update the firmware may have several reasons: release of new functions, bug fixing and improvements of existing software features. - Page 39 ZOOM 300 User manual Revision 03 January 2015 Step 2 Wait until the end of the upload procedure: the sytem will upload the firmware, check the upload procedure and inform about its correctness. It takes less than a minute to complete the process.
- Page 40 ZOOM 300 User manual Revision 03 January 2015 Step 4 Tap Upload button to apply the selected firmware. Tap Delete button to erase the file from the internal memory. Step 5 Wait until the end of the upgrade procedure. It takes less than a minute to complete the process.
-
Page 41: Information
ZOOM 300 User manual Revision 03 January 2015 3.5.6 Information Information Functions From this menu it is possible to learn about the ZOOM300 information. Device Device serial number. Firmware Versione and build of the firmware. Advanced Advanced ZOOM300 technical information: ... -
Page 42: Zoom300 Status
ZOOM 300 User manual Revision 03 January 2015 3.5.6.1 ZOOM300 Status ZOOM300 Status Functions This page checks and displays whether the hardware components inside the scanner are correctly powered and running. The components that are working properly are marked with the initials “OK”. -
Page 43: Internal Memory
ZOOM 300 User manual Revision 03 January 2015 3.5.6.3 Internal memory Internal memory Functions This menu allows to check the available free memory and the statistics of the data for each scan mode with or without pictures capture. 3.5.6.4 Features... -
Page 44: Download X3K
ZOOM 300 User manual Revision 03 January 2015 3.5.6.5 Download X3K Download X3K Functions The X3K file is a technical file (unique for each ZOOM300 unit) used as log‐system file, useful to check the configuration of the scanner in case of malfunction.
Need help?
Do you have a question about the ZOOM 300 and is the answer not in the manual?
Questions and answers