Table of Contents

Related Manuals for Eurofred SW M Series


Summary of Contents for Eurofred SW M Series
- Page 1 SW ... M UK Instructions for use NL Gebruiksaanwijzing DE Bedienungsanleitung ES Instrucciones para el uso FR Mode d’emploi CZ Návod k použití DK Brugsanvisning PL Instrukcja obsługi NO Bruksanvisning RUS Инструкция по эксплуатации...
-
Page 2: Table Of Contents
Thank you for purchasing your new fridge/ to the local distributor before the appliance freezer from Eurofred. Please note that is put to use. these instructions apply to all fridge/freezers in the SW range. Illustrations and fittings Remove the packaging. Clean the inside of... -
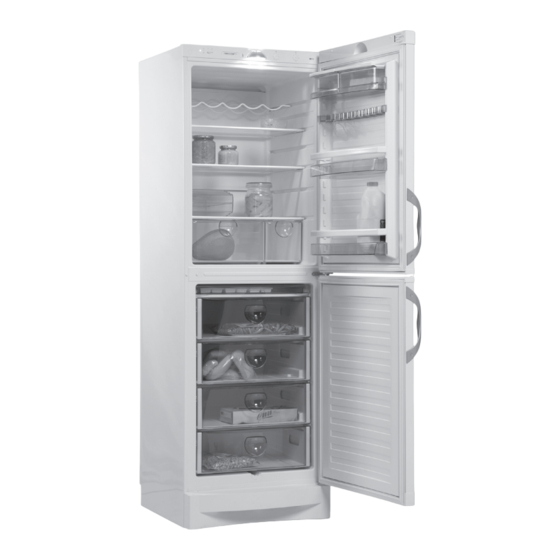
Page 3: Get To Know Your Fridge/Freezer
Get to know your fridge/freezer Control panel Lighting Shelf with storage boxes Bottle rack Glass shelf Door shelf Large storage box Nameplate Crisper bins Freezing tray Sealing strip Freezer drawers Door handle Defrost water drain Kick plate Adjustable feet fig. 1... -
Page 4: Installation And Start-Up
Installation and start-up Placement For safety and operational reasons, the appliance must not be installed outdoors. The appliance should be placed on a level surface in a dry, well ventilated room (max. 75% relative air humidity). Never place the appliance close to sources of heat such as cookers or radiators, and avoid placing it in direct sunlight. - Page 5 The appliance viewed from Special considerations for above climate class ST If the appliance is placed beside a wall, The distance pieces on the rear of the there must be sufficient room for the freezer appliance ensure sufficient air circulation. door to be opened wide enough to allow the Fit the two caps supplied with the appliance drawers to be pulled out (fig.
- Page 6 Setting up It is important that the appliance be absolutely level. To level the appliance, remove the kick plate below the door and screw the adjustable feet up or down (figs 8-9). If necessary, it is possible to adjust the back feet before the upright is installed. Use a spirit level to check that the appliance is absolutely level.
-
Page 7: Reversing The Door(S)
Reversing the door(s) The door(s) can be changed from right-hinged to left-hinged and vice versa as follows: 1. Remove upper hinge. The hinge will be 2. Remove middle hinge. Lift off lower 3. Remove kick plate. Remove lower reused later as the upper hinge on the door. - Page 8 Electrical connection The appliance is intended for connection to alternating current. The required volt- age (V) and frequency (Hz) are stated on the nameplate inside the appliance. Power must be connected via an independent wall socket outlet. Technical data This appliance complies with CE marking regulations, directives and standards.
-
Page 9: Operation And Function
Operation and function Thermometer Super Freeze Control lamp Lighting Thermostat button, refrigerator fig. 10 Thermostat button, freezer Refrigerator section The thermostat button can be set from 1 (min.) to 7 (max.). A suitable setting must be found by trial and error. Start by setting the button to 4. - Page 10 Glass shelves Glass shelf with slide damper The shelves are made of tempered glass The slide damper above the crisper bins and can be repositioned within the cabinet. allows the temperature and humidity in the To move the shelves, the door must be bins to be regulated. opened 90°.
-
Page 11: Freezer Section
Freezer section Freezer section vegetables in portions larger than 2.5 kg. Do not freeze meat in portions larger than The freezer section is a four-star freezer, 2.5 kg. Keep packages dry to prevent them approved for freezing and storing foodstuffs. from freezing together. To ensure rapid With the exception of frost-free models, the freezing, make sure, as far as possible, freezer is equipped with a practical tray for... - Page 12 Defrosting Automatic defrosting of 4. Remove the items of food. Place them in the refrigerator or wrap them in refrigerator section newspaper to keep them as cold as The refrigerator is defrosted automatically. possible. Defrost water runs through a pipe and is 5. Place a bowl of hot (but not boiling) water collected in a tray above the compressor in the freezer.
-
Page 13: Cleaning And Maintenance
Cleaning and maintenance Cleaning If the appliance is not to be used for any length of time, switch it off, empty it, clean Disconnect the power supply at the mains the cabinet and fittings, and leave the socket before cleaning the inside of the door(s) slightly open to allow air circulation cabinet. -
Page 14: Fault Finding
Fault finding Fault Possible cause Remedy The control lamp is Power failure; the fuse is blown; Check that power is connected. not lit. the appliance is not plugged in Reset the fuse. correctly. Water collects on Items of food at the back of the Move the rearmost items for- the glass shelves. -
Page 15: Warranty, Spare Parts And Service
Service Eurofred has local service centres all over Transport damage discovered by the buyer the country who specialise in Eurofred is primarily a matter to be settled between products. Here you can obtain fixed prices the buyer and the distributor, i.e.
Need help?
Do you have a question about the SW M Series and is the answer not in the manual?
Questions and answers